Creating a Falling Star quilt pattern is a delightful journey into the world of quilting, combining classic techniques with modern aesthetics.
This tutorial will guide you through each step, ensuring you have all the information needed to create a stunning Falling Star quilt.
From selecting the right fabrics to cutting precise measurements, this guide covers everything you need to know. Let’s dive into the details and explore the beauty of this timeless quilt pattern.

Introduction to the Falling Star Quilt Pattern
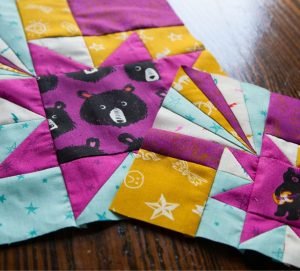
The Falling Star quilt pattern is a beautiful and versatile design that captures the essence of traditional quilting with a contemporary twist. This pattern is perfect for quilters of all skill levels, from beginners to advanced enthusiasts. Its striking design makes it a standout piece in any quilt collection.
Choosing the right fabrics for your Falling Star quilt is crucial. The pattern works best with a combination of light, medium, and dark fabrics to create contrast and depth. Consider using a mix of solids and prints to add texture and interest to your quilt.
Before you start cutting your fabrics, it’s essential to gather all your materials. You’ll need fabric for the star blocks, background, and borders, as well as batting and backing. Having everything ready will make the process smoother and more enjoyable.
Fabric Selection and Preparation
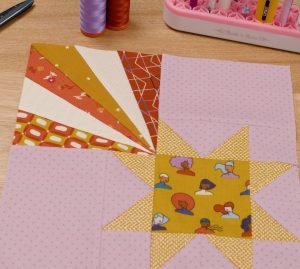
Selecting the fabrics for your Falling Star quilt is one of the most enjoyable parts of the process. For the star blocks, choose fabrics that contrast well with the background. This contrast will help the star design stand out and give your quilt a dynamic appearance.
Once you’ve chosen your fabrics, it’s time to prepare them for cutting. Pre-washing your fabrics is a good idea to prevent shrinkage later. After washing, press the fabrics to remove any wrinkles, making them easier to cut accurately.
To cut your fabrics, you’ll need a rotary cutter, cutting mat, and ruler. Accuracy is key in quilting, so take your time and measure twice before cutting. For the Falling Star quilt pattern, you’ll need to cut squares, half-square triangles, and rectangles, which we’ll detail in the next section.
Cutting the Fabric: Measurements and Techniques
For the Falling Star quilt pattern, precise cutting is essential. Start by cutting your fabric into the required shapes and sizes. You’ll need to cut the following pieces:
- Star Blocks: Cut twelve 5-inch squares from your chosen star fabric.
- Background Fabric: Cut twelve 5-inch squares and twelve 5-inch squares from contrasting background fabric.
- Half-Square Triangles (HSTs): Cut twenty-four 5-inch squares, then cut each square diagonally to create forty-eight HSTs.
Cutting these pieces accurately will ensure that your quilt blocks fit together perfectly. Use a sharp rotary cutter and a clear ruler to make clean, straight cuts. Marking your fabrics with a disappearing ink pen can also help guide your cutting.
Once all your pieces are cut, lay them out on your work surface to check that everything is in order. This step will help you visualize the finished quilt and make any necessary adjustments before you start sewing.
Assembling the Star Blocks
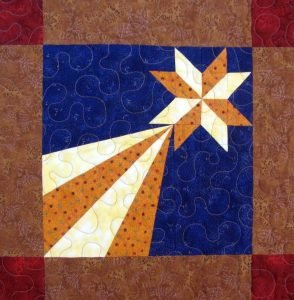
Now that you have all your fabric pieces cut, it’s time to start assembling the star blocks. The Falling Star quilt pattern features star blocks that are both visually striking and fun to create. Begin by pairing the star fabric squares with the background squares.
To create the star points, take two HSTs and sew them together along the diagonal edge. Press the seams open to reduce bulk and ensure a flat finish. Repeat this process for all the HST pairs, making sure to maintain consistent seam allowances.
Next, arrange the star points around a center square, aligning the edges carefully. Sew the pieces together, row by row, pressing the seams between each step. Once all the rows are complete, join them together to form the star block. Repeat this process for all the star blocks in your quilt.
Assembling the Quilt Top
With the star blocks completed, the next step is to assemble the quilt top. Lay out all your star blocks on a large surface, arranging them in a pleasing pattern. Take your time to ensure that the colors and patterns are balanced across the quilt.
Once you’re satisfied with the layout, begin sewing the blocks together in rows. Start with the first row, aligning the edges of each block carefully. Sew the blocks together with a quarter-inch seam allowance, pressing the seams open or to one side, depending on your preference.
After completing all the rows, it’s time to sew them together to create the quilt top. Match the seams between each row to ensure a neat and professional finish. Press the entire quilt top once it’s assembled, smoothing out any wrinkles or puckers.
EXPLORE THE BEST QUILT PATTERNS FOR INSPIRATION!
Adding Borders and Finishing Touches
Adding borders to your Falling Star quilt is the final step before quilting. Borders frame the quilt and add extra dimension to the design. For this pattern, consider using a solid fabric that complements the star blocks or a coordinating print for added interest.
Measure the length of your quilt top and cut border strips accordingly. Sew the side borders first, followed by the top and bottom borders. Use a quarter-inch seam allowance and press the seams towards the border fabric.
With the borders attached, your quilt top is complete. Now it’s time to prepare for quilting. Layer your quilt top with batting and backing, securing the layers with safety pins or basting spray. You’re now ready to quilt your Falling Star quilt, bringing it to life with your choice of quilting patterns.
Quilting and Binding
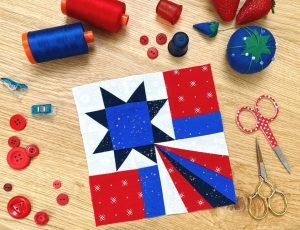
Quilting is where your Falling Star quilt truly comes to life. Choose a quilting design that complements the star pattern, such as echo quilting around the stars or an all-over free-motion design. Whether you quilt by hand or machine, take your time to ensure even stitching and a smooth finish.
Once the quilting is complete, it’s time to bind your quilt. Cut binding strips from your chosen fabric, typically 2.5 inches wide. Join the strips together to create a continuous length, then sew the binding to the quilt’s edges with a quarter-inch seam allowance.
Fold the binding over to the back of the quilt and hand-stitch it in place for a clean, polished finish. As you sew, make sure the binding covers the stitching line from the front and catches the edge of the quilt. Your Falling Star quilt is now complete, ready to be displayed and admired.
Conclusion and Final Thoughts
Creating a Falling Star quilt pattern is a rewarding experience, offering a blend of traditional quilting techniques and modern design elements. Whether you’re a seasoned quilter or a beginner, this pattern provides an opportunity to hone your skills and produce a beautiful, timeless piece.
The Falling Star quilt is versatile, making it suitable for various occasions, from gifts to home decor. Its striking star design will undoubtedly make it a favorite in your quilt collection. Remember to take your time with each step, ensuring accuracy in cutting, sewing, and quilting.
As you complete your Falling Star quilt, you’ll not only have a stunning quilt to show for your efforts but also a deeper appreciation for the art of quilting. Enjoy the process, and happy quilting!

