Thanksgiving is a time for family, warmth, and sharing. For quilters, it’s also a fantastic time to create something that reflects the holiday spirit.
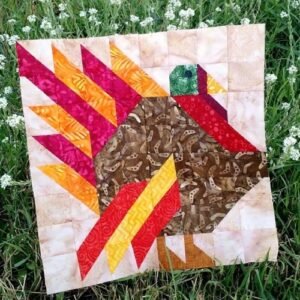
A Thanksgiving Turkey Quilt Block is the perfect project to add a festive touch to your home or as a gift for someone special. In this tutorial, we’ll walk you through the step-by-step process of creating this quilt block, detailing the fabric cuts and measurements needed for a flawless finish.
Using terms like “quilt” and “quilt patterns,” this guide will also provide useful tips to ensure your work shines. So, grab your sewing machine and fabric stash, and let’s get started!
Choosing Fabrics and Preparing Materials
Before you begin sewing your Thanksgiving Turkey Quilt Block, it’s essential to gather all the necessary materials. Since the quilt block is meant to represent the holiday turkey, consider fabrics that mimic its natural colors—think earthy browns, warm oranges, and soft yellows. Don’t forget the fabric for the background, which can be a neutral tone like cream or light tan to make your turkey design pop.
Once you’ve selected your fabrics, ensure you have all the quilting essentials: rotary cutter, quilting ruler, cutting mat, and thread that matches or contrasts nicely with your fabric choices. Precision is key in quilting, so make sure your tools are in good condition. If your blades are dull, it could affect the accuracy of your cuts, which is crucial for fitting your quilt block pattern pieces together perfectly.
Now it’s time to prepare your fabric by ironing it and cutting it into the required pieces. The Thanksgiving Turkey Quilt Block will require several different shapes and sizes of fabric, which we’ll detail in the following sections. Accurate fabric cutting ensures your quilt block comes together seamlessly, so take your time with this step.
Fabric Cutting: The Foundation of Your Quilt Block
Every successful quilt block starts with precise fabric cutting. For this Thanksgiving Turkey Quilt Block, you’ll need the following cuts:
- Turkey Body: Cut two rectangles, each measuring 4″ x 6″, from a dark brown fabric.
- Turkey Feathers: Cut four triangles (3″ on each side) from a combination of orange, yellow, and red fabrics.
- Turkey Head: Cut one 3″ x 3″ square from a lighter brown or beige fabric.
- Background: Cut four 4″ x 4″ squares from your chosen background fabric, along with two additional 6″ x 6″ squares for the block’s outer frame.
- Turkey Beak and Wattle: Cut one small triangle (1″ x 1″) from an orange fabric for the beak, and one small oval (1.5″ long) from red fabric for the wattle.
The use of multiple colors helps to create depth and dimension, making the turkey block stand out. The turkey’s body and feathers form the centerpiece of your design, while the background creates a clean space around it, allowing the turkey motif to be the focus of the quilt block pattern.
Once all your fabric pieces are cut, label them or arrange them in the order you’ll be sewing to avoid confusion during assembly. Keep your workspace organized to maintain the accuracy of the quilt block, which will save time and prevent mistakes during the sewing process.
Assembling the Turkey Body and Head
Now that your fabrics are cut, it’s time to assemble the turkey’s body and head. Take the two 4″ x 6″ rectangles for the turkey body and sew them together along the long side, using a ¼” seam allowance. Press the seams open to reduce bulk. This will create the base of the turkey’s body.
Next, take the 3″ x 3″ square you cut for the turkey head. Align it at the top center of the turkey’s body and sew it in place using a ¼” seam allowance. Once sewn, press the seam towards the body section. The head should sit nicely atop the body, forming the foundational structure of your Thanksgiving Turkey Quilt Block.
To complete this section, attach the beak and wattle. Sew the small orange triangle (beak) to the bottom center of the turkey’s head, ensuring it sits neatly along the seam. After that, sew the red oval (wattle) slightly off-center, just to the side of the beak. This will give your turkey some realistic detailing. Remember to press all your seams as you go along to ensure a smooth finish.
Creating and Attaching the Turkey Feathers
The turkey’s feathers add character and color to your quilt block, and this step is where you can be creative with your fabric choices. For each feather, take the triangles of fabric you cut earlier in the colors of your choice (orange, yellow, and red) and sew them together to form a fan-like shape behind the turkey body.
Begin by pairing two triangles together, sewing along one side with a ¼” seam allowance. Press the seam open and then repeat this process with the other two triangles. Once you have two pairs of triangles, sew them together along the long edge to form a four-feather unit. Press all seams flat to keep the block from becoming too bulky.
Now, it’s time to attach the feathers to the back of the turkey body. Place the feather unit behind the turkey body, aligning the edges so that the feathers fan out from behind the turkey. Pin in place and sew along the edge, using a ¼” seam allowance. Press the seams open for a polished look. Your turkey block is starting to take shape!
Completing the Background and Outer Frame
The final step in this Thanksgiving Turkey Quilt Block pattern is adding the background and outer frame. The background fabric helps to highlight the turkey design, so you want to ensure it complements the turkey without overshadowing it. Take the four 4″ x 4″ background squares and sew them to the sides of your turkey block.
Start by attaching one square to each side of the turkey block. Sew with a ¼” seam allowance and press the seams open. Next, sew the remaining two background squares to the top and bottom of the turkey block. These will complete the outer edges of the block, creating a frame around the turkey design.
Finally, take the two 6″ x 6″ squares and sew them to the outer edges of your quilt block. These larger squares will act as the outer border, framing the Thanksgiving Turkey Quilt Block and giving it a finished look. Once sewn, press all the seams flat and trim any excess fabric if necessary.
🌟 Join our exclusive Quilt broadcast list on Messenger! Receive the best patterns, tips, and updates directly in your inbox. Our team is ready to send you delightful content that will inspire your projects. Don’t miss this opportunity to stay updated and create amazing pieces. Join now and be part of this passionate quilt community! ✨📩
Finishing Touches and Quilting Techniques
Now that your Thanksgiving Turkey Quilt Block is complete, it’s time to think about how to incorporate it into a larger quilt project or use it as a standalone decoration. If you plan to include this block in a full Thanksgiving-themed quilt, consider repeating the block pattern with different turkey colors or alternating with autumn leaf blocks to create a cohesive design.
For quilting, you can choose to hand quilt or use a sewing machine. Either way, outline the turkey and feather shapes to add definition to the block. You might also consider adding some decorative quilting stitches to the background to enhance the overall design and make your quilt block stand out.
Finally, bind your quilt or block with a coordinating fabric to give it a polished, professional finish. Whether you use this block in a quilt or as a festive table runner, it’s sure to bring warmth and charm to your Thanksgiving celebrations.
This Thanksgiving Turkey Quilt Block is a fun and creative project that’s perfect for adding a seasonal touch to your home. With detailed quilt patterns, precise fabric cuts, and a little creativity, you can create a beautiful, festive quilt block that will be cherished for years to come. So why not get started today and bring some Thanksgiving cheer to your quilting table?


