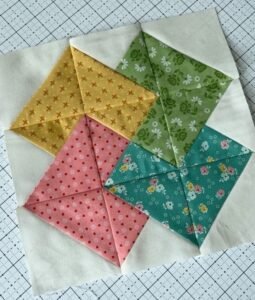
The Card Trick Quilt Block is a classic quilt pattern known for its intricate, overlapping geometric design, resembling a deck of cards fanned out in a magic trick.
Despite its complex appearance, this block is quite manageable to create with careful attention to detail. In this tutorial, we’ll guide you step-by-step through creating a Card Trick Quilt Block, from selecting fabrics to assembling the final block.
With clear instructions, you’ll be able to craft a quilt block that looks stunning in any quilt project. Let’s dive into the world of this mesmerizing quilt pattern!
Fabric Selection for the Card Trick Quilt Block
Choosing the right fabrics is essential to making the Card Trick Quilt Block come to life. This pattern works best when you select four distinct fabrics that contrast well but also complement each other. The illusion of overlapping cards is achieved by varying shades and tones, so pay close attention to your color choices.
- Main Fabrics: You will need four different fabrics for the “cards.” Each fabric should contrast with the others but still coordinate well. Consider using different shades from the same color family or using complementary colors for added visual interest.
- Background Fabric: Choose a neutral fabric, such as white, cream, or light gray, that will allow the main fabrics to stand out. A light background will help to create the illusion of depth and layering.
- Accent Fabric: Optionally, you can include an accent fabric to frame or highlight specific parts of the block. This can be done through sashing or cornerstones.
Carefully selecting fabrics with enough contrast ensures the “trick” effect is visible. Avoid fabrics with large, busy prints, as they may obscure the intricate lines of the block. Solid colors, or subtle tonal fabrics, often work best for this quilt pattern.
Cutting the Fabrics: Precise Measurements for Clean Lines
For a 12.5-inch unfinished Card Trick Quilt Block, you’ll need to carefully cut your fabric pieces. Accurate cuts are vital to ensure that all parts of the block align correctly when pieced together. Follow these cutting instructions to get started:
- Main Color Fabrics (for the cards):
- Cut four 3.5-inch squares from each of the four main color fabrics.
- Cut one 4.5-inch square from each main color fabric, then cut these squares diagonally twice to form four triangles from each square.
- Background Fabric (for the backdrop):
- Cut one 4.5-inch square, and then cut this square diagonally twice to form four triangles.
- Cut four 3.5-inch squares for the block’s corner pieces.
Accurate cutting is key to assembling a clean Card Trick Quilt Block. Be sure to use a sharp rotary cutter, and double-check your measurements before making any cuts. Laying out the pieces beforehand can help you ensure all the triangles and squares are cut perfectly to size.
Assembling the Card Trick Quilt Block: Layer by Layer
The key to the Card Trick Quilt Block lies in its clever use of triangles and squares to create the overlapping card illusion. With your fabric pieces ready, follow these steps to assemble the block:
- Creating the Card Units:
Begin by taking the triangles you cut from the 4.5-inch squares. Pair each triangle from the main fabrics with a corresponding background triangle. Sew these triangles together to form four squares (half-square triangles). Press the seams toward the darker fabric. - Laying Out the Block:
Arrange the half-square triangles, solid squares, and corner squares according to the Card Trick Quilt layout. The four triangles from each main color should come together to form the “cards” in the block’s center, while the background triangles and squares frame the design. - Piecing the Rows Together:
Assemble the block by sewing the pieces together in rows. Begin with the top row, ensuring that the points of the triangles align neatly. Once each row is complete, sew the rows together to form the full block. Press the seams carefully, pressing them toward the darker fabrics to avoid bulk.
Following these steps carefully will result in a well-constructed Card Trick Quilt Block that looks far more complex than it is. The precision of your sewing will help emphasize the sharp lines of the overlapping “cards.”
Pressing and Squaring the Block: Final Touches for a Professional Finish
Once your Card Trick Quilt Block is fully assembled, it’s time to press the block and square it up. This is an important step to ensure the block lays flat and fits perfectly when combined with other blocks in a larger quilt.
- Pressing the Seams:
Use a hot iron to press all the seams in your block. Press toward the darker fabric to prevent the seams from showing through the lighter background fabric. A well-pressed block will help ensure that the edges are crisp and the block lies flat. - Squaring the Block:
After pressing, use a quilting ruler to square up your block to the correct size. The unfinished block should measure 12.5 inches. Trim any excess fabric from the edges to ensure all sides are even. Careful squaring will ensure that your block fits perfectly with other blocks when you assemble your quilt. - Avoid Distortion:
Be gentle when pressing and squaring the block to avoid distorting the fabric, especially around the seams. If the fabric stretches too much, the block may become skewed, which could affect the overall alignment when you join it with other blocks.
Taking the time to press and square your block will give it a professional finish. This attention to detail is what elevates a handmade quilt into a beautifully crafted work of art.
Using the Card Trick Quilt Block in a Quilt
The Card Trick Quilt Block is versatile and works beautifully in a variety of quilt projects. Whether you’re making a large quilt or a smaller item like a table runner or pillow, this block adds a unique, intricate touch.
- Repeating the Block:
For a larger quilt, you can repeat the Card Trick Quilt Block across the entire quilt top. A 4 x 4 block layout, for example, will create a stunning quilt that showcases the intricate overlapping pattern. You can alternate the background fabric or even add sashing between the blocks to create a more structured look. - Adding Borders:
Borders can enhance the Card Trick Quilt Block and add dimension to the overall design. A simple border in a contrasting fabric can frame the blocks, while a pieced border using leftover fabric from the block adds continuity to the design. - Quilting the Design:
When quilting, you can either echo the shapes of the Card Trick Block with straight-line quilting or opt for free-motion quilting to add texture. The choice of quilting pattern will impact the final appearance of your quilt, so consider how you want the quilting to complement the design.
The Card Trick Quilt Block lends itself to a variety of quilting styles and layouts, giving you endless possibilities for creativity. The final quilt will be a true showstopper, sure to impress with its intricate design and clever use of fabric.
Quilting and Finishing Your Quilt
Once you’ve assembled the quilt top, it’s time to quilt and finish your project. Quilting adds texture and dimension to your quilt while also securing the layers together.
- Layering the Quilt:
Sandwich the quilt top, batting, and backing fabric together. Pin or baste the layers to keep them secure while you quilt. This is an important step to ensure that the layers don’t shift during the quilting process. - Choosing a Quilting Pattern:
For the Card Trick Quilt Block, you can use straight-line quilting to emphasize the clean lines of the block or opt for free-motion quilting to add a swirling effect that contrasts with the sharp angles of the block. The quilting pattern should complement, not overpower, the block’s design. - Binding the Quilt:
Once the quilting is complete, bind the quilt using your preferred method. A double-fold binding is durable and provides a clean finish to the edges of your quilt. You can choose a binding fabric that contrasts with the quilt top or matches the background fabric for a seamless look.
🌟 Join our exclusive Quilt broadcast list on Messenger! Receive the best patterns, tips, and updates directly in your inbox. Our team is ready to send you delightful content that will inspire your projects. Don’t miss this opportunity to stay updated and create amazing pieces. Join now and be part of this passionate quilt community! ✨📩
Quilting and binding your Card Trick Quilt is the final step in bringing your project to life. The finished quilt will be a beautiful testament to your quilting skills and the timeless appeal of this classic block.
Conclusion: Crafting the Perfect Card Trick Quilt Block
The Card Trick Quilt Block is a stunning, intricate design that brings both visual interest and complexity to any quilt. By following this tutorial, you can create a beautiful block that will serve as the centerpiece of your quilt or as part of a larger quilt top. With careful fabric selection, precise cutting, and attention to detail during assembly, your Card Trick Quilt Block will come together perfectly.
This block is a great choice for quilters of all levels, offering both a challenge and a rewarding result. Whether you’re making a quilt for yourself or as a gift, the Card Trick Quilt Block is sure to impress with its sophisticated design and timeless appeal. Happy quilting!


