Quilting is a beautiful art form that allows for endless creativity, and the Wings Block is a fantastic pattern that showcases both elegance and complexity.
This tutorial will guide you through each step of creating the Wings Block, complete with fabric cutting instructions and assembly tips.
Whether you’re a seasoned quilter or just starting, this guide will help you master this stunning quilt pattern.
What is the Wings Block?
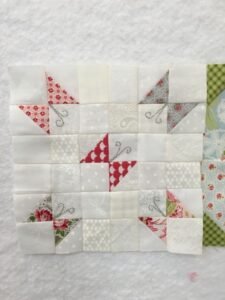
The Wings Block is a dynamic quilt pattern characterized by its unique shapes resembling wings. This block is often used in various quilt designs, adding a sense of movement and whimsy to any project. With its combination of triangles and squares, the Wings Block can be adapted to fit different quilting styles, from traditional to contemporary.
One of the appealing aspects of the Wings Block is its versatility. You can use a wide range of fabric colors and patterns to create stunning visual effects. Whether you opt for bold, bright colors or soft pastels, the Wings Block can accommodate your aesthetic preferences, making it a favorite among quilters.
In this tutorial, we will break down the construction of the Wings Block into manageable steps, allowing you to follow along easily and achieve excellent results. Let’s get started on this delightful quilting journey!
Materials Needed
Before we dive into cutting and sewing, gather all the necessary materials. Having everything on hand will streamline your process and help you stay organized. Here’s a list of what you’ll need:
- Fabric: Select three contrasting fabrics for this project. A light fabric for the wings, a medium fabric for the body, and a dark fabric for the background will create a stunning contrast.
- Rotary Cutter and Mat: These tools are essential for making precise cuts and achieving the best results in your quilt blocks.
- Ruler: A quilting ruler will help you measure and cut your fabric accurately.
- Sewing Machine: A reliable sewing machine is necessary for piecing your quilt blocks together.
Make sure to wash, dry, and iron your fabric before starting. This pre-washing step will prevent any future shrinkage and help your quilt maintain its shape. Choosing high-quality cotton fabric will ensure durability and a lovely texture for your finished quilt.
Cutting Your Fabric
Accurate cutting is crucial for creating the Wings Block. You’ll need to cut your fabric into specific shapes and sizes to achieve the desired look. Here’s how to do it:
- For the Wings:
- Cut 4 squares measuring 5 inches from your light fabric.
- Cut 4 squares measuring 5 inches from your medium fabric.
- For the Body:
- Cut 4 squares measuring 5 inches from your dark fabric.
- Background Fabric:
- Cut 1 square measuring 10 inches from your background fabric.
Take your time with this step, as precise measurements are vital for ensuring that your pieces fit together seamlessly. Using a rotary cutter and ruler will help you achieve clean, straight cuts.
Creating the Wing Units
With your fabric cut, it’s time to create the wing units. Follow these steps for a smooth assembly:
- Draw Diagonal Lines: On the wrong side of each 5-inch square of light fabric, draw a diagonal line from one corner to the opposite corner. This line will serve as a sewing guide.
- Sewing: Place a medium fabric square on top of a light fabric square, right sides together. Sew along the drawn line, then trim the excess fabric, leaving a quarter-inch seam allowance. Press the seam open.
- Repeat for All Squares: Continue this process until all your wing units are completed. You should have a total of 8 wing units, ready for assembly.
Creating the wing units is a crucial step, as these pieces will define the overall shape of your block. Ensure that your seams are straight and pressed well to achieve a polished finish.
Assembling the Body of the Block
Now that you have your wing units, it’s time to assemble the body of the Wings Block. Here’s how to do it:
- Arrange the Units: Lay out your wing units and body squares on a flat surface. Position the wing units to create the desired layout, with the body squares in between them.
- Sew the Units Together: Begin by sewing the wing units to the body squares. Make sure to align the edges carefully to maintain the shape of the wings. Press the seams open after sewing.
- Final Assembly: Once you have connected all the units, join the rows together to complete the Wings Block. Again, ensure that everything lines up correctly and press your final seams.
This assembly process brings the Wings Block to life, so take your time to ensure each piece fits perfectly. Proper pressing will make your block lay flat and look professional.
Adding the Background
With the main components of your Wings Block completed, it’s time to add the background. This step will help frame your block beautifully. Here’s how:
- Cutting the Background: Take your 10-inch square of background fabric and cut it in half diagonally to create two triangles.
- Sewing the Background: Attach one triangle to one side of your Wings Block and the other triangle to the opposite side. Make sure to align the edges carefully before sewing. Press the seams once attached.
- Trimming: After attaching the background triangles, trim any excess fabric if necessary to ensure your block is an even square. You should now have a completed Wings Block with a beautiful background.
Adding the background enhances the overall look of your quilt block and provides a clean finish. Pay attention to how the colors interact to create a harmonious design.
🌟 Join our exclusive Quilt broadcast list on Messenger! Receive the best patterns, tips, and updates directly in your inbox. Our team is ready to send you delightful content that will inspire your projects. Don’t miss this opportunity to stay updated and create amazing pieces. Join now and be part of this passionate quilt community! ✨📩
Tips for Success
To ensure your Wings Block turns out beautifully, consider these helpful tips:
- Use Quality Tools: Investing in good cutting and sewing tools will make a significant difference in the accuracy and quality of your quilt block. A sharp rotary cutter and a sturdy ruler can help achieve precise cuts.
- Maintain Consistent Seams: Keeping a consistent seam allowance is crucial for a successful quilt block. Use a quarter-inch foot on your sewing machine to help maintain this measurement throughout the process.
- Be Patient and Practice: Quilting takes time and practice. Don’t rush through any steps, and remember that each block you create is an opportunity to learn and improve your skills.
By following these tips, you can elevate your quilting experience and ensure that your Wings Block is as stunning as you envisioned. Enjoy the process and take pride in your craftsmanship.
Variations and Creative Options
Once you’ve mastered the basic Wings Block, consider exploring variations and creative options to make your quilts even more unique. Here are a few ideas to inspire you:
- Color Combinations: Experiment with different color palettes. Using bold colors can create a striking contrast, while softer tones can produce a more delicate look. Play with different fabric patterns as well to add depth and interest.
- Size Adjustments: You can alter the size of the Wings Block by changing the measurements of the fabric pieces. This flexibility allows you to create larger or smaller blocks, fitting them into various quilt designs.
- Mix and Match: Combine the Wings Block with other quilt patterns to create a stunning patchwork effect. The playful nature of the Wings Block pairs well with various designs, allowing for endless creativity in your quilting projects.
Exploring these variations can lead to exciting new designs and expand your quilting skills. Let your creativity shine and enjoy the journey of discovering unique quilt patterns.
Conclusion
The Wings Block is a delightful quilt pattern that combines beauty and creativity. By following this step-by-step tutorial, you now have the knowledge to create your own Wings Block with ease. Whether you’re making a single block or incorporating it into a larger quilt project, this pattern offers endless possibilities for creativity.
As you experiment with colors and designs, remember that quilting is a personal journey. Each block you create tells a story, and the Wings Block is a wonderful way to express your artistic vision. Happy quilting!