The Sawtooth Star Block is a classic quilt block that adds a striking design to any quilt project.
In this tutorial, we will guide you through the steps to create this stunning block, ensuring you have all the information needed, including fabric cuts and measurements.
Whether you’re a seasoned quilter or a beginner, this step-by-step guide will help you master the Sawtooth Star Block and incorporate it into your quilt patterns.
Understanding the Sawtooth Star Block
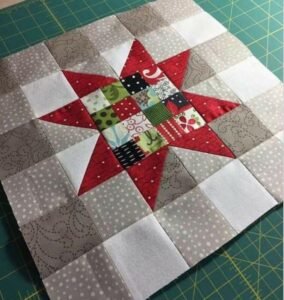
The Sawtooth Star Block is characterized by its star shape, featuring a central square surrounded by triangular points. This design is both traditional and versatile, making it suitable for various quilting styles. The block typically measures 12 inches square, but you can adjust the size to fit your project needs.
When planning your quilt, consider the color palette and fabric choices for the Sawtooth Star Block. Using contrasting colors can make the star pop, while a monochromatic scheme can create a more subtle effect. Think about how the block will interact with other quilt blocks you may use, ensuring a cohesive look throughout your project.
This block’s design can be adapted for various quilt patterns, allowing for creativity in layout and assembly. From bed quilts to wall hangings, the Sawtooth Star Block provides a beautiful focal point that can elevate your quilting projects.
Materials Needed for the Sawtooth Star Block
Before starting your Sawtooth Star Block, gather the necessary materials. You will need the following items:
- Fabric: Choose three different fabrics for your block. For this tutorial, we recommend:
- Fabric A (Background): 1/4 yard
- Fabric B (Star Points): 1/4 yard
- Fabric C (Center Square): 1/8 yard
- Cutting Tools: A rotary cutter, cutting mat, and quilting ruler will help you achieve precise cuts. Ensure your tools are sharp for clean edges.
- Sewing Supplies: You will need a sewing machine, thread, and an iron for pressing seams. Having a seam ripper handy is also a good idea, just in case!
Cutting Your Fabric
To create the Sawtooth Star Block, accurate cutting is crucial. Start by cutting your fabrics according to the following measurements:
- Fabric A (Background):
- Cut four squares measuring 4.5 inches x 4.5 inches.
- Cut one square measuring 4.5 inches x 4.5 inches for the center.
- Fabric B (Star Points):
- Cut eight triangles using the “Half-Square Triangle” method, each measuring 4.5 inches. To do this, cut two squares measuring 5 inches x 5 inches, and then cut each square diagonally in half.
- Fabric C (Center Square):
- Cut one square measuring 4.5 inches x 4.5 inches.
Label your pieces to keep track of them as you sew. Organizing your fabric will save you time and help prevent confusion later on.
Assembling the Sawtooth Star Block
Now that you have all your fabric pieces cut, it’s time to assemble the Sawtooth Star Block. Follow these steps carefully:
- Create Half-Square Triangles: Take the two 5-inch squares from Fabric B. Place them right sides together and sew along one diagonal line. Press the seams open, then trim the excess fabric, leaving you with two 4.5-inch half-square triangles.
- Sewing the Star Points: Take the half-square triangles and pair them with the 4.5-inch squares from Fabric A. Position the triangle with the long edge aligned with one edge of the square. Sew along this edge, flip the triangle up, and press. Repeat for the remaining three sides.
- Joining the Sections: Now that you have the star points attached to the background squares, it’s time to assemble the block. Arrange your pieces in a 3×3 grid, placing the center square (Fabric C) in the middle. Sew each row together, then join the rows to complete the Sawtooth Star Block.
Pressing and Finishing
Proper pressing is essential for achieving a polished finish on your Sawtooth Star Block. After assembling the block, press all seams toward the dark fabric to reduce bulk and enhance the block’s overall appearance. This step is crucial for maintaining the block’s shape and ensuring it fits well with other blocks in your quilt.
Check the measurements of your completed block to ensure it measures 12.5 inches square. If your block is slightly off, don’t worry! A small discrepancy can often be adjusted during the quilting process. Trim any excess fabric carefully to maintain the desired dimensions.
Finally, prepare your Sawtooth Star Block for quilting. You can choose to incorporate it into a larger quilt project or use it as a standalone piece. Consider adding borders or combining it with other blocks to create a unique design.
Tips for Successful Quilting
As you work on your Sawtooth Star Block, keep these tips in mind for a successful quilting experience:
- Accuracy is Key: Precise cutting and sewing will ensure your blocks fit together seamlessly. Take your time with measurements and cuts to achieve the best results.
- Practice Makes Perfect: If you’re new to quilting or making this block, don’t hesitate to practice on scrap fabric first. This will help you become familiar with the techniques involved before cutting into your main fabric.
- Explore Variations: Once you’re comfortable with the Sawtooth Star Block, experiment with different color combinations and sizes. You can create variations like the Double Sawtooth Star or even mix it with other quilt patterns for a more intricate design.
🌟 Join our exclusive Quilt broadcast list on Messenger! Receive the best patterns, tips, and updates directly in your inbox. Our team is ready to send you delightful content that will inspire your projects. Don’t miss this opportunity to stay updated and create amazing pieces. Join now and be part of this passionate quilt community! ✨📩
Conclusion
The Sawtooth Star Block is a timeless addition to any quilt pattern. By following this tutorial, you now have the skills and knowledge to create your own stunning blocks. Remember to enjoy the process of quilting and let your creativity shine through your fabric choices and designs.
As you incorporate the Sawtooth Star Block into your quilting projects, you’ll find endless possibilities for customization and creativity. Happy quilting!