As the leaves change and the air turns crisp, autumn provides a stunning color palette that can be beautifully captured in quilting projects.
The Autumn Trees quilt pattern is a perfect way to bring those warm fall hues into your home. Whether you’re a beginner looking for a simple yet impactful design or an experienced quilter wanting to experiment with seasonal fabrics, this tutorial will guide you through the process.
We’ll cover everything from fabric selection to precise cutting and piecing, using SEO-friendly terms like [quilt] and [quilt patterns] to ensure your blog reaches the right audience.
Selecting the Right Fabrics for an Autumn Trees Quilt
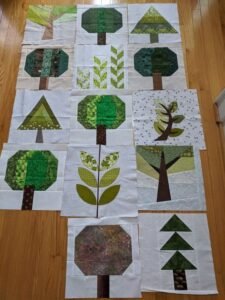
When creating an autumn-themed quilt, the fabric choices are essential to capture the essence of the season. Think of the rich hues of fall—deep oranges, fiery reds, golden yellows, and browns reminiscent of tree bark. These colors will form the leaves and tree trunks in your quilt, giving it a natural, warm aesthetic.
For the tree leaves, select a variety of fabrics in autumnal colors. You can opt for solid fabrics, but small prints that mimic the texture of leaves can add a beautiful touch. Batiks or hand-dyed fabrics can also bring extra depth to the design. For the tree trunks, choose darker browns or even wood-grain fabrics to give the trees a realistic look.
Finally, you’ll need a background fabric to make your trees pop. A cream or light beige background mimics a cloudy autumn sky, while a light blue background can provide a bright, cheerful contrast to the warm autumn tones.
Cutting the Fabrics: Precise Measurements for Your Quilt Blocks
Before starting your [quilt], ensure all your fabrics are pre-washed and pressed. This step is essential for preventing any shrinking or color bleeding in your finished project. Once the fabrics are ready, you can start cutting the pieces for your Autumn Trees quilt.
Here’s what you’ll need to cut:
- Tree Leaves Fabric (variety of fall colors):
- Cut twelve 5-inch squares for the leaves in various autumn colors. These will form the tops of your tree blocks.
- Tree Trunk Fabric (brown or wood grain):
- Cut twelve 2-inch by 3-inch rectangles for the tree trunks.
- Background Fabric (light blue or cream):
- Cut twenty-four 5-inch squares for the background. These will surround the tree shapes and give the quilt its open space.
- Sashing Fabric (optional, for borders between trees):
- Cut strips 2 ½ inches wide by the length of your quilt for sashing if desired.
Having all the pieces accurately measured and cut will make the assembly process much smoother. Be sure to use a rotary cutter, quilting ruler, and cutting mat to ensure straight lines and even edges.
SEE OTHER FACE PATTERNS HERE!
Piecing the Autumn Trees Quilt Blocks
Now that your fabric pieces are cut, it’s time to start piecing the blocks together. Each tree block will consist of a triangle formation for the leaves and a rectangle for the trunk, framed by background fabric.
- Making the Leaves: Take two 5-inch squares of leaf fabric and two 5-inch squares of background fabric. Pair one leaf square with one background square, right sides together. Draw a diagonal line from one corner to the opposite corner on the back of the background fabric. Sew a ¼-inch seam on either side of the line. Cut along the drawn line to create two half-square triangle units. Repeat this process with the second pair of squares.
- Assembling the Tree: Arrange your four half-square triangles to form a larger triangle (tree top) by placing the leaf fabrics together at the center. Sew the units together to complete the tree top block. Press the seams open for a flat finish.
- Adding the Trunk: Take your 2-inch by 3-inch rectangle of tree trunk fabric and place it below the completed leaf block. Sew this piece to the bottom, ensuring the trunk is centered between the tree leaves. Press the seams once again, and you’ve completed your first tree block!
Repeat these steps for all twelve tree blocks, alternating your leaf fabrics to create variety and depth in your quilt design.
🌟 Join our exclusive Quilt broadcast list on Messenger! Receive the best patterns, tips, and updates directly in your inbox. Our team is ready to send you delightful content that will inspire your projects. Don’t miss this opportunity to stay updated and create amazing pieces. Join now and be part of this passionate quilt community! ✨📩
Assembling the Quilt Top
Once you have completed all your tree blocks, it’s time to assemble the entire quilt top. Lay out your tree blocks on a large surface like a table or the floor to arrange them in a way that pleases you. You can place the trees in neat rows or stagger them for a more dynamic, natural look.
- Row Construction: Begin by sewing the tree blocks into rows. Use a ¼-inch seam allowance, and make sure your seams are straight and consistent. If you’re using sashing, sew sashing strips between each tree block within the rows to create space between the trees.
- Joining Rows: Once the rows are complete, sew the rows together to form the full quilt top. If you’ve chosen to add sashing, sew the sashing strips between the rows as well. Be sure to press the seams at each stage for a clean, professional finish.
- Adding Borders: For a polished look, consider adding a border to your quilt. You can use leftover leaf fabrics to create a scrappy border or choose a solid fabric that complements the quilt’s autumn theme. Cut your border strips to your desired width (typically 2 ½ to 4 inches wide) and sew them around the entire quilt top.
Quilting the Autumn Trees Quilt
With the quilt top completed, the next step is quilting. Layer your quilt sandwich with the quilt top, batting, and backing fabric. Baste the layers together using pins or basting spray to prevent shifting during the quilting process.
- Choosing a Quilting Design: For this quilt, a simple quilting design works well. Consider using a free-motion meander or loop design to represent swirling autumn winds. Alternatively, you could stitch in the ditch along the seams to highlight the tree shapes.
- Quilting the Layers: Using your sewing machine, quilt across the entire quilt. Start from the center and work your way out to prevent any puckering. The quilting should enhance the design without overwhelming it, so choose a thread color that blends nicely with the background fabric.
- Binding the Quilt: After quilting, trim the excess batting and backing fabric from the edges of the quilt. Cut your binding strips 2 ½ inches wide and sew them around the edges of the quilt to finish. Binding gives your quilt a clean, finished edge and ensures durability.
Finishing Touches and Displaying Your Quilt
Once your Autumn Trees quilt is bound, give it a final press with the iron, and you’re ready to display your creation! This [quilt] is perfect for cozying up during fall, or it can be used as a seasonal decoration to hang on a wall or drape over a couch. The vibrant fall colors and tree motif make it an ideal project to showcase the beauty of autumn.
If you’re gifting the quilt, consider adding a quilt label on the back to commemorate the occasion. You can write a personalized message or simply include your name and the date the quilt was made.
This project is also a great way to experiment with different [quilt patterns]. If you enjoyed making the tree blocks, consider trying variations of the design with other seasonal fabrics or colors. The Autumn Trees quilt pattern is versatile and adaptable, making it a valuable addition to any quilter’s pattern collection.
Conclusion
The Autumn Trees quilt pattern is a perfect project for capturing the beauty of fall in fabric form. With its straightforward piecing and charming design, it’s a great way to practice essential quilting skills while creating something that feels special and unique.
By following this tutorial and incorporating key SEO terms like [quilt] and [quilt patterns], you’ll not only create a beautiful quilt but also ensure your blog post is optimized for search engines. Whether you’re a beginner or an experienced quilter, this project is sure to bring the warmth and beauty of autumn into your home. Happy quilting!


