Crochet enthusiasts often find joy in combining traditional designs with delicate floral motifs.
The Rose Flower Granny Squares are a stunning representation of this fusion, offering a charming addition to any crochet project. These squares can be joined to create beautiful quilts, blankets, or even pillow covers.
In this tutorial, we will walk you through each step of creating a Rose Flower Granny Square, ensuring that your finished product is as beautiful as it is functional. With a focus on key terms like [quilt] and [quilt patterns], this guide is optimized for search engines and tailored to both beginners and experienced crocheters alike.
Materials and Yarn Selection for Your Rose Flower Granny Squares
Before starting any crochet project, choosing the right materials is key to achieving the desired look and feel. For the Rose Flower Granny Squares, you’ll want to use soft, durable yarn that complements the floral theme. Cotton or acrylic yarns work well for this project, offering both structure and softness.
- Yarn Choices: To capture the essence of a rose, opt for colors that closely resemble natural flowers. A deep red or pink for the petals, green for the leaves, and a neutral background color such as white or cream will make your rose stand out. Using multiple shades of the same color for the petals can also add depth to your square, giving the rose a more lifelike appearance.
- Hook Size: A 4.0mm (G) crochet hook is recommended for a balance of tightness and flexibility in your stitches. However, depending on your tension and the yarn weight you choose, you may need to adjust your hook size accordingly.
- Additional Tools: Don’t forget your scissors, a yarn needle for weaving in ends, and stitch markers if needed. These tools will ensure that your work stays neat and precise.
With all your materials gathered, you’re ready to begin crafting your rose-inspired granny square!
Creating the Rose Center: Step-by-Step Instructions
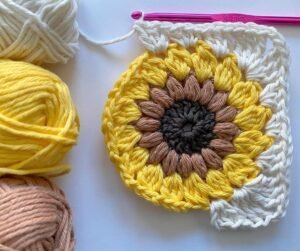
At the heart of the Rose Flower Granny Square is the flower itself, which will be crocheted first. This section of the project is what gives the square its unique charm. Follow these steps to create the rose center:
- Step 1: Form the Magic Circle: Begin by making a magic circle (or a chain of 4 stitches joined to form a ring) with your rose-colored yarn. This will serve as the base for the flower’s petals.
- Step 2: Round 1 – Petal Foundation: Chain 3 (counts as your first double crochet), then double crochet 11 more times into the magic circle, giving you a total of 12 double crochets. Pull the tail of your magic circle to close the ring. Join with a slip stitch to the top of your beginning chain-3.
- Step 3: Round 2 – Forming the Petals: For this round, you’ll begin shaping the petals. Chain 3 (counts as your first double crochet), then double crochet twice into the same stitch. In the next stitch, work 3 double crochets. Repeat from * around the circle, creating 6 petal clusters in total. Slip stitch to join.
Each petal you create will begin to bring your rose to life. The color and texture of the yarn will add to the realistic look, and the shaping of the petals gives the square its distinctive floral appearance.
Forming the Granny Square Base
Once the rose is complete, you’ll build the granny square base around it. This step will give structure to your design, allowing you to join multiple squares together for larger projects like quilts and blankets. Here’s how to construct the base:
- Step 1: Changing Colors: Switch to your background color (white or cream) by joining it with a slip stitch in any space between your rose’s petals. This contrast will make the flower pop within the square.
- Step 2: Round 3 – Building the Corners: Chain 3 (counts as your first double crochet). In the same space, double crochet 2 more times to form a granny cluster. Chain 2 (for the corner), then in the next space, work 3 double crochets. Continue this pattern—working 3 double crochets into each space between petals and chaining 2 at the corners—until you’ve completed the round.
- Step 3: Expanding the Square: For subsequent rounds, continue working granny clusters (3 double crochets) into each space and chain 2 at the corners to expand the square. You can make your square as large as you’d like, depending on the size of your overall project.
As you build the granny square around the rose, the contrast between the solid granny stitch and the intricate flower creates a beautiful visual effect, making this pattern both classic and modern.
Assembling Your Rose Flower Granny Squares into a Quilt
Once you’ve completed your Rose Flower Granny Squares, the next step is deciding how to join them into a larger project like a quilt. This process involves some basic techniques that will help give your finished piece a polished and cohesive look.
- Step 1: Joining the Squares: There are several methods to join your granny squares. One popular option is the slip stitch method, where you align two squares and slip stitch through both loops of each square’s edge. Another option is the whip stitch method, using a yarn needle to sew the squares together for an invisible seam.
- Step 2: Planning Your Layout: Lay out all of your squares before joining to determine the arrangement. You can alternate between different colors of roses or stick to one color scheme. Play around with the placement to achieve the best visual balance for your quilt.
- Step 3: Adding a Border: To finish your quilt, consider adding a border around the edges. This can be done with a simple row of double crochets or with a more intricate stitch pattern for added texture. A solid-colored border will help frame the quilt, making the rose squares the focal point.
With the squares joined and the border added, your quilt is nearly complete! Whether you choose to make a blanket, wall hanging, or other project, the Rose Flower Granny Squares will add a touch of elegance to any space.
DISCOVER MORE FREE PATTERNS HERE!
Tips for Customizing Your Rose Flower Granny Square Quilt
While the Rose Flower Granny Squares pattern is beautiful on its own, there are plenty of ways to customize your project to suit your style and preferences. From color choices to yarn textures, the possibilities are endless.
- Experiment with Colors: Try using different shades for the rose petals to create a gradient effect. You can also experiment with non-traditional colors for a modern twist on this classic design. Pastels, bold hues, or even variegated yarns can add a unique touch to each square.
- Incorporate Different Stitches: For added texture, consider incorporating puff stitches or bobble stitches into the flower center or the granny square base. This will give your quilt more dimension and make the flowers stand out even more.
- Create a Mixed-Pattern Quilt: If you enjoy variety, mix your Rose Flower Granny Squares with other crochet squares in different patterns. Combining various [quilt patterns] within the same project can add visual interest and showcase a range of crochet techniques.
Conclusion
The Rose Flower Granny Squares are a timeless and versatile addition to any crochet project. Whether you’re making a quilt, a blanket, or simply a decorative throw, these squares bring a touch of elegance and charm. By following this step-by-step tutorial, you’ll be able to create your own stunning granny square quilt, complete with beautiful roses and a classic granny square base.
As you work through this project, keep in mind the importance of using SEO-friendly terms like [quilt] and [quilt patterns] to ensure your blog post reaches the right audience. Happy crocheting, and may your next project bloom with creativity!

