If you’re looking to add a touch of festive charm to your holiday decor, these Crochet Christmas Coasters are the perfect project.
Not only are they functional, but they also bring a seasonal flair to your home. This tutorial will guide you through the process of creating these coasters step by step.
Using quilt patterns as inspiration, this crochet project brings a cozy and decorative element to any Christmas gathering.
Materials You Will Need
Before we begin, let’s gather all the materials necessary for this project. The simplicity of the Crochet Christmas Coasters makes it a great project for beginners and experienced crocheters alike.
- Cotton yarn in Christmas colors (red, green, white)
- 4mm crochet hook
- Scissors
- Tapestry needle for weaving ends
Start by selecting a soft, durable yarn like cotton. This material will ensure that your coasters are absorbent and easy to clean. The 4mm crochet hook is ideal for creating the intricate stitches while maintaining the coaster’s firmness. Lastly, keep your scissors and tapestry needle handy for cutting yarn and weaving in ends neatly.
Creating the Base: Step-by-Step
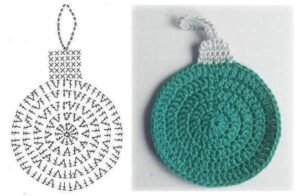
To start the Crochet Christmas Coasters, you’ll first create a simple base using basic crochet stitches. Follow the instructions below:
- Begin with a magic ring.
- Crochet 12 double crochets (DC) into the ring.
- Pull the ring tight and slip stitch to join the round.
The magic ring technique is crucial as it allows you to create a tight center, perfect for a coaster. The first round of 12 double crochets forms the foundation. Ensure your stitches are tight but not too tight, as you’ll need room to work into them for the following rounds. Slip stitch to join at the end of each round, giving the coaster its circular shape.
Building the Rounds
Now that you’ve established the base, it’s time to build up the coaster by adding additional rounds. Follow these next steps to create a solid, decorative piece:
- Chain 2, and make 2 double crochets in each stitch from the previous round.
- Continue around, finishing with a slip stitch.
- For the next round, chain 2, alternate between 1 double crochet in one stitch and 2 double crochets in the next.
These additional rounds create the body of the coaster, expanding the size while keeping it flat. The alternation of double crochet stitches allows for a balanced growth, and the chain 2 at the beginning of each round ensures an even height to the coaster. By the end of this step, your coaster will start to take shape, resembling the round quilt patterns you may already be familiar with.
DISCOVER MORE FREE PATTERNS HERE!
Adding the Christmas Motif
To make your Crochet Christmas Coasters stand out, we will now add a festive touch in the form of a Christmas motif. Whether you choose a small Christmas tree, star, or holly leaf, this detail will elevate your coasters from simple to stunning.
- Choose a contrasting yarn color (green for a tree, yellow for a star).
- Using a slip stitch, attach the yarn to your coaster’s surface.
- Follow a simple motif pattern for the tree, star, or holly leaf, working directly onto the coaster.
Adding a motif gives your coasters that special holiday vibe. You can personalize them with different designs for each coaster, making them a great gift option. If you’re using quilt patterns for inspiration, you can mimic traditional quilt shapes like stars or leaves, blending the world of quilting with crochet.
Finishing Touches
After you’ve added your motifs, it’s time to finish the coaster with some clean edges and final touches:
- Single crochet around the edge of the coaster for a clean, finished look.
- Fasten off and weave in all ends using your tapestry needle.
- Block the coaster by lightly steaming it with an iron to ensure it lays flat.
The single crochet edging adds stability to the coaster while keeping it neat and professional-looking. Blocking your project ensures that the stitches even out and the coaster stays flat. At this point, your Crochet Christmas Coasters are ready for use or gifting!
Variations and Ideas
One of the great things about these Crochet Christmas Coasters is their versatility. While we’ve stuck with traditional holiday colors, you can easily adapt the design for other seasons or events. Swap out red and green for pastel colors to create a spring-themed set, or use shades of blue and silver for a winter wonderland theme.
You can also experiment with different quilt patterns to inspire new crochet designs. By incorporating motifs like snowflakes or geometric shapes, you can give each coaster its unique touch. The more creative you get, the more personalized your crochet project will be!
Conclusion: Bringing Quilting and Crochet Together
The Crochet Christmas Coasters tutorial is a fun, festive project that blends quilting inspiration with crochet techniques. From creating a solid base to adding decorative motifs, each step is easy to follow and customizable. By using quilt patterns as a reference, you can create coasters that are not only functional but also beautifully designed.
Whether you’re new to crochet or an experienced crafter, this project offers an opportunity to explore creativity while making something practical for the holiday season. Grab your materials and start crafting your set of Crochet Christmas Coasters today!
With these instructions, you now have a step-by-step guide on how to make a set of coasters that will bring warmth and charm to any holiday table.