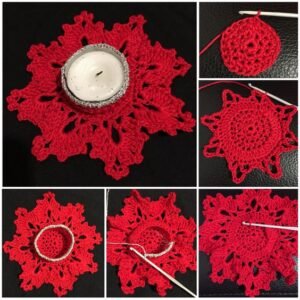
Creating the perfect holiday ambiance often requires those small yet impactful touches. A crocheted Tea Light Holder Melting Snowflake is a cozy addition to your winter décor, and it’s not only beautiful but functional too!
In this tutorial, we’ll take you through the steps to crochet a stunning snowflake-themed tea light holder using simple techniques that even beginners can follow.
Let’s dive into this festive project and create something special for your home!

Materials You Will Need
When beginning your crochet projects, it’s essential to have the right materials on hand. Here’s a list of what you’ll need for the Tea Light Holder Melting Snowflake.
First, you will need your crochet hook. A size 2.5 mm (C-2) crochet hook is recommended for this project. This will give the snowflake a tight weave, helping it maintain its shape while holding the tea light.
DISCOVER MORE FREE PATTERNS HERE!
Next, you’ll need 100% cotton yarn. Cotton is preferable over synthetic fibers because it holds its shape better and withstands heat from the tea light. Go for white or light blue to enhance the snowflake effect.
Finally, grab a small, battery-powered LED tea light for safety. Real candles generate too much heat for a crocheted holder. Now that you’ve gathered your materials, let’s move on to cutting the fabric.
Preparing and Cutting the Fabric
To ensure your snowflake fits perfectly around the tea light, precise measurement is crucial. While no fabric is involved in the traditional sense, the yarn you use plays a similar role in crochet patterns. The snowflake must be structured enough to hold its shape but flexible enough to wrap around the tea light.
Begin by crocheting a chain of 12 stitches, then slip stitch to form a ring. From this point, we will work outward in rounds. In the first round, you’ll need to crochet 18 double crochets into the ring. This forms the base that will support the tea light.
In the second round, you’ll start creating the snowflake’s arms. These are done by creating clusters of 4 double crochets separated by chain spaces. Repeat this process, ensuring each arm has symmetrical spacing for a balanced snowflake shape.
Creating the Snowflake Design
The essence of the Tea Light Holder Melting Snowflake lies in its delicate design. The intricate snowflake pattern starts to take form in the third round of your crochet work.
You’ll begin by crocheting a series of chain-5 spaces, which will form the points of the snowflake. Attach these chains at regular intervals along the second round. Next, you will crochet treble crochets into the chain spaces, creating elongated arms that resemble snowflake spikes.
Continue this pattern until you have completed six arms for the snowflake. To give the snowflake a more defined shape, consider adding picots at the tips of each arm. A picot stitch adds a little decorative knot at the end of your crochet, enhancing the frosty, delicate appearance.
Assembling the Tea Light Holder
Once your snowflake is complete, it’s time to assemble it as a tea light holder. To do this, crochet a small base to hold the tea light in place. The base should be a simple round shape, about the size of the bottom of your LED tea light.
To create the base, start by making a magic ring and crocheting 12 single crochets into the ring. Continue to crochet in rounds, increasing evenly until you have a small circle that is just a bit larger than the tea light. Make sure the base is tight enough to keep the tea light secure but loose enough to allow for easy removal.
Next, attach the snowflake to the base by slip stitching around the edge. Ensure it fits snugly around the tea light, with the snowflake’s arms extending outward for an elegant appearance. You can also reinforce the structure by adding an extra round of stitches to strengthen the bond between the base and the snowflake.
Finishing Touches
Once your snowflake tea light holder is assembled, it’s time to add some finishing touches. This is where you can get creative and truly make the piece your own. Consider adding a bit of sparkle by sewing tiny beads or sequins along the edges of the snowflake. These little embellishments can mimic the look of frost or ice crystals, adding to the wintery vibe.
Another option is to lightly stiffen the snowflake by dipping it in a mixture of water and white glue. Shape the snowflake around a mold (such as a small bowl) while it dries, ensuring it keeps its structure. This stiffening technique will make sure your snowflake holds its shape, even with prolonged use.
Lastly, consider giving your Tea Light Holder Melting Snowflake a personal touch by using different colored yarns or adding a decorative ribbon around the tea light’s base. These simple additions can elevate the look and feel of your finished piece.
How to Use Your Crochet Tea Light Holder
Now that you’ve completed your Tea Light Holder Melting Snowflake, you might be wondering how best to use it in your home. This handmade piece makes an excellent centerpiece for holiday tables, adding a warm and inviting glow. Simply place your battery-powered tea light into the holder, turn it on, and watch as the soft light flickers through the crochet stitches.
Another great use for this holder is as a gift. Handmade items like this are thoughtful and unique, making them the perfect present for loved ones during the holiday season. You can even create multiple tea light holders in different colors and sizes for a varied, festive display.
Finally, consider using your snowflake tea light holder as part of a winter-themed vignette. Pair it with evergreen branches, pinecones, and glass ornaments to create a cozy, wintery atmosphere in any room. The soft light from the tea light will add warmth and comfort to your space, making it the perfect décor for cold winter nights.
Why Crochet Your Own Snowflake Tea Light Holder?
There are plenty of reasons to crochet your own Tea Light Holder Melting Snowflake, especially if you love adding personal, handmade touches to your home décor. First and foremost, it’s a fun and creative project that you can complete in just a few hours. It’s also a great way to practice your crochet skills, especially if you’re a beginner looking to try new techniques.
Crocheting your own tea light holders also allows for a lot of customization. You can choose your favorite colors, add embellishments, and adjust the size to suit your needs. Plus, by using LED tea lights, these holders are completely safe to use around the house, unlike traditional candles.
Finally, creating a crochet tea light holder is an eco-friendly alternative to buying mass-produced holiday decorations. You can use natural materials like cotton yarn, and by making the holder yourself, you’re reducing the need for plastic or non-recyclable items. It’s a small but meaningful way to contribute to a more sustainable holiday season.
Conclusion
In this tutorial, we’ve walked you through the steps to create a beautiful Tea Light Holder Melting Snowflake. With the right materials, a little bit of patience, and your crochet skills, you can craft a lovely piece that adds warmth and charm to your home.
Whether you’re making it for yourself or as a gift, this snowflake tea light holder is sure to be a hit during the winter season. So grab your hook and yarn, and start creating your own cozy holiday décor today!


