The Sunburst Granny Square is a vibrant, versatile pattern that has gained immense popularity among crochet enthusiasts.
This pattern is loved for its bright, circular center that radiates outward, resembling the sun’s rays. If you’re looking to add a cheerful and colorful touch to your crochet projects, learning how to make the Sunburst Granny Square is an excellent place to start.
In this tutorial, we’ll go over each step of creating this pattern, making it easy to follow for both beginners and experienced crocheters.

By the end, you’ll have all the tools and techniques you need to crochet beautiful Sunburst Granny Squares to use in afghans, blankets, and other projects. Let’s dive into the details, covering everything from the materials to final assembly.
DISCOVER MORE FREE PATTERNS HERE!
Materials Needed for the Sunburst Granny Square
To create the Sunburst Granny Square, you’ll need basic crochet supplies, including yarn in various colors, a crochet hook, and some scissors. Choosing the right materials is essential for achieving the best results and durability in your finished squares.
- Yarn – Select at least three or four different colors of yarn. Opt for medium-weight yarn for a classic look, but feel free to experiment with lighter or bulkier yarns to achieve different effects. Cotton or acrylic yarns work well, as they hold their shape and are easy to care for in the long run.
- Crochet Hook – Use a hook that matches your yarn weight. Typically, a 4.5mm to 5.5mm hook works well for medium-weight yarn. Make sure the hook is comfortable for you, especially if you plan on making multiple squares, as it can prevent hand fatigue.
- Other Supplies – A tapestry needle is essential for weaving in ends, and scissors are needed to cut your yarn. Additionally, stitch markers can help keep your rounds organized, especially if you’re new to crochet patterns.
Step 1: Creating the Foundation Circle
To begin your Sunburst Granny Square, start with a foundation circle. This will serve as the center of your square, where the “sunburst” effect begins.
- Form a Magic Ring – Start by creating a magic ring, which is a popular method for making circles in crochet. To make a magic ring, loop the yarn around your fingers, insert the hook under the loop, and pull up a loop to form the starting point. This ring can be adjusted by pulling the tail to tighten it after your first round of stitches.
- Crochet the First Round – Chain 2, which counts as your first half double crochet (HDC), then crochet 11 HDCs into the ring. After completing the stitches, pull the tail to tighten the magic ring, closing up the center hole. Slip stitch into the top of the chain-2 to complete this round.
- Choosing Colors – For a colorful sunburst effect, switch colors at each round. Cut the yarn, pull the tail through the last loop, and weave in the ends as you switch to a new color for the next round.
Step 2: Adding the Petal-Like Stitches
In this round, you’ll create the “petals” of the sunburst, adding texture and dimension to the design. Using a new color helps make these petals stand out beautifully.
- Join a New Color – Attach the next color with a slip stitch in any HDC from the previous round. Chain 2, which counts as the first double crochet (DC) of the round. In the same stitch, crochet another DC, creating the start of your petal shape.
- Crochet Petals Around the Circle – In each stitch around the circle, crochet 2 DCs. This will give you a total of 24 DCs by the end of the round. The double crochet stitches create a fuller, petal-like look that surrounds the central circle and adds the characteristic shape to the square.
- Close the Round – After crocheting into each stitch, join with a slip stitch to the top of the first chain-2. You should see a sunburst effect emerging, with a textured, petal-like circle that forms the square’s foundation.
Step 3: Forming the Square Shape
Now that the circular foundation is complete, it’s time to add corners and transform it into a square shape.
- Start the Round with a New Color – To emphasize the square’s borders, join a new color with a slip stitch in any DC stitch from the previous round. Chain 2 as your starting DC.
- Creating Corners – In each fourth stitch, crochet (2 DC, chain 2, 2 DC) to create a corner. This stitch combination naturally forms a right-angle corner, turning the circle into a square shape. Repeat this pattern around the entire circle, placing a corner stitch group in every fourth stitch.
- Complete the Square – After forming each corner, join the round with a slip stitch to the first chain-2. You should see a square shape forming, with rounded petals in the center and sharp, defined corners at the edges.
Step 4: Adding the Border Rounds
The final steps involve adding additional rounds to build up the square to your desired size. Adding more rounds in contrasting colors enhances the Sunburst Granny Square’s beauty.
- Add Simple Border Rows – Start with a new color and crochet DC stitches around the square, adding (2 DC, chain 2, 2 DC) in each corner space to maintain the square shape. This round reinforces the structure and provides a clean, solid border.
- Adjusting the Border – Continue adding rounds until you achieve the size you need for your project. For example, four or five rounds may be enough for a small afghan square, while additional rounds can create larger squares for blankets or pillow covers.
- Finishing the Border – End with a final round of single crochet (SC) stitches around the border for a polished look. Fasten off the yarn, weave in all ends with a tapestry needle, and trim any excess yarn.
Final Assembly and Project Ideas
Once you’ve made several Sunburst Granny Squares, you can assemble them into a larger project, such as a blanket or cushion cover. There are several techniques for joining granny squares, depending on your desired look and level of complexity.
- Joining Methods – Try the whip stitch, slip stitch join, or single crochet join to connect the squares. Each method gives a slightly different effect: whip stitch is nearly invisible, slip stitch creates a raised seam, and single crochet adds a more textured edge.
- Adding a Border to the Finished Project – Once joined, consider adding a border around the entire project to unify the squares. A simple DC or SC border in a neutral color can bring the entire piece together, giving it a finished look.
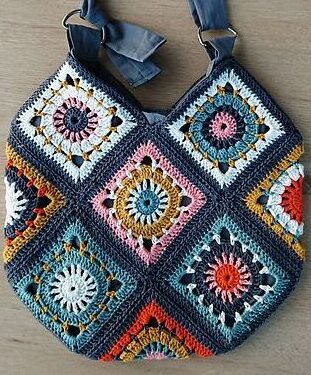
- Project Inspiration – Use your Sunburst Granny Squares to make everything from throw blankets and afghans to decorative pillows and even unique, colorful tote bags. Experiment with different yarn colors to create customized, eye-catching designs that suit any style.
The Sunburst Granny Square is an adaptable and cheerful pattern, perfect for adding a touch of warmth and creativity to any crochet project. With its eye-catching design, this pattern can be used in a range of projects, from home decor to cozy accessories. Whether you’re a beginner or an experienced crocheter, this step-by-step guide to crocheting the Sunburst Granny Square offers detailed instructions to help you succeed.
With just a bit of yarn and a few simple stitches, you can create beautiful squares that showcase your creativity. So, grab your crochet hook and favorite yarns, and start crafting these vibrant squares today!


