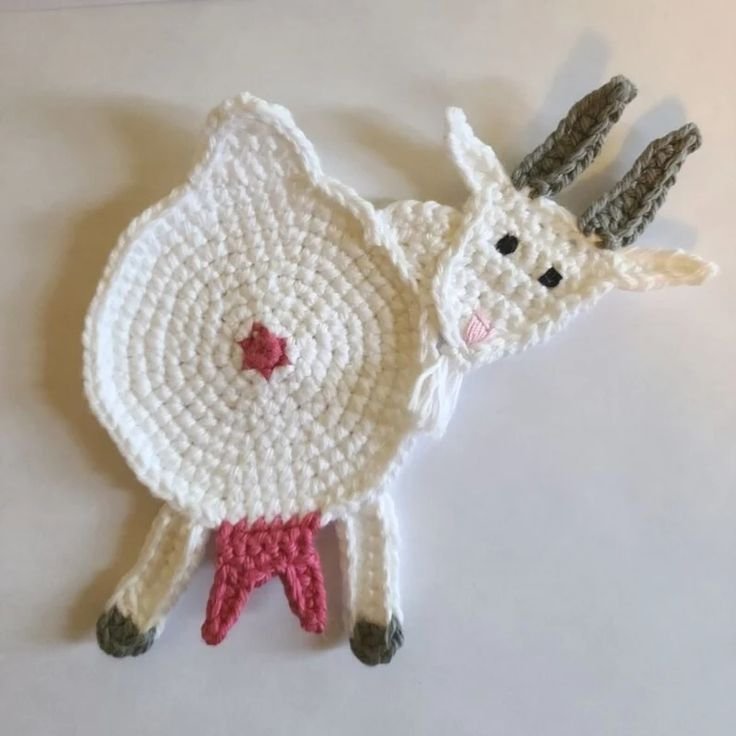
The Goat Coaster Crochet is a fun and quirky crochet pattern that’s perfect for adding a playful touch to your home decor. Featuring an adorable goat motif, this coaster is not only functional but also a conversation starter. Whether you’re a seasoned crocheter or a beginner looking for a new challenge, this Goat Coaster Crochet pattern will guide you through the steps needed to create a charming set of coasters for your coffee table or as a unique gift.
Crocheting animal-themed designs can be both exciting and rewarding, and the Goat Coaster is no exception. The intricate details and easy-to-follow steps will make you fall in love with the process. In this tutorial, we will take you through every step from choosing the right yarn to creating the perfect goat face, making sure your coasters turn out looking adorable and well-made.
Whether you’re making a single coaster for fun or creating a whole set, the Goat Coaster Crochet pattern offers endless possibilities to customize your project. Let’s get started and crochet this whimsical piece that brings both function and charm to any space!
1. Materials and Tools You’ll Need
Before we jump into crocheting the Goat Coaster, let’s first go over the materials and tools you’ll need. Ensuring that you have everything on hand will make the process smoother and more enjoyable.
DISCOVER MORE FREE PATTERNS HERE!
- Yarn: Select a yarn that suits your desired look and feel. A medium-weight yarn (worsted weight) in colors like white, beige, and black is ideal for creating a goat’s face, but feel free to use any color combination you like.
- Crochet Hook: You’ll need a crochet hook that fits your yarn. Typically, a 4.0mm (G-6) hook works well for worsted-weight yarn, but refer to your yarn label for the best hook size.
- Scissors: A good pair of scissors will help you cut yarn when you finish off each piece and are ready to move on to the next section of your goat.
- Yarn Needle: A yarn needle is crucial for weaving in ends and attaching the facial features of the goat securely.
- Stitch Markers: Use stitch markers to keep track of your rounds and avoid losing your place in the pattern.
- Polyfill (optional): If you want your coasters to have a slightly puffed-up appearance, adding a small amount of polyfill inside the coaster can help.
Once you have all your materials gathered, you’re ready to start working on this delightful project. Now, let’s go through the steps of crocheting the Goat Coaster!
2. Understanding the Goat Coaster Crochet Pattern
The Goat Coaster Crochet pattern involves several basic crochet stitches like slip stitch (sl st), single crochet (sc), and half double crochet (hdc). The pattern is made in the round, starting from the center and working outward to form a circular shape. The key feature of this pattern is the goat’s face, which is worked in different rounds to create the ears, eyes, nose, and mouth.
By following the pattern, you will create a goat’s face that becomes the focal point of the coaster. The shape of the coaster will form naturally as you continue to work the rounds. Once the base of the coaster is complete, you’ll add the facial features to give the goat its signature look.
The beauty of this crochet pattern lies in its versatility. You can experiment with different yarn colors for the background, goat face, and details. Whether you want a more realistic look or something whimsical, you have the freedom to adapt the pattern as you see fit.
Let’s move forward and look at the step-by-step instructions to help you complete the Goat Coaster Crochet.
3. Step-by-Step Instructions to Crochet the Goat Coaster
Ready to get started? Follow these step-by-step instructions to create your very own Goat Coaster:
Round 1: Start with a Magic Ring
- Begin by making a magic ring (also known as a magic circle).
- Inside the ring, work 6 single crochet (sc) stitches. Pull the ring tight to close the hole and join with a slip stitch (sl st) into the first stitch.
Round 2: Increase Stitches
- To start expanding the base of the coaster, work 2 single crochet (sc) stitches in each stitch around (12 stitches total).
- Join with a slip stitch to the first stitch of the round.
Round 3: Continue Expanding
- In this round, work 1 single crochet (sc) in the first stitch and then 2 single crochet (sc) in the next stitch. Repeat around (18 stitches total).
- Join with a slip stitch to the first stitch.
Round 4: Create the Goat’s Face
- Begin forming the goat’s face by using different colored yarn. Work 1 single crochet (sc) in each stitch around (18 stitches total).
- Join with a slip stitch to the first stitch.
Round 5: Add Ears
- In the next round, we will add the goat’s ears. Choose a contrasting color for the ears.
- Work 3 single crochet (sc) in the next 2 stitches, then make 2 slip stitches for each ear.
- Join with a slip stitch to close the round.
Round 6: Finish the Face and Tail
- Work additional rounds to complete the face of the goat with a half double crochet (hdc) for the snout.
- Complete the coaster by joining and finishing off all yarn ends securely. You can add a cute little tail if desired.
Now your goat coaster is complete! If you want to make multiple coasters, simply repeat these steps. Be sure to adjust the facial features to give each one its own unique personality.
4. Tips for Perfecting Your Goat Coaster Crochet
To help you create the best Goat Coaster Crochet possible, here are some helpful tips:
- Work in a Continuous Round: Try working in a continuous round instead of joining rounds each time. This will help you avoid the seam that can appear when joining rounds.
- Change Yarn Colors: Don’t hesitate to experiment with different yarn colors to make your goat coaster even more unique. You can try making goats with different colored backgrounds or funky horns!
- Tighten Your Stitches: Make sure your stitches are not too loose, as loose stitches can cause the coaster to lose its shape and structure.
- Use Stitch Markers: Use stitch markers to mark the beginning of each round, especially if you are making multiple coasters at once.
- Customize the Size: If you’d like to make a larger or smaller coaster, adjust the number of stitches in each round to fit your needs.
- Add Personal Details: Customize your goat’s face by adding extra details like eyebrows, a smile, or unique horns to make each coaster different.
These tips will ensure that your goat coasters turn out looking flawless and fun!
FAQ – Goat Coaster Crochet
Q1: How long does it take to crochet a Goat Coaster?
The time it takes to crochet a Goat Coaster depends on your experience level, but typically it can be completed in 1-2 hours.
Q2: Can I make the Goat Coaster bigger or smaller?
Yes! To make a larger or smaller coaster, adjust the number of stitches in each round. For a larger coaster, continue increasing in the same pattern until the desired size is reached.
Q3: Can I use different yarn weights for the Goat Coaster?
Yes, you can use different yarn weights, but keep in mind that you may need to adjust the size of your crochet hook to match the yarn weight. The standard worsted weight yarn works well for this pattern.
Q4: How do I join multiple coasters together?
To join multiple coasters, use a whip stitch or slip stitch method. Leave a long yarn tail to easily join each coaster’s edges together.
Q5: Can I add other animals to this coaster pattern?
Absolutely! This Goat Coaster Crochet pattern can easily be adapted to create other animal-themed coasters. Just adjust the facial features and body shapes accordingly.
In this Goat Coaster Crochet tutorial, we’ve covered everything you need to know to create your own charming goat-themed coasters. From gathering your materials to following the step-by-step instructions, you now have the tools and knowledge to crochet these adorable coasters with ease. With the right colors and creativity, you can make a fun set of coasters that add personality to any space.
We hope you enjoyed this tutorial and found it helpful. Please share your thoughts and experiences in the comments section below, and don’t hesitate to offer suggestions or ask questions. Happy crocheting!