The Sunburst Granny Square – Pattern is one of the most popular and vibrant designs in the world of crochet. Known for its stunning colors and radiant look, this pattern brings life to any project. Whether you’re creating a blanket, pillow, or even a scarf, the Sunburst Granny Square can be a great way to add a cheerful touch to your crochet creations. This guide will walk you through everything you need to know about this beautiful pattern, from the basic steps to advanced techniques. By the end of this article, you’ll be ready to crochet your own Sunburst Granny Square – Pattern with confidence!
Crocheting a Sunburst Granny Square involves a unique combination of simple stitches that come together to form a star-like pattern in the center, gradually radiating outward in layers of color. It’s a timeless crochet design that has captured the hearts of many, from seasoned crocheters to beginners. The beauty of the Sunburst Granny Square lies in its versatility — you can experiment with colors and customize the design to suit any style or preference.
As you dive into this pattern, you’ll discover that it’s not as complicated as it might seem. While the Sunburst Granny Square – Pattern may look intricate at first glance, its step-by-step process is manageable and rewarding. With a little practice, you’ll soon be able to crochet beautiful squares that shine like rays of sunshine!
1. Understanding the Basics of the Sunburst Granny Square Pattern
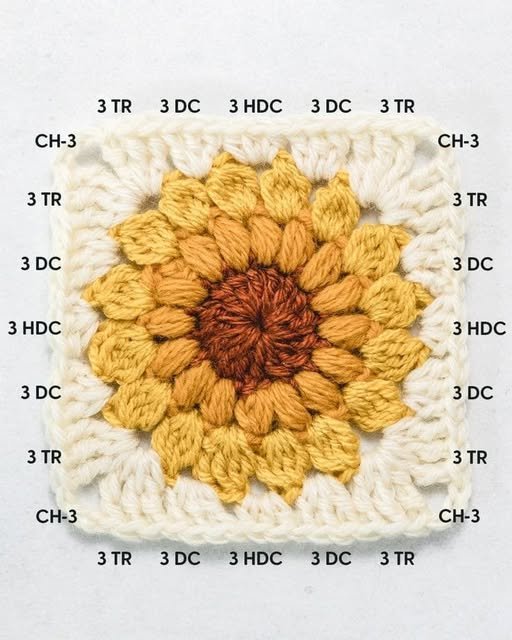
The Sunburst Granny Square – Pattern is a combination of double crochet, slip stitches, and chain stitches, forming a beautiful, star-like center that gradually expands into a circular shape. The pattern typically starts with a small center, often using a different color to give it a burst of contrast. You then continue to work in rounds, adding new colors to create layers that form the sunburst effect.
DISCOVER MORE FREE PATTERNS HERE!
The Foundation Ring
The first step in the Sunburst Granny Square is creating a foundation ring, also known as a magic circle. This loop will serve as the center of the square, and you’ll start your first round of crochet stitches inside it. The key here is to ensure that your foundation ring is neither too tight nor too loose, as this will impact the overall shape of the square.
Working the First Round
Once your foundation ring is ready, you’ll start with the first round, typically using a bright, bold color to form the star center. This round is where you’ll begin to see the sunburst pattern take shape. The first round usually consists of small groups of double crochet stitches, forming a petal-like design that radiates from the center.
Building Layers with New Colors
After completing the first round, the fun really begins! The Sunburst Granny Square involves adding multiple rounds of different colors to create the layered, sunburst effect. You can choose to follow a specific color palette or mix and match colors to suit your project. Each round will add a new layer, making your square bigger and more vibrant.
Changing Colors
One of the most exciting aspects of the Sunburst Granny Square – Pattern is the ability to change colors between rounds. Each time you complete a round, you’ll cut the yarn of the current color and attach a new one. This allows you to experiment with color combinations, creating a square that is truly unique.
The Final Round and Edging
Once you’ve completed all your rounds and the square has reached your desired size, you’ll finish it off with an edging round. This round typically involves single crochet stitches or slip stitches to neatly finish the square and give it a polished look. The edging also helps to even out any uneven edges and ensures that your square is ready to be used in a larger project.
Joining the Squares
After crocheting multiple Sunburst Granny Squares, you’ll need to join them together to create your finished piece. There are several methods for joining granny squares, such as whip stitch, slip stitch, or even using the join-as-you-go method. The method you choose will depend on your preference and the look you want for your project.
2. Tips for Perfecting Your Sunburst Granny Square
Now that you have a basic understanding of the Sunburst Granny Square – Pattern, it’s time to share some tips that will help you perfect your technique. With these tips, you’ll be able to create squares that are not only beautiful but also consistent and professional-looking.
Consistency in Tension
One of the most important factors when crocheting is maintaining a consistent tension. Uneven tension can lead to squares that are misshapen or uneven in size. To avoid this, practice keeping your stitches evenly spaced and your yarn tension steady. If you find that your squares are too tight or too loose, adjust your tension accordingly.
Use Stitch Markers
When working on rounds, it can sometimes be hard to keep track of where the beginning of the round is. Using a stitch marker at the start of each round will help you keep track and avoid losing your place. This simple tool can make a big difference, especially when you’re working with multiple rounds of colors.
Experiment with Colors
The Sunburst Granny Square is known for its vibrant, eye-catching design, and you can play with countless color combinations. Don’t be afraid to experiment with different hues — whether you want a bold, contrasting look or a more subtle, gradient effect, the possibilities are endless.
Block Your Squares
After completing your Sunburst Granny Squares, it’s a good idea to block them before joining them together. Blocking helps to even out any uneven stitches and gives the squares a more uniform shape. To block your squares, simply wet them with water and pin them into shape, allowing them to dry completely.
Take Your Time
While it’s tempting to rush through your project, taking your time will lead to better results. The Sunburst Granny Square – Pattern requires patience, especially when changing colors or working through the rounds. Enjoy the process, and remember that the end result will be worth it!
Avoiding Common Mistakes
Some common mistakes when crocheting the Sunburst Granny Square include skipping stitches, working into the wrong space, or making uneven color changes. To avoid these mistakes, always double-check your work and take your time with each round. If you notice any errors, it’s easy to unravel a few stitches and fix them before continuing.
3. How to Customize Your Sunburst Granny Square
One of the best things about the Sunburst Granny Square – Pattern is how easily it can be customized. Whether you want to adjust the size, change the shape, or add extra flair, there are many ways to make this design uniquely yours.
Adjusting the Size
You can easily adjust the size of your Sunburst Granny Square by adding or subtracting rounds. For a smaller square, you can stop after just a few rounds, while a larger square may require more layers. Simply continue adding rounds until you reach the desired size.
Adding Textures
If you want to add extra texture to your Sunburst Granny Square, you can incorporate different crochet techniques. For example, you can use puff stitches, popcorn stitches, or other textured stitches in the center or along the edges to give your square more depth and interest.
Shaping Your Squares
While the traditional Sunburst Granny Square is circular, you can experiment with different shapes. You can turn your square into a hexagon, octagon, or even a heart shape by adjusting your stitch placement and the number of sides in each round.
Creating Multi-Color Effects
To make your Sunburst Granny Square even more eye-catching, try using multiple colors in each round. Instead of changing colors only at the end of each round, you can switch colors more frequently, creating a multicolored effect that makes your square pop.
Adding Embellishments
If you want to take your Sunburst Granny Square to the next level, consider adding embellishments like beads, buttons, or fabric flowers. These small details can enhance the overall look of your project, giving it a personalized touch.
Using Different Yarn Weights
You don’t have to stick to the standard yarn weight for the Sunburst Granny Square – Pattern. You can experiment with thinner or thicker yarns to create different effects. A thinner yarn will create a more delicate, lacy square, while thicker yarn will give a chunkier, more substantial look.
4. Common Uses for Sunburst Granny Squares
The Sunburst Granny Square is incredibly versatile and can be used in a variety of projects. Whether you’re making a large blanket, a small cushion, or something else entirely, this pattern will add a vibrant, cheerful touch to any creation.
Blankets
One of the most common uses for the Sunburst Granny Square is in blankets. By joining multiple squares together, you can create a cozy, colorful blanket that will brighten any room. You can choose to make a traditional granny square blanket or opt for a more modern design with a mix of different square sizes.
Pillows and Cushions
Another popular project for the Sunburst Granny Square – Pattern is creating pillows or cushions. The square design works perfectly for these home decor items, and the bright colors will add a cheerful touch to your living room or bedroom.
Scarves and Shawls
The Sunburst Granny Square can also be used in wearable items like scarves, shawls, and wraps. The vibrant colors will make any accessory stand out, and the soft texture of the yarn will keep you warm in cooler weather.
Bags
If you love making crochet bags, the Sunburst Granny Square can be an excellent addition to your bag designs. Whether you use it for the entire bag or as a decorative element, the unique sunburst pattern will make your bag one-of-a-kind.
Coasters and Rugs
The Sunburst Granny Square can even be used to create smaller items like coasters or rugs. You can make a set of matching coasters or create a large rug by joining several squares together. These projects are perfect for adding a pop of color to your home.
Wall Hangings
Lastly, the Sunburst Granny Square – Pattern is great for wall hangings. You can create a stunning tapestry or wall art by arranging multiple squares in a pattern that suits your space. The vibrant colors will bring energy to your walls and make your home feel inviting.
FAQ: Frequently Asked Questions About Sunburst Granny Squares
1. What yarn should I use for the Sunburst Granny Square?
You can use any yarn that you feel comfortable with, but most crocheters prefer to use a medium-weight yarn, such as worsted weight. This provides a good balance between softness and durability.
2. How do I join multiple Sunburst Granny Squares together?
There are several methods for joining your squares, including whip stitch, slip stitch, and join-as-you-go. Choose the method that best suits your project and gives you the desired look.
3. Can I make a larger project with the Sunburst Granny Square?
Yes! You can easily adjust the size of your project by adding more squares or increasing the number of rounds in each square. Larger blankets or throws can be made by joining many squares together.
4. How do I avoid mistakes when crocheting Sunburst Granny Squares?
The best way to avoid mistakes is to take your time and follow the pattern carefully. Use stitch markers to keep track of your rounds, and always check your work for any errors before moving on.
5. Can I change colors in the middle of a round?
Yes, you can change colors in the middle of a round. This will add a unique touch to your square and help create more interesting color transitions.
6. What other patterns can I combine with the Sunburst Granny Square?
The Sunburst Granny Square – Pattern can be combined with many other crochet patterns, such as solid granny squares, hexagons, or ripple designs. Combining different shapes and colors can give your project a creative, eclectic look.


