A Strawberry Mug Rug – PATTERN is a delightful and charming project for those who love quilting and sewing. This type of pattern is designed to help you create a small, decorative piece of fabric art that combines both practicality and beauty. If you enjoy crafting and want to make something that will add a personal touch to your kitchen or living space, this project is perfect for you. Whether you’re a beginner or an experienced crafter, this guide will walk you through every step of the process, giving you all the information you need to create your own beautiful strawberry-themed mug rug.
A mug rug is a small quilted mat that can be used under a cup or mug to protect your furniture from heat and spills. It’s the ideal project for showing off your sewing skills while adding a fun and functional accessory to your home. The Strawberry Mug Rug – PATTERN brings a pop of color and sweetness to any table setting, and it can easily be customized to fit your style or match your existing decor.
In this article, we will dive deep into how you can create your own Strawberry Mug Rug using a pattern that guides you through every detail. From fabric selection to sewing techniques, we’ll cover everything you need to know to bring this creative project to life. By the end of this guide, you’ll have a charming piece that’s perfect for gifting, selling, or using in your own home.
1. Understanding the Basics of a Strawberry Mug Rug
Before you start, it’s important to understand what a Strawberry Mug Rug – PATTERN entails. A mug rug is typically smaller than a placemat, usually measuring about 6 to 8 inches in width and 8 to 10 inches in length. The strawberry theme adds a whimsical, fruity touch to your creation, making it perfect for summer or as a unique gift. These rugs not only serve as practical items but also as small pieces of art.
SEE OTHER FACE PATTERNS HERE!
When looking at a pattern, you’ll find detailed instructions on how to cut your fabric pieces, stitch them together, and add any decorative touches, such as embroidery or applique. Patterns for mug rugs typically come with a step-by-step guide that makes the entire process more manageable, even for beginners. Most Strawberry Mug Rug – PATTERN designs will also incorporate simple quilting techniques that add texture to the finished product, giving it a more polished and professional look.
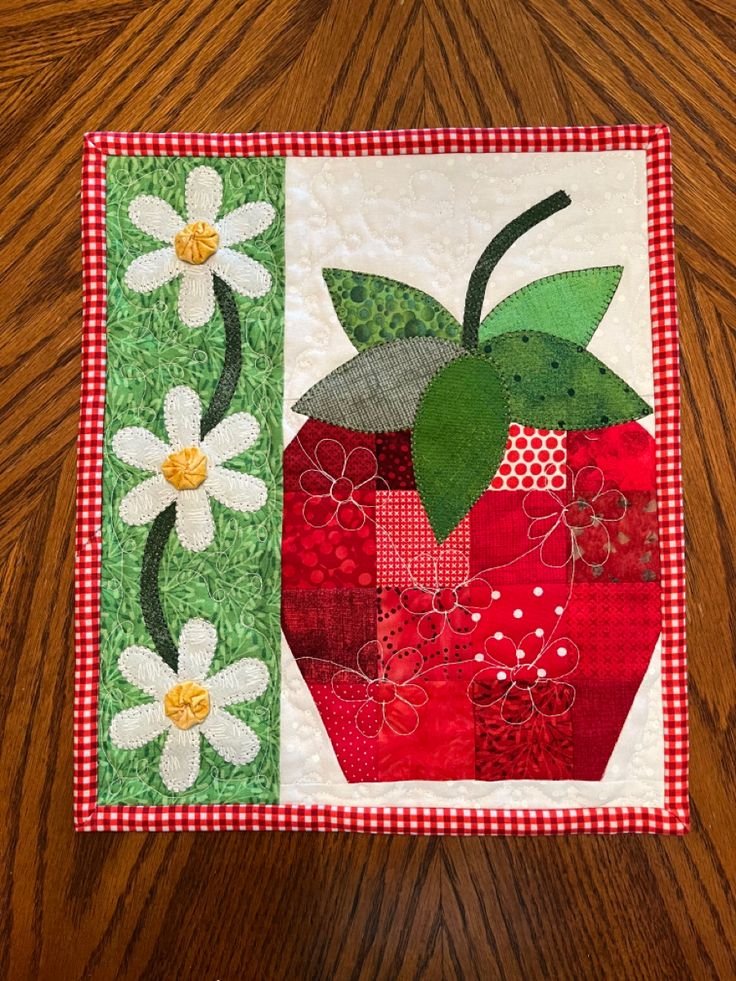
It’s also important to consider the type of fabric you’ll use for your project. Cotton is the most common choice due to its durability and ease of use. Choose fabric in bright colors to enhance the strawberry theme, such as red, green, and white. You’ll also need some batting for the interior of the rug, which provides cushioning and structure. Lastly, a backing fabric is necessary to complete your mug rug.
2. Choosing the Right Materials for Your Strawberry Mug Rug
Choosing the right materials is crucial for creating a Strawberry Mug Rug – PATTERN that will not only look great but also stand the test of time. The fabric you select will play a huge role in how your rug turns out. As mentioned earlier, cotton fabric is the most popular choice for quilting, but there are a variety of fabrics that can work well, including linen or even felt.
The key to a successful project is selecting high-quality materials. For the strawberry design, you will need at least three types of fabric: one for the strawberry body (usually red), one for the leaves (green), and one for the background (which could be any color you prefer, although light or neutral tones work best). You will also need batting for the interior, which can be polyester or cotton. Choose batting that provides enough thickness to create a soft but firm surface.
When it comes to tools, having the right sewing machine and accessories will make the process much smoother. Make sure your sewing machine has a walking foot for quilting, as this helps the fabric feed evenly through the machine. You will also need needles appropriate for quilting, as well as thread that complements your fabric choices.
For finishing touches, you might want to include embroidery floss or fabric paint to add tiny details to your strawberries, such as seeds or outlines. Additionally, you can opt for a contrasting color for the quilt binding, which will give your mug rug a neat and finished look.
3. Step-by-Step Guide to Creating Your Strawberry Mug Rug
Now that you understand the materials you need and the basic concept of a Strawberry Mug Rug – PATTERN, let’s dive into the step-by-step instructions. Follow these simple steps to create a beautiful and functional mug rug that will brighten up any space.
Step 1: Prepare Your Fabrics
Start by cutting your fabrics into the required shapes. You will need a rectangle or square piece for the main rug, plus smaller pieces for the strawberries and leaves. If your pattern includes templates for the strawberries, cut them out carefully to ensure precise stitching. Don’t forget to cut your batting and backing fabric to match the size of the rug.
Step 2: Assemble the Strawberries
Place the strawberry pieces (red fabric) onto the background fabric, arranging them in a pleasing pattern. Use a fabric adhesive or pin them in place before stitching them down. Once positioned, sew around the edges of each strawberry, either using a straight stitch or a decorative stitch for extra flair. Add the green fabric pieces to form the leaves at the top of each strawberry. You can also add tiny embellishments such as small seed-like stitches using embroidery floss for extra detail.
Step 3: Quilt the Mug Rug
Now that your strawberries are sewn onto the background, it’s time to quilt. Layer the quilt top (the side with the strawberries), batting, and backing fabric together. Pin or baste the layers to hold them in place. Then, using your walking foot, sew through all three layers to create a quilted effect. You can quilt in straight lines, zig-zags, or any pattern that you like.
Step 4: Attach the Binding
To finish your mug rug, trim any excess fabric from the edges and add the quilt binding. Fold the edges of the binding over the raw edges of the rug and sew them down securely. This not only reinforces the rug but also gives it a clean, finished look.
Step 5: Final Touches
Once the binding is in place, inspect your Strawberry Mug Rug – PATTERN for any loose threads or imperfections. You can hand-stitch or machine-stitch any small details or repairs. Your strawberry mug rug is now ready to be used!
4. Tips for Customizing Your Strawberry Mug Rug
While the Strawberry Mug Rug – PATTERN provides a basic structure, there are several ways you can customize your creation to make it truly unique. Customization is a great way to personalize your mug rug and give it your own flair.
Tip 1: Play with Colors
Experiment with different colors for the strawberries, leaves, and background fabric. You could create a more subtle design by using pastel shades or opt for bold, vibrant colors for a striking look. You can even incorporate prints or patterns into your strawberry rug to add more texture and interest.
Tip 2: Add Embellishments
If you want to make your mug rug extra special, add embellishments like rickrack, buttons, or lace. You can sew small buttons in the center of the strawberries to mimic seeds, or add a decorative border to the edges of the rug.
Tip 3: Mix Up the Layout
The pattern might include specific instructions for the placement of strawberries, but you can experiment with different arrangements. Consider adding more strawberries, fewer strawberries, or a completely different arrangement of elements to fit your taste.
Tip 4: Use a Different Shape
Instead of the traditional rectangular or square shape, you could try a different shape for your mug rug, like a circle or even a heart, to make it stand out more. This adds a creative twist to your project.
Tip 5: Incorporate Applique
Adding applique techniques, like creating a fabric flower or another fun design element, can elevate your strawberry mug rug and add another layer of detail. Applique works particularly well with the strawberry design, allowing for a more 3D effect.
Tip 6: Experiment with Quilting Styles
You don’t have to stick to the traditional quilted look. Experiment with free-motion quilting to create swirls, loops, or any other design you prefer. This can make your mug rug even more one-of-a-kind.
FAQ about Strawberry Mug Rugs
1. What is a mug rug used for?
A mug rug is a small, quilted mat that serves as a coaster for a cup or mug. It can also be used as a decorative item for your kitchen or coffee table.
🌟Join our exclusive Quilt broadcast list on Messenger! Receive the best patterns, tips, and updates directly in your inbox. Our team is ready to send you delightful content that will inspire your projects. Don’t miss this opportunity to stay updated and create amazing pieces. Join now and be part of this passionate quilt community!✨📩
2. Can I make a mug rug without quilting?
Yes! While quilting adds texture and durability, you can also create a mug rug using only fabric piecing and simple sewing techniques if you prefer.
3. How do I care for my strawberry mug rug?
To care for your mug rug, simply wash it by hand or machine on a gentle cycle. Make sure to dry it flat to prevent distortion. For best results, use a mild detergent.
4. Can I create a mug rug with different themes?
Absolutely! While the strawberry theme is popular, you can create mug rugs with any design, such as flowers, animals, or even holiday-themed patterns.
5. Is the strawberry pattern suitable for beginners?
Yes! The Strawberry Mug Rug – PATTERN is beginner-friendly, with easy-to-follow steps that even novice crafters can manage.
6. How long does it take to make a mug rug?
It typically takes a few hours to complete a mug rug, depending on your sewing skills and the complexity of the design.
In conclusion, the Strawberry Mug Rug – PATTERN is a fun and rewarding sewing project that allows you to create a cute and functional accessory for your home. Whether you’re making it for yourself or as a gift, this project will showcase your crafting skills and add a touch of whimsy to any space. We hope you found this guide helpful, and we’d love to hear your thoughts or any suggestions you might have. Please leave a sincere comment below!


