The Striped Quarter Log Cabin Block is a timeless quilt pattern that has been a favorite for quilters worldwide. Whether you’re new to quilting or an experienced artisan, mastering this block opens doors to endless creative possibilities. In this detailed tutorial, we’ll guide you through the steps to create this beautiful quilt block, while also providing valuable tips for making it a fun and rewarding project.
Learning how to make a Striped Quarter Log Cabin Block will not only add flair to your quilting projects but also give you the chance to experiment with different fabric choices and colors. This block is designed to be simple yet striking, making it a great option for both beginners and seasoned quilters alike. So, whether you’re looking to create a cozy throw or a stunning bedspread, this pattern will be your go-to option for adding visual interest and charm.
In this tutorial, we’ll cover everything you need to know about the Striped Quarter Log Cabin Block, from the materials required to step-by-step instructions. We’ll explore the importance of fabric choices, piecing techniques, and finishing touches that will bring your quilt to life. Plus, we’ll provide helpful tips on how to incorporate this block into your larger quilt designs. Let’s get started and explore the beauty of this quilting classic!
1. Understanding the Striped Quarter Log Cabin Block
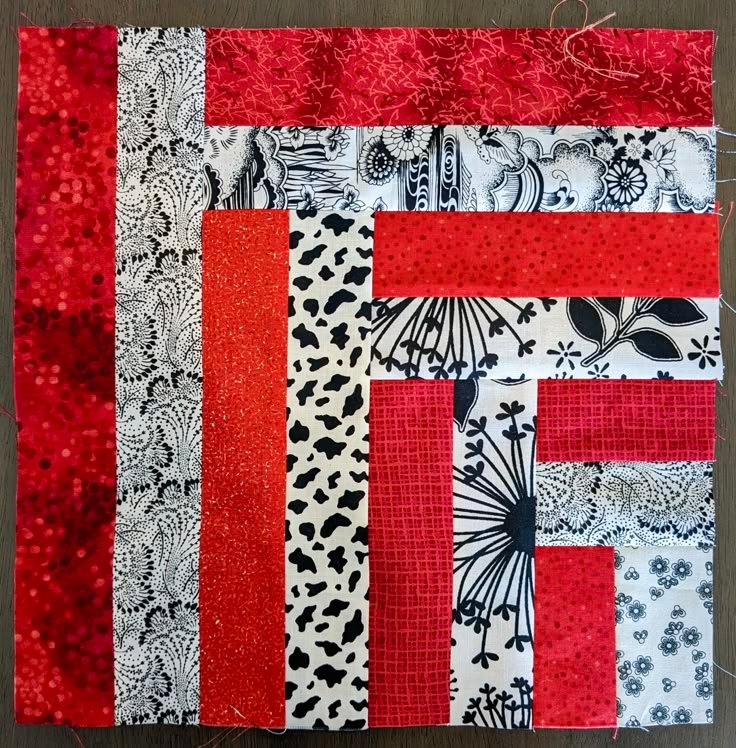
Before diving into the making of the Striped Quarter Log Cabin Block, it’s important to understand its structure and design. This quilt block is a variation of the classic Log Cabin block but with an added twist—the use of stripes. The block is traditionally divided into quarters, with each quarter featuring strips of fabric arranged in a circular pattern around a central square. The stripes create a dynamic visual effect, giving the block a sense of movement and depth.
SEE OTHER FACE PATTERNS HERE!
To start, you’ll need to choose the fabric strips for each quarter. The beauty of the Striped Quarter Log Cabin Block lies in its versatility, so feel free to mix and match different colors, patterns, and widths of stripes. Some quilters prefer a monochromatic scheme, while others like to create bold contrasts by using complementary colors. Keep in mind that the arrangement of stripes will play a major role in how the final block appears, so take your time to experiment with different combinations.
As you work through this pattern, remember that the key to achieving the perfect Striped Quarter Log Cabin Block is precision. Each strip must be sewn evenly and aligned correctly, so take care when cutting and stitching your fabric. A ruler and rotary cutter will help ensure that your strips are consistent in size. With a little patience and practice, you’ll soon master the art of creating this beautiful quilt block!
2. Gathering Materials for Your Striped Quarter Log Cabin Block
To make a Striped Quarter Log Cabin Block, you’ll need to gather a few essential materials. The right fabrics and tools are crucial to achieving a professional-looking result. Here’s a list of the basic materials you’ll need for this project:
- Fabric strips: Choose several fabrics with different patterns and colors for your stripes. These can be solid colors or prints, depending on the look you want to achieve.
- Central square: You’ll need a square of fabric for the center of your block. This is often a solid color or a contrasting pattern to make the block stand out.
- Rotary cutter and mat: These tools are essential for cutting your fabric strips to the correct size.
- Quilting ruler: A quilting ruler helps you measure and cut fabric strips accurately.
- Sewing machine: A basic sewing machine will suffice for this project, but make sure to use a quarter-inch foot for precise seams.
- Thread: Choose a thread color that complements your fabric choices. A neutral color is often a good choice, but you can also match it to one of your fabrics.
Having these materials on hand will make the entire process much smoother. Take your time to select fabrics that complement each other, and don’t be afraid to experiment with various combinations to create a unique design. The Striped Quarter Log Cabin Block offers endless possibilities for creativity!
3. Step-by-Step Instructions for Creating a Striped Quarter Log Cabin Block
Now that you have a basic understanding of the materials and design, let’s dive into the step-by-step process of creating your Striped Quarter Log Cabin Block. This section will guide you through each stage of the project, from cutting your fabric to piecing the block together.
Step 1: Cutting Your Fabric Strips
Start by cutting your fabric strips. The width of each strip will depend on the size of your block and your personal preference. For a traditional look, cut the strips at 2 inches wide. If you prefer a more modern aesthetic, you can adjust the strip width to your liking.
Step 2: Cutting the Central Square
Cut a square of fabric for the center of the block. This square should be a contrasting color or pattern to make it stand out. Typically, a 3-inch square works well, but you can adjust the size based on the overall dimensions of your block.
Step 3: Assembling the First Quarter
Begin by attaching the first strip to one side of the central square. Use your sewing machine to stitch it in place, then press the seam open. Continue adding strips to each side of the square, making sure to align them properly. Keep in mind that the strips should be sewn in a clockwise or counterclockwise direction for a consistent look.
Step 4: Completing the Other Quarters
Repeat the process for each of the remaining three quarters of the block. You’ll follow the same technique, adding fabric strips to each side of the central square in a circular pattern. As you add more strips, the block will begin to take shape. Make sure each strip is sewn straight and the seams are pressed neatly.
Step 5: Trimming the Block
Once all the strips are sewn on, trim the block to the desired size. Use a quilting ruler and rotary cutter to ensure that the edges are straight and even.
Step 6: Final Touches
After trimming, your Striped Quarter Log Cabin Block is complete! If you’re making multiple blocks for a quilt, repeat this process until you have the desired number of blocks. Then, you can join them together to form a beautiful quilt top. Don’t forget to add a border if desired for extra flair.
4. Tips for Success with the Striped Quarter Log Cabin Block
While creating the Striped Quarter Log Cabin Block is relatively straightforward, there are several tips and tricks that can help you achieve a polished and professional result. Here are some of the best practices to keep in mind:
1. Choose Fabrics Carefully
The fabric you select plays a major role in the final appearance of your quilt block. Bold, contrasting colors will create a striking effect, while soft, harmonious colors can give a more subtle look. Don’t be afraid to experiment with different prints and textures, but ensure that the fabrics complement each other to avoid overwhelming the design.
2. Keep Your Strips Even
Consistency is key when creating the Striped Quarter Log Cabin Block. Make sure each fabric strip is cut to the same width and sewn evenly. Using a rotary cutter and quilting ruler will help you achieve uniformity.
3. Press the Seams
Pressing your seams as you go along will help the block maintain its shape and make your quilting easier. Use a hot iron and press the seams open or to one side, depending on your preference.
4. Experiment with Color Placement
Don’t be afraid to play around with the placement of colors and patterns within your block. For example, placing darker colors near the center and lighter colors on the outer edges can create depth and dimension.
5. Add Embellishments
Once you’ve completed your Striped Quarter Log Cabin Block, consider adding embellishments such as embroidery, applique, or decorative stitching. These details can enhance the visual appeal of the block and make it even more unique.
6. Keep Practicing
Like any quilting technique, the more you practice, the better your blocks will become. If you’re new to this pattern, take your time and don’t rush through the process. With each block you make, you’ll gain more confidence and improve your skills.
FAQ – Frequently Asked Questions
Q1: How do I know what size to cut my fabric for the Striped Quarter Log Cabin Block?
A1: The size of your fabric strips depends on the desired finished size of the block. Typically, 2-inch strips work well, but you can adjust the size based on your design. Be sure to measure your block and cut your fabric strips accordingly.
🌟Join our exclusive Quilt broadcast list on Messenger! Receive the best patterns, tips, and updates directly in your inbox. Our team is ready to send you delightful content that will inspire your projects. Don’t miss this opportunity to stay updated and create amazing pieces. Join now and be part of this passionate quilt community!✨📩
Q2: Can I use different fabric types for the Striped Quarter Log Cabin Block?
A2: Yes! You can use any fabric type you like, such as cotton, linen, or even flannel. However, cotton is the most commonly used fabric for quilting due to its durability and ease of handling.
Q3: How do I join multiple blocks together to make a quilt?
A3: Once you have completed several blocks, you can join them using a basic quilting technique. Simply align the edges of the blocks and sew them together, making sure to match the seams. You can then add a border or binding to finish the quilt.
Q4: Can I add more colors to my Striped Quarter Log Cabin Block?
A4: Absolutely! The Striped Quarter Log Cabin Block is highly versatile, and adding more colors can make your design even more striking. Experiment with different fabrics and combinations to create a block that suits your style.
Q5: How can I make my Striped Quarter Log Cabin Block more complex?
A5: If you’re looking for a more intricate design, consider using smaller strips, adding more quarters, or incorporating other quilt blocks into your project. You can also experiment with different piecing techniques to create unique patterns within the block.
The Striped Quarter Log Cabin Block is a fantastic project for quilters of all skill levels. With its simple construction and striking design, it offers endless creative possibilities. By following this tutorial, you’ll be able to create beautiful quilt blocks that can be incorporated into larger quilts or used as standalone pieces. We hope this guide has inspired you to start your own Striped Quarter Log Cabin project.
We’d love to hear your thoughts on this tutorial! Please leave a sincere opinion or any suggestions you might have in the comments section below. Happy quilting!


")