Creating a crochet blanket with cars is an exciting and creative project that combines the warmth and comfort of a crochet blanket with the playful charm of a car-themed design. Whether you are an experienced crocheter or just starting your crochet journey, this tutorial will guide you step by step in creating your very own car-themed crochet blanket. With a bit of patience, a dash of creativity, and the right tools, you will be able to make a cozy and fun piece for any child’s room or a unique gift for a loved one.
In this Crochet Blanket With Cars tutorial, you will learn how to craft a beautiful and functional blanket using basic crochet techniques combined with a fun car motif. We’ll cover everything you need to know, from choosing yarn and hooks to mastering the necessary stitches and assembling the blanket. Along the way, we’ll also provide helpful tips and tricks to ensure your project turns out perfect.
Crocheting a blanket might seem daunting, but breaking it down into manageable steps makes the process much more approachable. You don’t need to rush; this is about enjoying the process, watching your creation grow, and, most importantly, adding your own personal touch. So grab your yarn, hook, and let’s dive into this fun crochet blanket with cars tutorial!
1. Choosing the Right Yarn and Hook
Before you begin, it’s essential to select the correct materials for your crochet blanket. For a crochet blanket with cars, you’ll need a soft, durable yarn that can handle a lot of wear and tear, especially if it’s meant for a child’s room or for use on a couch. You can choose between different types of yarns, such as cotton or acrylic, but acrylic yarn is often preferred for blankets due to its affordability and easy care.
DISCOVER MORE FREE PATTERNS HERE!
When choosing yarn, it’s also important to consider the weight of the yarn. For a blanket, a medium weight yarn like worsted weight yarn works well, as it’s thick enough to keep you warm but not too heavy. The color options are another factor to think about – you’ll want to pick colors that will complement the car designs you plan to crochet.
Once you’ve selected your yarn, choosing the right crochet hook size is equally important. Typically, for worsted weight yarn, a 5.5mm (I-9) crochet hook works best. However, you should always check the recommended hook size on your yarn label to ensure the best results.
Having the right yarn and hook is the foundation of your project. This choice will impact the overall texture, comfort, and appearance of your finished crochet blanket with cars. So take the time to choose wisely!
2. Mastering Basic Crochet Stitches
Now that you’ve chosen your materials, it’s time to start crocheting! In this section, we’ll go over the basic crochet stitches needed for creating your crochet blanket with cars. Don’t worry if you’re not yet familiar with these stitches – they are easy to learn and will become second nature with practice.
The most basic stitch for any crochet project is the chain stitch, which forms the foundation of your project. To create your starting chain, wrap the yarn around the hook and pull it through to create a loop. Keep repeating this until you have a chain of the desired length.
Once you’ve completed your chain, the next stitch you’ll need to master is the single crochet stitch. This stitch is perfect for creating a tight, sturdy fabric for your blanket. To do a single crochet stitch, insert your hook into the next stitch, yarn over, and pull through. Then yarn over again and pull through both loops on your hook. This creates a solid fabric that’s perfect for a blanket.
Finally, you’ll need the slip stitch to join your car designs together or to finish off the ends of your project. The slip stitch is simple to execute – just insert your hook into the stitch, yarn over, and pull the yarn through both the stitch and the loop on your hook.
By mastering these basic stitches, you will have all the tools necessary to complete your crochet blanket with cars. Practice these stitches until you feel comfortable with them – they are the building blocks for your entire project.
3. Designing the Car Motif
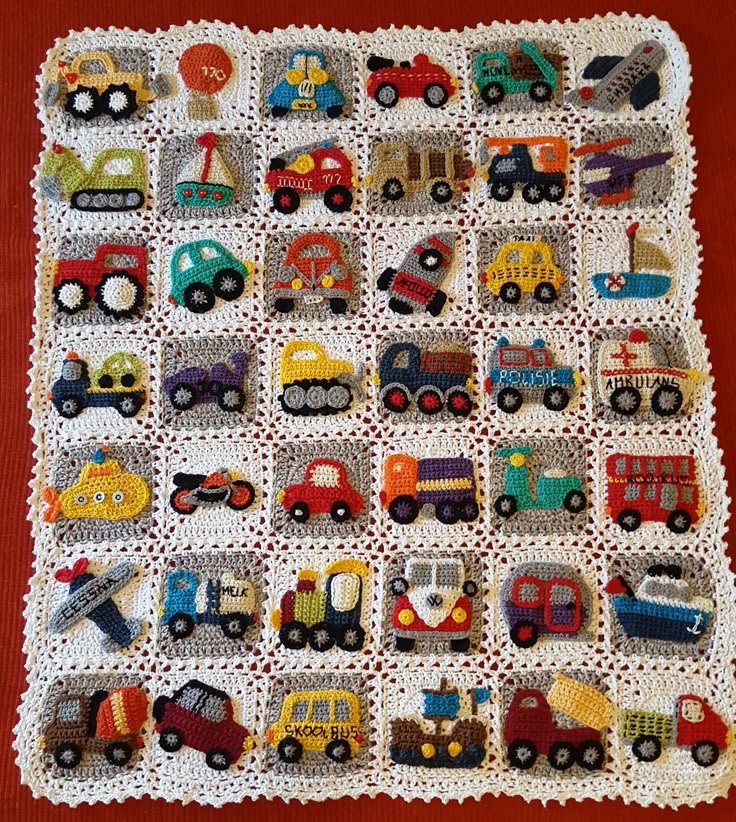
The key to making your crochet blanket with cars truly unique is designing the car motifs. You can either create your own car designs or follow pre-made patterns. Either way, the process involves crocheting small car shapes that will later be incorporated into your blanket.
Start by crocheting the basic shape of a car. You’ll typically begin with a foundation chain, followed by working rows of single crochet stitches to build the body. To create the wheels, you’ll crochet small circles using the magic ring technique. Once the car body and wheels are completed, sew or join the pieces together using a slip stitch or whip stitch.
You can get creative with your car designs – experiment with different colors for the car body and wheels. You can also add extra details, such as windows, headlights, and bumpers, using contrasting yarn colors. If you’re feeling adventurous, you could even create different car models (e.g., sports cars, trucks, and sedans) to give the blanket variety and fun.
Once you have a few car motifs finished, arrange them in the layout that you want for your blanket. You can place them randomly or in rows, depending on the effect you’re going for.
Creating the car motif adds a playful, personalized touch to your crochet blanket with cars. It’s an opportunity to showcase your creativity and create something that is both functional and fun.
4. Assembling Your Blanket
After completing your car motifs, the final step is assembling the blanket. This process involves joining all of the individual pieces together and creating the overall shape of the blanket. Start by laying out the car motifs in the pattern you desire, keeping in mind the overall size of your blanket.
To attach the car motifs, use a slip stitch or whip stitch to sew the pieces together. Take care to align the edges of each motif neatly to maintain the structure and flow of the design. As you attach the pieces, be sure to weave in any loose ends to keep the blanket looking clean and tidy.
Once the motifs are all sewn together, you can add a border around the edges of the blanket to give it a finished look. A simple scalloped edge or shell stitch works well for a clean, polished border.
Finally, after assembling the blanket, take a moment to admire your work! Your crochet blanket with cars is now complete and ready to be used. It’s perfect for cuddling up on the couch, adding warmth to a bed, or as a gift for someone special.
Frequently Asked Questions
1. Can I use different types of yarn for my crochet blanket?
Yes, you can use different types of yarn, but it’s best to stick to yarns that are soft, durable, and machine washable, especially if the blanket is intended for a child. Acrylic yarn is a popular choice for blankets, as it’s both affordable and easy to care for.
2. How long does it take to make a crochet blanket with cars?
The time it takes to make a crochet blanket depends on your experience, the size of the blanket, and the complexity of the car motifs. On average, it can take anywhere from a few days to a few weeks to complete a blanket.
3. Can I adjust the size of the blanket?
Yes, you can easily adjust the size of your blanket by adding or removing rows of motifs. Simply follow the pattern and add more motifs for a larger blanket or reduce them for a smaller size.
4. How do I care for my crochet blanket?
To keep your crochet blanket looking great, follow the care instructions for the yarn you used. Most acrylic yarn blankets can be machine washed and dried, but it’s always best to check the label for specific instructions.
5. Can I add other designs to my crochet blanket?
Absolutely! You can add any other designs you like, such as flowers, animals, or geometric patterns. Let your imagination run wild and make the blanket truly your own.
INSPIRATION VIDEO
Conclusion
In this Crochet Blanket With Cars tutorial, we’ve covered everything you need to know, from choosing the right yarn and hook to mastering basic crochet stitches and assembling your finished blanket. We hope this guide has helped you start your creative journey and inspired you to add a playful, car-themed design to your next crochet project.
If you’ve followed the steps carefully, you now have a beautiful, cozy, and fun crochet blanket that’s perfect for any child or as a charming addition to your home. Please share your thoughts and any suggestions you have for future tutorials – we love hearing from you! Happy crocheting!