If you’re looking to add a touch of charm to your home décor or craft a seasonal gift, the Bunny Coaster – Pattern is the perfect project. This cute and functional creation not only brings joy to any table setting but also offers a delightful way to explore your creativity through crochet or sewing. Whether you’re a beginner or an experienced crafter, a Bunny Coaster – Pattern is a fun and rewarding craft that you can personalize to your heart’s content.
Using a Bunny Coaster – Pattern allows you to create pieces that are both decorative and practical. They serve as lovely additions to Easter tables, spring-themed gatherings, or simply as year-round accents for those who adore whimsical animals. Because these patterns often come in a variety of styles—from minimalist outlines to more detailed, textured designs—you’re sure to find one that matches your taste and skill level.
In this article, we’ll guide you through everything you need to know about the Bunny Coaster – Pattern, from understanding the types of materials commonly used, to learning how to read a pattern, and exploring variations to spark your inspiration. Get ready to dive into a world of cozy, handmade charm.
1. Understanding the Bunny Coaster – Pattern
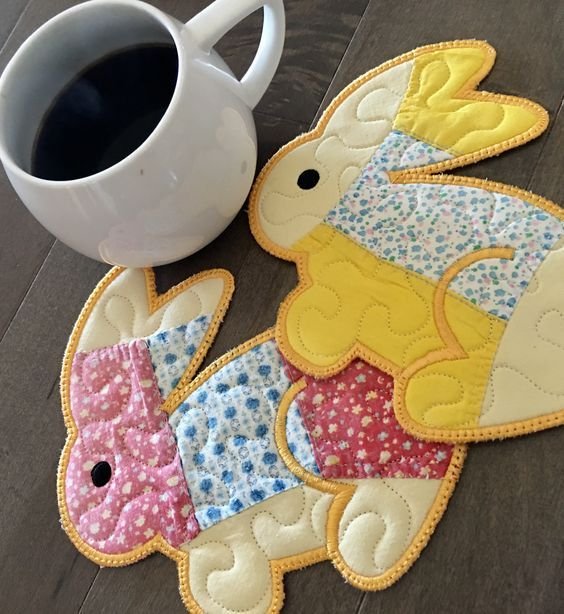
A Bunny Coaster – Pattern is a crafting template, typically in crochet, knit, or fabric, that guides you in creating bunny-shaped coasters. These patterns can range from simple flat designs to more intricate shapes with ears, whiskers, and embroidered eyes.
SEE OTHER FACE PATTERNS HERE!
The purpose of these patterns is not only decorative. They protect surfaces from heat and moisture while adding an adorable touch to your space. Many crafters use leftover yarn or fabric scraps, making this project eco-friendly and budget-conscious.
There are two popular styles: flat and three-dimensional. Flat patterns are easier and quicker to make, perfect for beginners. On the other hand, 3D patterns offer more creative flair and are ideal for gifts or seasonal displays.
Most Bunny Coaster – Pattern guides are beginner-friendly. They include step-by-step instructions, often with illustrations or video links. This makes the process enjoyable even for those who are new to crafting.
Crocheted coasters typically use basic stitches like single crochet, double crochet, and slip stitch. Meanwhile, fabric versions may involve cutting out bunny silhouettes and stitching the edges by hand or machine.
The versatility of these patterns allows for personalization. You can experiment with yarn colors, eye styles, ear shapes, and even add embroidered initials to make each coaster unique.
2. Materials You Need to Create Your Bunny Coaster – Pattern
Before you begin crafting your Bunny Coaster – Pattern, it’s important to gather the right materials. Choosing quality supplies ensures a smoother crafting process and a more polished final product.
For crocheted versions, you’ll need yarn—cotton is best because it’s absorbent and easy to clean. You’ll also need a crochet hook suited to your yarn weight, typically 3.5mm to 4.5mm for most coaster patterns.
Fabric coasters require cotton fabric, felt (optional for ears), scissors, thread, a sewing needle or machine, and a printable or drawn bunny pattern. Iron-on interfacing may also help to give the coaster a firmer shape.
Embellishments like safety eyes, embroidery thread, or buttons can add personality to your bunny. These small details bring your Bunny Coaster – Pattern to life.
Stuffing is optional. Some 3D patterns call for light filling in the ears or body to create a more tactile design, while others keep it flat for practicality.
Glue guns can be used for no-sew versions, although these are more decorative than functional. For coasters that will see regular use, sewing or crocheting is best for durability.
Don’t forget finishing tools like a tapestry needle for weaving in yarn ends or pinking shears for cutting fabric with a clean edge. These small tools make a big difference in the final look.
3. Creative Ideas and Variations for Your Bunny Coaster – Pattern
The beauty of a Bunny Coaster – Pattern lies in its customizability. Whether you’re making one for yourself or giving it as a handmade gift, the options for personalization are endless.
Consider creating a pastel color set for Easter, with different shades of pink, yellow, lavender, and blue. These work beautifully as a holiday table accent or as part of a seasonal gift basket.
Want to go beyond the holidays? Use modern or neutral tones like cream, taupe, or navy to keep your bunny coaster stylish all year round. Add a little gold thread for a touch of elegance.
Personalize each coaster with initials, a little heart, or even a small flower. This is a great idea for party favors or housewarming gifts, making each piece feel special and one-of-a-kind.
You can also turn your Bunny Coaster – Pattern into a teaching moment by letting kids choose colors and help with simple steps like gluing or arranging pieces. It’s a fun way to introduce crafting to younger ones.
Make a seasonal set—not just for Easter. Use Halloween colors and add a little hat for fall, or snowflakes and scarves for a winter-themed bunny coaster collection.
Don’t forget functional upgrades, like adding a cork backing for extra heat protection or using waterproof fabric if your coasters will be exposed to drinks with condensation.
4. Tips for Selling or Gifting Your Bunny Coaster – Pattern Creations
If you love crafting and want to share your creations, your handmade Bunny Coaster – Pattern designs can become popular gifts or even a small business product. Presentation is key.
Packaging matters. Wrap your coasters with a ribbon or place them in eco-friendly boxes. Add a tag that includes care instructions and a short note about your crafting process to give it a personal touch.
Make themed sets—three or four coasters tied together in seasonal or color-coordinated bundles. These make appealing items for craft fairs, Etsy shops, or local boutiques.
Use social media platforms like Instagram or Pinterest to showcase your designs. Post pictures of the process, behind-the-scenes shots, and finished products. Don’t forget to use hashtags like #BunnyCoasterPattern, #HandmadeHome, and #CozyCrafts.
Offer customization for buyers—let them choose colors or add initials. This adds value and makes the product more desirable as a gift.
Keep your costs low by buying supplies in bulk or using leftover materials from other projects. This ensures you can price your products competitively while still making a profit.
Always ensure that the patterns you use for commercial sales allow for selling finished items. Many designers are fine with this, as long as you credit them properly—check their terms before listing your coasters for sale.
🌟Join our exclusive Quilt broadcast list on Messenger! Receive the best patterns, tips, and updates directly in your inbox. Our team is ready to send you delightful content that will inspire your projects. Don’t miss this opportunity to stay updated and create amazing pieces. Join now and be part of this passionate quilt community!✨📩
FAQ – Bunny Coaster – Pattern
Q1: Is a Bunny Coaster – Pattern beginner-friendly?
Yes! Most patterns are designed with beginners in mind, using basic stitches and simple shapes.
Q2: What kind of yarn is best for crocheted bunny coasters?
Cotton yarn is ideal due to its absorbency, durability, and ease of washing.
Q3: Can I machine-wash my bunny coaster?
If crocheted with cotton or sewn with machine-washable fabric, yes. Just avoid embellishments that may come loose.
Q4: How long does it take to complete one coaster?
Beginners might take 1–2 hours. Experienced crafters can finish in under an hour, depending on the pattern’s complexity.
Q5: Can I sell items made from a Bunny Coaster – Pattern?
Yes, in most cases, especially if the pattern allows for commercial use. Always check the copyright notice.
Q6: Where can I find good Bunny Coaster – Pattern templates?
Etsy, Ravelry, and crafting blogs offer a wide range of free and paid templates.
Q7: Can I use felt instead of fabric or yarn?
Absolutely! Felt is a great option for a quick no-sew version, especially for decorative coasters.
Q8: How do I stop fabric coasters from fraying?
Use pinking shears, or stitch around the edges to reinforce them. Interfacing also helps maintain shape.
Q9: What ages are these crafts suitable for?
With supervision, kids as young as 6–8 can participate, especially in no-sew or glue-based versions.
Q10: Can I make a whole matching table set with the same pattern?
Yes! Coasters, placemats, and napkin rings can all be made using a cohesive Bunny Coaster – Pattern theme.
Conclusion
Crafting a Bunny Coaster – Pattern is a joyful experience, whether you’re making it for yourself, gifting it to someone special, or selling it as part of a handmade collection. It combines creativity, functionality, and personal expression in a single, adorable package. From learning the basics and gathering materials to customizing your own designs, the process is full of opportunities for fun and learning.
We hope this guide helped you understand how to approach your Bunny Coaster – Pattern projects with confidence and creativity. If you’ve enjoyed this article, please leave your honest opinion below and share any suggestions or experiences you’ve had making bunny coasters. Happy crafting!


