The Devoted Quilt Block – TUTORIAL is a beautiful blend of tradition and heartfelt design that speaks directly to the passion quilters feel for their craft. Whether you’re a seasoned quilter or just beginning your journey, this block will capture your attention with its elegant symmetry and deep symbolism. It’s more than just fabric and thread—it’s a symbol of love, commitment, and creativity.
This pattern is perfect for those looking to add meaning to their quilt projects. The clean lines and thoughtful construction make it ideal for memory quilts, wedding gifts, or heirloom pieces that will be cherished for years to come. The Devoted Quilt Block – TUTORIAL offers a timeless design that can be customized with your favorite fabrics to tell a personal story.
In this guide, you’ll learn everything you need to create your own Devoted Quilt Block, from fabric selection and cutting to piecing and finishing. With clear instructions and creative tips, you’ll be inspired to bring this heartfelt block to life in your own unique way.
1. Understanding the Devoted Quilt Block Design
The Devoted Quilt Block – TUTORIAL stands out because of its symbolic structure and clean aesthetic. Its design combines geometric precision with emotional meaning, often using contrast and repetition to symbolize unity and commitment.
SEE OTHER FACE PATTERNS HERE!
This block usually measures 12×12 inches, though it can be resized depending on your project. The pattern often features a central motif surrounded by mirrored triangles or squares that represent harmony and balance.
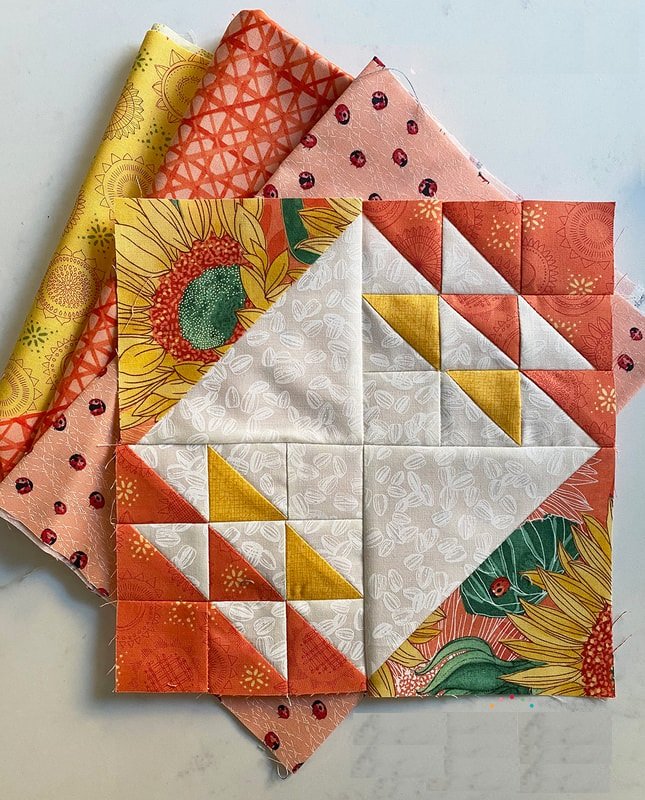
A key feature of the design is its ability to showcase fabric prints effectively. Whether you choose solids, florals, or bold patterns, the Devoted Block offers a frame that highlights each piece beautifully.
Color placement plays a big role in the visual impact of this block. Using light and dark values strategically can emphasize the block’s symmetry and create a three-dimensional effect.
Many quilters choose a limited color palette to keep the focus on the design itself, while others opt for vibrant contrasts to make a bold statement.
The versatility of the Devoted Quilt Block – TUTORIAL means it works well in single-block wall hangings, full-size bed quilts, or as part of a sampler quilt.
2. Materials and Preparation Tips
To get started with the Devoted Quilt Block – TUTORIAL, you’ll need just a few basic materials. With careful preparation, you’ll ensure a smooth sewing experience and a polished result.
You’ll need four or five different fabrics: one for the background, one or two for the central motifs, and one or two for the outer edges. Choose fabrics with complementary tones for a cohesive look.
A rotary cutter, self-healing mat, and clear quilting ruler are essential tools for accurate cuts. Precision is important in this block to maintain clean points and alignment.
Use 100% cotton quilting fabric and pre-wash it if you prefer a softer texture and minimal shrinkage. This will also help prevent color bleeding.
Always press your fabric before cutting. Crisp, flat fabric ensures that your measurements are accurate and your pieces fit together correctly.
For thread, stick with a neutral cotton thread that blends well with your fabric. A ¼” quilting foot on your sewing machine is ideal for accurate seam allowances.
It’s helpful to lay out all your pieces before sewing. This gives you a clear visual map and reduces mistakes during assembly.
3. Step-by-Step Construction Guide
Now it’s time to dive into the construction of your Devoted Quilt Block – TUTORIAL. This section provides an easy-to-follow breakdown to help you stitch with confidence.
Begin by cutting your fabric pieces. The block is made up of squares, rectangles, and sometimes half-square triangles, depending on the variation you choose.
Start by piecing the central unit. This is typically a square made from two or more fabrics, arranged to create a focal point. Use careful seam alignment to keep everything centered.
Next, sew your side units. These often involve triangle shapes or mirrored squares that extend from the central block outward. Take your time to match points.
Join the top and bottom units to the center square, and then attach the side units. Always press seams as you go—pressing open or to one side, based on preference.
Check the block for squareness after all the sections are joined. Trim the edges if necessary to maintain a consistent 12×12 size or your preferred dimension.
Repeat the process to create as many blocks as needed. Each Devoted Quilt Block adds depth and symbolism to your overall quilt layout.
4. Creative Uses and Customization Ideas
The beauty of the Devoted Quilt Block – TUTORIAL lies in its flexibility. You can adapt this pattern to suit a variety of quilt styles and occasions.
Use the block as the foundation for a memory quilt. Add photo-transfer fabric or embroidery to personalize each square with names, dates, or quotes.
Create a wedding or anniversary quilt using this block to symbolize lasting commitment. Choose fabrics in the couple’s favorite colors or meaningful prints.
Make a baby quilt with pastel versions of the block. It’s an elegant and unique alternative to traditional baby quilt patterns.
Incorporate negative space around each block to give a modern aesthetic. This approach works well in minimalist designs.
Try scrappy quilting with this block. Use fabric leftovers to create a vibrant and eclectic version that’s full of character.
Use the block for small projects too—pillow covers, tote bags, table runners, or mini wall quilts. Its versatility means it works beautifully in any format.
🌟Join our exclusive Quilt broadcast list on Messenger! Receive the best patterns, tips, and updates directly in your inbox. Our team is ready to send you delightful content that will inspire your projects. Don’t miss this opportunity to stay updated and create amazing pieces. Join now and be part of this passionate quilt community!✨📩
FAQ – Devoted Quilt Block – TUTORIAL
Q1: Is the Devoted Quilt Block beginner-friendly?
Yes. While the block has a polished and professional look, it uses basic shapes like squares and triangles, making it suitable for confident beginners.
Q2: What size is the standard Devoted Block?
Most tutorials use a 12×12 inch layout, but it can be resized depending on your project.
Q3: What fabrics are best for this pattern?
100% quilting cotton in solids, tone-on-tones, or small prints work best. Choose fabrics that offer good contrast to highlight the design.
Q4: Can I use this block in modern quilt designs?
Absolutely. The clean geometry of the block pairs beautifully with modern layouts, especially when paired with minimalist color palettes.
Q5: How can I add personal touches to this block?
Try incorporating embroidered initials, hand quilting, or meaningful fabric selections to make your quilt more personal.
Q6: Where can I find the Devoted Quilt Block pattern?
Many quilting blogs and online shops offer this pattern for free or as part of digital bundles. Be sure to download from trusted sources.
Conclusion
The Devoted Quilt Block – TUTORIAL is more than just a pattern—it’s a meaningful journey in fabric and thread. Its thoughtful design, versatility, and emotional resonance make it a favorite among quilters of all styles. Whether you’re making a single-block mini quilt or a full-sized memory masterpiece, this pattern offers beauty and purpose in every stitch.
We hope you found this tutorial helpful and inspiring. If you’ve tried this block or plan to, we’d love to hear from you! Please leave a comment below with your experience, tips, or suggestions. Your feedback helps us and other quilters keep creating with joy and devotion.


