The Sailboat Quilt Block – Tutorial is a delightful way to bring nautical charm and breezy summer vibes into your quilting projects. With its playful and timeless design, this quilt block captures the essence of calm seas, sunny days, and the freedom of sailing across open waters. Whether you’re creating a baby quilt, a beach-themed throw, or a seaside wall hanging, the Sailboat Quilt Block – Tutorial is a perfect addition to your quilting journey.
In this tutorial, we’ll explore the step-by-step process to create your own sailboat quilt block, including fabric tips, piecing instructions, and creative ideas to customize your project. Let’s set sail into the world of quilting with this charming block pattern that’s ideal for quilters of all levels.
With easy-to-follow instructions and plenty of room for personalization, the Sailboat Quilt Block – Tutorial is more than just a pattern—it’s an opportunity to create something joyful, meaningful, and perfect for summer-themed decor or gifts.
1. Why You’ll Love the Sailboat Quilt Block – Tutorial
The Sailboat Quilt Block – Tutorial offers both simplicity and style, making it a favorite among quilters who enjoy creative yet manageable projects.
SEE OTHER FACE PATTERNS HERE!
This quilt block is beginner-friendly. With basic squares, half-square triangles, and rectangles, it’s an excellent introduction to piecing for those new to quilting.
It brings a fun, nautical aesthetic to any quilt. Whether you’re going for a coastal cottage vibe or a playful children’s quilt, the sailboat design fits beautifully.
It’s a great stash buster. You can use scraps of blue, white, red, or any colors that remind you of the sea, skies, and sails.
The block is versatile. Use it as a repeating motif in a larger quilt, or as a centerpiece for pillows, placemats, or mini quilts.
You can easily customize it. Change the sails’ shape, add waves or sun motifs, or vary the boat’s size to match your vision.
It’s quick to sew. One block can be finished in under an hour, making it ideal for weekend projects or last-minute handmade gifts.
2. Materials You Need to Make the Sailboat Quilt Block
Before you begin sewing, gather the right materials to make your Sailboat Quilt Block – Tutorial experience smooth and enjoyable.
Choose cotton quilting fabric. You’ll need fabric for the boat, sails, background (typically sky blue or white), and water (navy or turquoise works great).
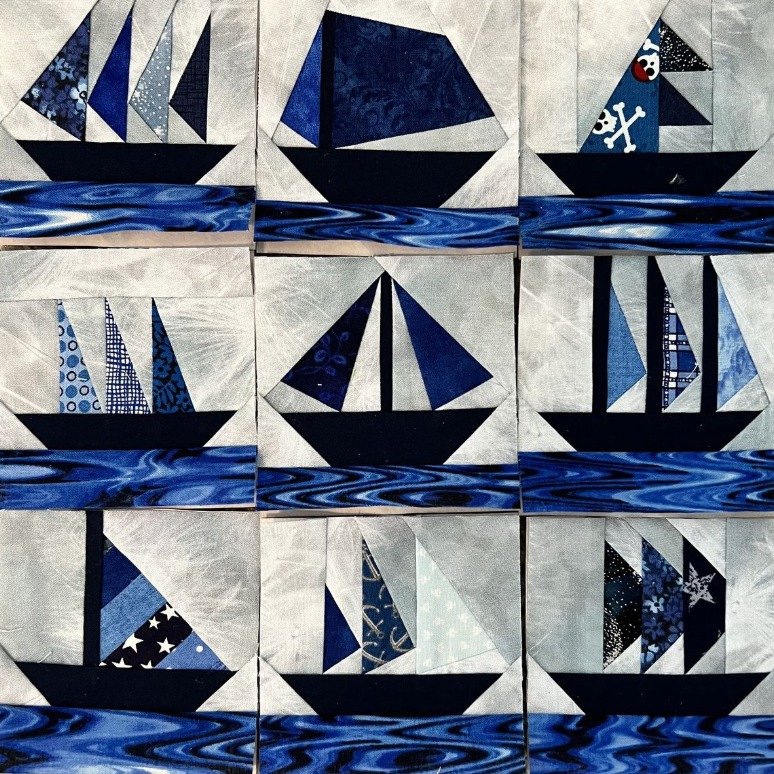
For a classic look, go with navy blue for the boat, white sails, and a pale blue sky. For a playful or modern version, try bold prints or bright solids.
You’ll need fabric pieces in the following approximate sizes (per block):
-
(2) 2.5″x2.5″ squares for sails
-
(2) 3.5″x3.5″ squares for background
-
(1) 2″x5″ rectangle for the boat base
-
(1) 4.5″x2.5″ strip for the water or waves
-
(1) 5″x5″ square for optional embellishments
A sewing machine, rotary cutter, self-healing mat, quilting ruler, thread, iron, and pins are essential tools.
You might also want fusible interfacing or fabric markers if you plan to add embellishments like sun, clouds, or birds.
Optional additions include buttons (for sun or wheels), embroidery floss for outlines, or a label for a personalized touch.
3. Step-by-Step Sailboat Quilt Block – Tutorial
Let’s walk through how to piece your own Sailboat Quilt Block – Tutorial, one step at a time. This guide is perfect for confident beginners and seasoned quilters alike.
Step 1: Cut all your fabric pieces according to your pattern or measurements. Organize them into sails, background, boat base, and water sections.
Step 2: Begin with the sails. Pair each 2.5″ sail square with a 2.5″ background square. Draw a diagonal line on the back of the background squares and sew along the line. Trim and press open to create half-square triangles (HSTs).
Step 3: Lay out your HSTs side by side, forming a triangle that resembles the sail portion. Sew the units together and press the seams toward the darker fabric.
Step 4: Add the boat base. Attach the 2″x5″ rectangle to the bottom of your sails using a 1/4″ seam allowance. Press the seam toward the boat base.
Step 5: Attach the water piece (4.5″x2.5″) beneath the boat base. This completes the horizontal layout of your block and gives the illusion of the boat floating on water.
Step 6: Add background rectangles (3.5″x3.5″) to either side of the sails for spacing. If you want a wider block or want to add a border, now is the time to add extra strips.
Step 7: Press the entire block and square it up if necessary. Make sure your seams align and that the block is the correct finished size (usually 8″x8″ or 10″x10″).
Step 8: Optional: Add decorative elements such as sun, waves, or birds using appliqué or embroidery to enhance the nautical theme.
4. Creative Ways to Use Your Sailboat Quilt Block
Once you’ve made one block, you’ll be hooked! The Sailboat Quilt Block – Tutorial opens up endless creative options for quilting projects.
Use it to create a full quilt. Alternate sailboat blocks with solid or wave-patterned fabric blocks for a coastal-inspired layout.
Make a wall hanging. Combine a few sailboat blocks with borders and add hanging loops for a summer-themed home decor piece.
Create a set of nautical placemats. Each placemat can feature one or two blocks, backed with coordinating fabric and bound with navy trim.
Design a themed baby quilt. Use sailboats in different colors or add names and dates with embroidery for a one-of-a-kind keepsake.
Sew a quilted pillow cover. One sailboat block centered with a bold border makes an eye-catching pillow perfect for summer cottages.
Use scraps from your sailboat project to make matching accessories—like a mug rug, tote bag panel, or zipper pouch.
FAQ – Sailboat Quilt Block – Tutorial
Is the Sailboat Quilt Block good for beginners?
Yes! It’s perfect for beginners, using basic piecing techniques like half-square triangles and rectangles. It’s a great way to practice precision sewing.
What size is a typical Sailboat Quilt Block?
Most versions finish at 8″x8″ or 10″x10″, but you can scale the pattern up or down to suit your project.
Do I need a special ruler to make this block?
No special ruler is needed. A standard quilting ruler and rotary cutter are enough to cut and square your fabric pieces.
Can I use printed fabrics for the sails and boat?
Absolutely! Fun prints like stripes, dots, or even nautical-themed motifs add extra personality to your sailboat.
What fabric colors work best?
Classic colors like navy, red, and white create a traditional look, while teal, coral, and gold can add a modern or playful twist.
How many blocks do I need for a full quilt?
It depends on your quilt size. For a lap quilt (50″x60″), you might use 30 blocks with sashing or alternating with solid blocks.
Conclusion
The Sailboat Quilt Block – Tutorial is a charming, beginner-friendly project that brings the spirit of adventure and coastal calm into your home. From fabric choices to final stitches, each part of this block invites creativity, joy, and a splash of summer magic.
Whether you’re quilting for a child, decorating a beach house, or simply enjoying the art of sewing, this tutorial gives you the tools and inspiration to make something truly special.
VIDEO TUTORIAL:
If you enjoyed this tutorial, leave a comment below with your thoughts or ideas for future blocks! We’d love to hear from you and see what you create. Happy quilting and smooth sailing! ⛵🧵