The Crochet Butterfly Blouse – Tutorial is a stunning and airy crochet pattern that blends elegance, comfort, and creativity. Inspired by the delicate wings of a butterfly, this blouse features openwork stitches and flowing shapes that add charm to any outfit. Whether you’re dressing up for a summer event or creating something unique for your wardrobe, this tutorial will guide you through every step of the process.
Right from the first stitch, the Crochet Butterfly Blouse – Tutorial captures your imagination. Its lightweight, breathable design makes it perfect for warm weather, while the elegant silhouette flatters all body types. Made with basic crochet techniques and a touch of flair, this project is accessible even for adventurous beginners.
In this complete guide, we’ll walk you through the materials you’ll need, the steps to follow, customization tips, and answer common questions from crafters like you. Let’s spread our wings and begin this stylish journey into the world of butterfly-inspired crochet!
1. What Makes the Crochet Butterfly Blouse – Tutorial So Popular
One of the reasons why the Crochet Butterfly Blouse – Tutorial stands out is its combination of beauty and simplicity. It’s more than just a garment—it’s wearable art. With its butterfly-inspired shape, it moves gracefully with you, adding a whimsical touch to your everyday style.
DISCOVER MORE FREE PATTERNS HERE!
The pattern uses open stitches and lacy motifs to mimic the delicate look of butterfly wings. This makes the blouse both breathable and beautiful, ideal for spring and summer days.
Another reason this blouse is so beloved is its flattering fit. It suits a wide range of body shapes and can easily be adjusted in length and width to match your preferences.
You can make it in any color to suit your personal style—pastels for a romantic look, bold hues for a statement piece, or neutrals for timeless elegance.
It’s a versatile pattern that can be worn with jeans, skirts, or even layered over dresses for a boho-chic outfit.
Finally, it’s a satisfying project. You’ll learn new techniques, enjoy the rhythm of crochet, and end up with a handmade blouse you’ll be proud to show off.
2. Materials and Tools Needed for the Butterfly Blouse
Creating the Crochet Butterfly Blouse – Tutorial requires only a few materials, most of which are likely already in your crochet stash. This is a project where choosing the right yarn and hook can make all the difference in comfort and drape.
Start with a lightweight yarn—cotton, bamboo, or a cotton-acrylic blend works best. Look for DK (double knitting) or light worsted yarn for a perfect summer feel.
A crochet hook size appropriate for your yarn is essential. Usually, a 3.5mm to 4.5mm hook will work, but check your yarn label for guidance.
You’ll need stitch markers to help keep track of pattern repeats, especially if you’re working with lace motifs or increasing in the round.
A measuring tape is handy for ensuring the blouse fits well across your bust, waist, and shoulders.
Don’t forget scissors and a yarn needle for weaving in ends and finishing your work neatly.
And most importantly—have a comfortable, well-lit space to crochet in. This pattern is as relaxing as it is rewarding.
3. Step-by-Step Instructions: Crochet Butterfly Blouse – Tutorial
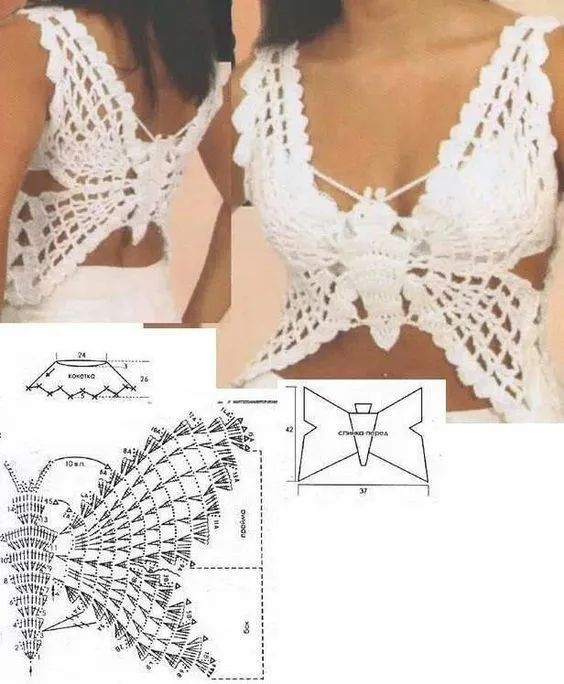
Now that you’re set up, it’s time to dive into the Crochet Butterfly Blouse – Tutorial. While there are many variations, the basic structure is often made in two identical panels joined at the sides and shoulders, with room left for armholes.
Start by creating a foundation chain the width of your desired blouse size. This could range from 90 to 140 chains depending on size and gauge.
Work a series of lacy or shell stitch rows. The butterfly effect often comes from fan-shaped stitches like double crochets grouped together in a pattern repeat.
Continue working in rows until your panel measures the desired length—usually from shoulder to hip or waist, depending on your style.
Make a second identical panel. Once both front and back panels are complete, lay them together and seam the shoulders using slip stitches or whipstitch.
Leave space for the neck opening (usually 6–8 inches) and then seam the sides, stopping around 7–9 inches from the top to create armholes.
Try it on and make adjustments. If you want a more fitted look, you can taper the sides slightly or add a tie belt. For a flowing butterfly shape, leave the body loose and open.
4. Customization Tips for the Perfect Butterfly Blouse
One of the greatest joys of the Crochet Butterfly Blouse – Tutorial is how customizable it is. With just a few tweaks, you can make a blouse that perfectly fits your personal style.
Change up the stitch pattern. Shells, fans, or mesh stitches all work beautifully and give different textures to your blouse.
Experiment with sleeve length. You can add cap sleeves, bell sleeves, or leave the armholes open for a sleeveless design.
Play with yarn color. Use ombre yarn for a gradient effect, stripes for a playful look, or solid colors for elegance.
Add edging. A picot or scallop border at the neckline or hem can give your blouse a finished, professional look.
Include ties or buttons on the back or shoulders for an extra detail or adjustable fit.
Crochet a matching butterfly appliqué and sew it onto the back or front of your blouse for an extra whimsical touch.
FAQ – Crochet Butterfly Blouse – Tutorial
Is the Crochet Butterfly Blouse suitable for beginners?
Yes! While the lacy stitches may look complicated, most versions of this blouse use basic stitches like double crochet and chains. It’s perfect for beginners ready to try something a little more decorative.
What yarn is best for the butterfly blouse?
Lightweight, breathable yarns like cotton or bamboo are ideal. They drape well and feel soft against the skin—perfect for a summer top.
Can I adjust the size of the blouse easily?
Absolutely. You can adjust both width and length by increasing the number of stitches and rows. Measure as you go to get the right fit.
Do I need to block my blouse after finishing it?
Blocking is recommended, especially with lacy stitches. It helps even out the pattern and gives your blouse a polished look.
How long does it take to make a butterfly blouse?
Depending on your speed and size chosen, it may take 2–4 days of relaxed crocheting. It’s a fun project that’s rewarding from start to finish.
Can I sell blouses made with this tutorial?
Yes, as long as the pattern allows for it. Many designers encourage handmade sales, especially if you credit the pattern source.
Conclusion
The Crochet Butterfly Blouse – Tutorial is more than just a pattern—it’s a celebration of creativity, comfort, and handmade beauty. With its light, airy structure and whimsical design, it’s the perfect project for anyone looking to expand their crochet skills and wardrobe.
By following the steps in this tutorial, you can create a blouse that’s stylish, breathable, and uniquely yours. From picking the yarn to adding your personal touches, each part of the process is an opportunity to express your style.
Have you tried making your own crochet butterfly blouse? We’d love to hear how it turned out! Leave your honest opinion or helpful suggestions below to inspire others in our crochet-loving community. 🦋🧶