The How to Crochet Travel Jewelry Pouch tutorial is perfect for crafters who love combining beauty with functionality. Whether you’re going on vacation, a weekend getaway, or simply want a stylish way to store your accessories at home, this easy-to-make crochet pouch keeps your jewelry organized, secure, and elegantly displayed.
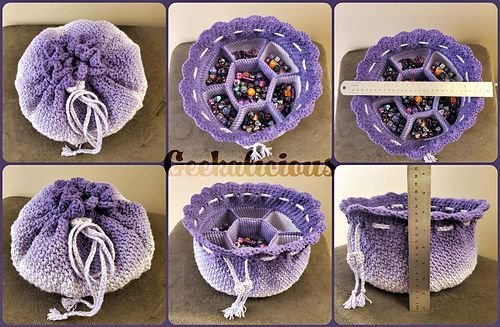
Compact and lightweight, the Crochet Travel Jewelry Pouch is designed with multiple compartments or soft dividers to protect delicate pieces such as earrings, rings, bracelets, and necklaces. Best of all, it’s a quick and satisfying project you can finish in just an afternoon, even if you’re a beginner.
In this tutorial, we’ll walk you through everything you need—from materials and stitches to tips for assembling and personalizing your pouch. With just a hook, yarn, and your creativity, you’ll have a beautiful handmade accessory that’s both practical and chic.
1. Why You’ll Love This Crochet Travel Jewelry Pouch
There are so many reasons to fall in love with the Crochet Travel Jewelry Pouch pattern. First and foremost, it’s stylish and functional. No more tangled necklaces or missing earrings at the bottom of your suitcase—this pouch keeps everything organized in one safe, soft place.
DISCOVER MORE FREE PATTERNS HERE!
The pouch is small enough to fit inside a handbag or luggage without taking up much space. Yet, it’s big enough to hold several pieces of jewelry comfortably.
This project is also beginner-friendly. It uses simple stitches and basic shaping techniques. If you know how to single crochet and slip stitch, you can absolutely make this pouch.
It’s a perfect stash buster! You’ll only need a small amount of yarn—ideal for using leftover skeins or scraps in your favorite colors.
You can also personalize it in so many ways. Choose bold colors, pastel tones, add embroidery, buttons, or lace. Make one for yourself and a few more as handmade gifts for friends and family.
Last but not least, it’s reusable, washable, and eco-friendly. You’re not only making something beautiful—you’re creating a sustainable alternative to plastic or disposable jewelry storage.
2. Materials and Tools for Crocheting Your Jewelry Pouch
To get started with the How to Crochet Travel Jewelry Pouch, you’ll need just a few affordable and easy-to-find materials. You can customize your pouch based on your yarn type and design preferences.
Yarn: Choose a soft but sturdy yarn. Cotton is ideal because it holds shape well and is gentle on jewelry. DK or worsted weight yarn works perfectly for this project.
Hook: Use a crochet hook that matches your yarn—usually between 3.5mm to 4.5mm. A tighter stitch helps protect jewelry and keeps the pouch durable.
Lining (optional): For extra structure, you can add a fabric lining. Soft felt or cotton fabric works well to reinforce the pouch and prevent small jewelry from slipping through stitches.
Drawstring: Use a crochet chain, satin ribbon, or leather cord for the drawstring closure.
Stitch markers (optional): Helpful for keeping track of rounds or sections.
Scissors and yarn needle: For finishing, weaving in ends, and assembling optional pockets or flaps inside the pouch.
Buttons, beads, or appliqués (optional): Add a decorative flair to your pouch or create compartments using stitched-in buttons or toggles.
3. Step-by-Step Instructions – How to Crochet Travel Jewelry Pouch
This pattern is worked in the round, starting from the bottom and working upward. You’ll create a simple flat circle, build up the sides, and then add the drawstring closure.
Begin with a magic ring. Work 6 single crochets (sc) into the ring and pull tight. Join with a slip stitch.
Round 2: Work 2 sc in each stitch around (12 stitches). Continue increasing in each round using standard flat circle rules (i.e., Round 3: 1 sc, inc; Round 4: 2 sc, inc) until your base circle is about 5–6 inches wide.
Once your base is complete, stop increasing and begin working even sc rounds to build the sides of the pouch. Continue for 8–10 rows or until the sides are about 3 inches tall.
To create a drawstring channel, work one round of double crochet (dc), chain 1 between each dc. This creates eyelets for the drawstring.
After the eyelet round, add 1 or 2 rounds of single crochet for a neat finish. Fasten off and weave in ends.
Make your drawstring by crocheting a chain approximately 20–24 inches long or use a ribbon or cord. Thread the string through the eyelets evenly.
Optional: Sew or crochet small pockets inside the pouch. These can hold rings or earrings separately and prevent tangling.
Now you have a complete pouch with soft sides, a secure base, and a drawstring that closes tightly to keep jewelry safe during travel.
4. Customization Ideas for a Unique Jewelry Pouch
Once you’ve mastered the basic Crochet Travel Jewelry Pouch, you can have fun customizing it to fit your personal style or gifting needs.
Color blocking is a simple yet beautiful way to make your pouch pop. Alternate colors for the base, body, and drawstring.
Add decorative edges. Scalloped or picot edging at the top adds a delicate, feminine touch.
Use variegated yarn for a multicolored effect or create stripes for a cheerful design.
Incorporate beads into the drawstring ends or stitch on small flowers or heart motifs to make your pouch truly one of a kind.
Add labels or tags for gifting—embroidered initials or crochet appliqués work great for this.
If you sew, line the inside with coordinating fabric for added polish. This helps small earrings or chains stay neatly in place.
For extra structure, use slightly thicker yarn and a tighter gauge to make the pouch more durable and supportive for larger jewelry items.
FAQ – How to Crochet Travel Jewelry Pouch
Is this project suitable for beginners?
Yes! This pattern uses basic stitches like single crochet and is worked in the round. If you’ve made a hat or pouch before, you’ll find this very approachable.
How long does it take to make?
You can complete the pouch in about 1 to 2 hours, depending on your speed and if you choose to add extra pockets or embellishments.
What size should the finished pouch be?
The standard size is around 6 inches in diameter and 3–4 inches tall. You can adjust the size by increasing or decreasing the number of rounds.
Can I wash the pouch?
Yes! If made with cotton yarn, it’s machine washable. Just air dry to preserve the shape. For pouches with lining or decorative elements, handwashing is preferred.
Can I use this pattern to make gift sets or sell them?
Absolutely. Handmade jewelry pouches make excellent gifts, especially when paired with handmade jewelry. Just be sure to credit the pattern designer if required.
Is lining necessary?
No, lining is optional. However, adding a fabric lining can give extra durability and prevent delicate jewelry from snagging on yarn.
Conclusion
The How to Crochet Travel Jewelry Pouch is a charming, useful project that brings together creativity and practicality. It’s perfect for travel, gifting, or organizing your accessories at home in a stylish, handmade way.
In just a short time and with a few basic materials, you can create a beautiful pouch that reflects your personality or the thoughtfulness of a handmade gift. From simple stitches to elegant finishing touches, this pouch proves that useful can also be beautiful.
We hope you enjoyed this tutorial! If you’ve tried making your own crochet jewelry pouch, we’d love to hear your thoughts. Leave a sincere opinion or suggestion in the comments to inspire others in the community. Happy crocheting! 🧶💍✈️