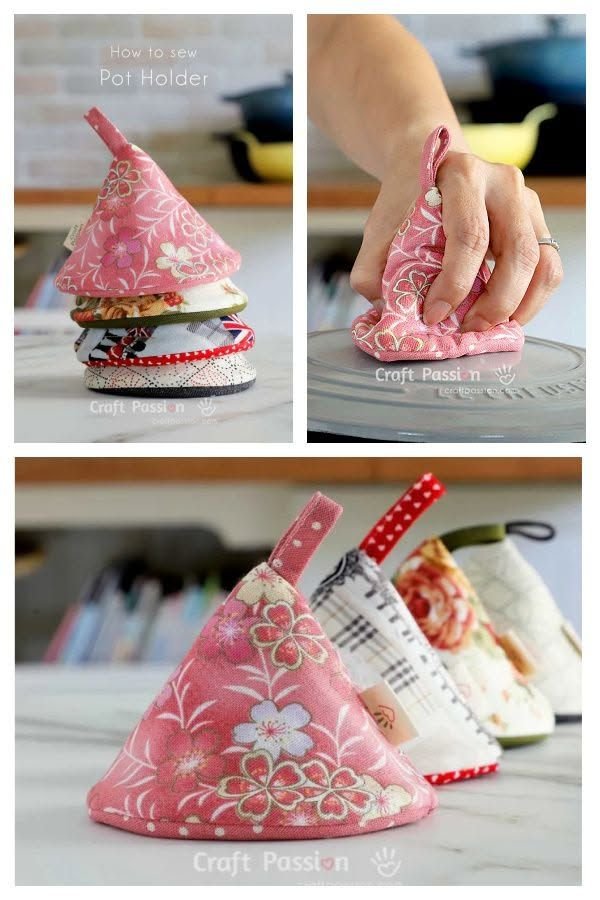
If you’re ready to bring some geometric charm into your kitchen, the DIY Triangle Pot Holder is the perfect quilting project to try. It combines functionality and creativity, offering a fresh and modern take on traditional potholders. Whether you’re a beginner exploring quilted accessories or an experienced quilter looking for a quick and fun project, this tutorial will walk you through every step.
The triangle shape isn’t just stylish—it’s also practical. The pointed ends give you better grip and coverage when handling hot pots and pans. You’ll also love how easily this project comes together using scrap fabrics or fat quarters, making it a fantastic stash-busting solution.
In this step-by-step guide, we’ll cover all the materials you need, the sewing process, and creative ideas to personalize your DIY Triangle Pot Holder. Get ready to quilt a kitchen essential that’s both beautiful and useful!
1. Why the Triangle Pot Holder is a Must-Make Project
The DIY Triangle Pot Holder is more than just a pretty kitchen accessory—it’s a practical, beginner-friendly project that offers lots of creative possibilities.
SEE OTHER FACE PATTERNS HERE!
First of all, the triangular shape sets this potholder apart from the usual round or square designs. It offers better flexibility when gripping cookware and makes the design feel more contemporary and unique.
This project is also a great introduction to quilting techniques. You’ll practice fabric layering, quilting stitches, edge finishing, and binding—all essential skills wrapped into a quick, satisfying project.
It’s also an ideal way to use fabric scraps effectively. You don’t need much material for each potholder, and the small size makes it perfect for experimenting with color combinations, patterns, or novelty prints.
Besides function and aesthetics, this potholder is a great handmade gift. You can pair it with a tea towel or baking mix and wrap it in a ribbon for holidays, birthdays, or housewarmings.
Finally, the triangle design makes it easy to create sets of matching or contrasting potholders. They’re quick enough to make several in an afternoon and versatile enough to suit any decor.
2. Materials and Tools You’ll Need
Before starting your DIY Triangle Pot Holder, gather the basic sewing supplies and choose your fabrics. This project doesn’t require anything fancy, and you can customize it easily depending on what you already have.
Materials:
-
Cotton fabric (2 different prints or solids)
-
Heat-resistant batting (like Insul-Bright)
-
Cotton batting (optional, for extra thickness)
-
Bias tape (or make your own binding)
-
Thread (matching or contrasting)
Optional Add-ons:
-
Hanging loop (ribbon, fabric strip, or twill tape)
-
Embroidery or appliqué for personalization
Tools:
-
Sewing machine
-
Iron and ironing board
-
Scissors or rotary cutter and mat
-
Pins or clips
-
Triangle template or quilting ruler
-
Fabric marker or chalk
Choosing fabrics:
Use 100% cotton for heat resistance and durability. Mix solids and prints for a fun look. Seasonal fabrics like autumn leaves, Christmas themes, or cheerful florals can be used to match the time of year.
Size tips:
You can make your triangle pot holder any size, but a common finished size is 9–10 inches per side. Use an equilateral triangle template for balanced sides.
Once you have everything ready, it’s time to sew!
3. How to Make a DIY Triangle Pot Holder – Step by Step
The construction of the DIY Triangle Pot Holder is simple, and you’ll enjoy how quickly it comes together. Follow these steps for a clean, durable finish.
Step 1: Prepare your triangle template
Use a quilting ruler or printable template to trace an equilateral triangle on paper. Each side should measure about 10″. Cut it out and use it to trace onto your fabric and batting.
Step 2: Cut your fabric and batting
-
1 triangle from your front fabric
-
1 triangle from your back fabric
-
1 triangle from heat-resistant batting
-
1 triangle from cotton batting (optional)
Step 3: Layer your materials
Stack your layers in this order:
-
Back fabric (right side down)
-
Cotton batting
-
Heat-resistant batting
-
Front fabric (right side up)
Use pins or clips to secure all the layers together.
Step 4: Quilt the layers together
Sew straight lines across the triangle—diagonally, vertically, or even in a grid pattern—to secure all layers. This helps prevent shifting and adds a decorative touch. Use a walking foot for best results.
Step 5: Trim and neaten edges
After quilting, trim the triangle edges so all layers are even. This will make binding easier and give you a cleaner final look.
Step 6: Attach binding
Use premade or homemade bias tape. Start at one corner, and carefully stitch the binding all around the triangle. Fold it over the raw edge and topstitch in place. Miter the corners for a neat finish.
Step 7: Add hanging loop (optional)
Sew a small loop into one of the corners or bind it separately and attach later. This makes it easy to hang your pot holder in the kitchen.
Once finished, give your potholder a final press with the iron, and it’s ready to use!
4. Creative Ideas and Variations for Triangle Pot Holders
Now that you’ve made your first DIY Triangle Pot Holder, there are endless ways to customize and expand on the design. Here are some ideas to spark your creativity.
Scrappy style:
Use small fabric scraps sewn together in strips or blocks to make a pieced front panel. This is perfect for reducing waste and adding charm.
Holiday themes:
Create triangle potholders for every season—pastel florals for spring, pumpkins for fall, snowflakes for winter. They also make excellent handmade holiday gifts.
Reversible design:
Use two different fabrics on each side so the potholder can be flipped for a new look. Great for kitchens with changing seasonal decor.
Mini version:
Make smaller triangles to use as mug rugs or trivets for hot pans and teapots. These are fast and fun gift ideas too!
Embellishments:
Add embroidered initials, appliqué shapes (like hearts or stars), or decorative stitching to make your potholder even more special.
Matching sets:
Sew two triangle potholders and a matching kitchen towel or fabric basket for a cohesive and charming kitchen set.
Experimenting with your fabric choices and construction techniques allows you to create a pot holder that’s as beautiful as it is functional.
🌟Join our exclusive Quilt broadcast list on Messenger! Receive the best patterns, tips, and updates directly in your inbox. Our team is ready to send you delightful content that will inspire your projects. Don’t miss this opportunity to stay updated and create amazing pieces. Join now and be part of this passionate quilt community!✨📩
FAQ – DIY Triangle Pot Holder
Can I make this potholder without a sewing machine?
Yes, but hand sewing will take longer. A sewing machine makes the quilting and binding steps much easier and faster.
What batting should I use?
Use heat-resistant batting like Insul-Bright. You can also add cotton batting for thickness but avoid polyester as it can melt under heat.
How do I make my own binding?
Cut strips of fabric on the bias (at a 45-degree angle) and fold them in half lengthwise. Press and use as you would with store-bought bias tape.
Can I wash the triangle potholder?
Yes! Use machine-washable cotton fabrics and batting. Wash in cold water and let air dry to maintain shape and durability.
What size should I make my triangle?
A triangle with 9–10 inch sides works well for an average potholder. You can scale up or down depending on your needs.
Can I sell these potholders at markets or online?
Absolutely! These make popular items for craft fairs, Etsy shops, and gift bundles. Be sure to test them for heat resistance first.
Conclusion
The DIY Triangle Pot Holder is a simple yet creative quilting project that blends practicality with beauty. It’s fast, fun, and rewarding—perfect for using up scraps, experimenting with designs, or making heartfelt gifts.
Whether you’re sewing one for yourself or planning a full set, you’ll enjoy how easily this pattern comes together and how impressive the final result looks. The geometric design stands out in any kitchen and makes a functional item feel like a piece of art.
VIDEO TUTORIAL:
Have you tried this project? We’d love to hear your thoughts, tips, or see your unique creations! Leave a comment below and share your experience with the DIY Triangle Pot Holder. 🧵🔺🔥


