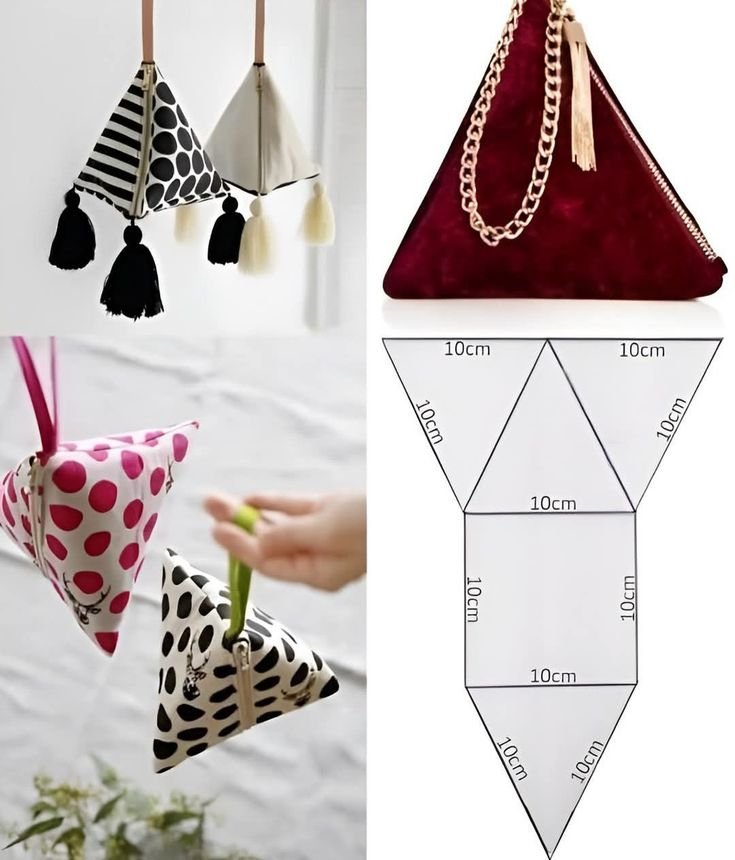
If you’re searching for a small, practical sewing project that’s both stylish and functional, the Triangle Zipper Pouch is the perfect choice. These geometric pouches are trendy, fun to make, and incredibly versatile. Whether you’re organizing your bag, gifting handmade accessories, or just love creative quilting and sewing projects, this tutorial is a must-try.
The best part? The Triangle Zipper Pouch is ideal for beginners and experienced sewists alike. With just a few materials and some basic sewing skills, you can whip up one of these in under an hour. Plus, the unique shape makes it stand out from standard rectangular pouches.
Let’s dive into this step-by-step Triangle Zipper Pouch tutorial, where we’ll cover everything you need—from materials and measurements to sewing instructions and design ideas.

1. Why Make a Triangle Zipper Pouch
There are several great reasons to add the Triangle Zipper Pouch to your next sewing session. It’s small, useful, and absolutely charming.
SEE OTHER FACE PATTERNS HERE!
First, it’s a quick project. You can complete one pouch in less than an hour, making it a great option for last-minute gifts or craft fairs.
Second, it’s perfect for using up fabric scraps. The small panels make it an excellent scrap-buster project, especially if you love quilting or sewing with colorful prints.
Third, it’s extremely functional. Use your Triangle Zipper Pouch to store coins, earbuds, makeup, cables, or even small sewing notions.
Fourth, it makes a unique gift. Unlike common pouches, this triangle shape adds personality and shows off your sewing skills.
Fifth, it’s a great skill-builder. Working with zippers, boxed corners, and lining teaches important techniques in a small and manageable way.
Finally, it’s customizable. Once you learn the basic steps, you can alter the size, add embellishments, or experiment with patchwork and quilted versions.
2. Materials and Tools You’ll Need
Before you start sewing your Triangle Zipper Pouch, make sure you’ve gathered all the required materials. This project doesn’t need much, and you probably already have most items in your sewing space.
Fabric:
-
Two outer fabric pieces: 6″ x 6″ each
-
Two lining fabric pieces: 6″ x 6″ each
-
Optional: batting or fusible fleece for a quilted look
Other supplies:
-
7″ or longer zipper (nylon or metal, depending on style preference)
-
Sewing machine
-
Thread in coordinating color
-
Scissors or rotary cutter
-
Pins or clips
-
Iron and ironing board
-
Optional: zipper foot, for easier sewing around zipper teeth
Optional embellishments:
-
Ribbon or leather tabs
-
Keyring loop
-
Small tag or label
-
Decorative stitching or embroidery
Using quilting cotton is a great option for the outer fabric, and you can add interfacing or batting to give it extra structure if desired.
3. How to Sew a Triangle Zipper Pouch – Step-by-Step
Now for the fun part—let’s learn how to make your very own Triangle Zipper Pouch. Follow the steps below and feel free to personalize the design as you go.
Step 1: Prepare your fabrics
If using interfacing or batting, fuse or quilt it to the outer fabric pieces. This adds structure and durability to your pouch.
Step 2: Attach the zipper
Place one outer fabric right side up. Lay the zipper face down along the top edge. Place a lining piece on top, right side down, aligning edges. Clip or pin in place and sew along the edge with a ¼” seam using a zipper foot.
Repeat on the other side of the zipper with the remaining outer and lining pieces.
Step 3: Topstitch and press
Fold the fabrics away from the zipper and press. Topstitch near the zipper edge to keep everything neat and prevent the lining from catching.
Step 4: Sew the side seams
Open the zipper halfway. This is very important!
Match the outer fabric pieces right sides together and the lining pieces together, forming a rectangle. Pin all the way around.
Sew all around the edges, leaving a 2″ opening at the bottom of the lining for turning.
Step 5: Box the corners
To create the triangle shape, you’ll need to box one corner only. On one side of the outer fabric, pinch the corner so the side seam meets the bottom seam and forms a triangle. Sew across the corner about 1½” from the tip, and then trim the excess.
Step 6: Turn and finish
Turn the pouch right side out through the opening in the lining. Push out all the corners and seams. Sew the lining opening closed with a small invisible stitch or a quick machine topstitch.
Give everything a final press, and your Triangle Zipper Pouch is done!
4. Creative Ideas and Variations
Once you’ve mastered the basic Triangle Zipper Pouch, you can start exploring fun ways to make it even more creative and personalized.
Quilted look
Add a layer of batting and do some simple straight-line quilting on the outer fabric before construction. It adds texture and a cozy handmade vibe.
Patchwork style
Sew together small scraps or use leftover quilt blocks to make a pieced version. This is great for a scrappy, colorful design.
Add tabs or loops
Attach a ribbon or leather loop to the end for easy hanging or keyring attachment. You can also insert a wrist strap to make it a mini purse.
Different sizes
Adjust the initial fabric dimensions to create tiny triangle coin pouches or larger makeup bags. Keep the same construction method.
Personalized gifts
Embroider names or initials before assembly to make each pouch unique. Add buttons, beads, or appliqué for decorative flair.
Holiday themes
Use seasonal fabrics to make pouches for holidays like Christmas, Valentine’s Day, or Halloween. Fill with candy or small gifts for a handmade touch.
These variations make the Triangle Zipper Pouch endlessly adaptable and a great way to show off your sewing creativity.
🌟Join our exclusive Quilt broadcast list on Messenger! Receive the best patterns, tips, and updates directly in your inbox. Our team is ready to send you delightful content that will inspire your projects. Don’t miss this opportunity to stay updated and create amazing pieces. Join now and be part of this passionate quilt community!✨📩
FAQ – Triangle Zipper Pouch Tutorial
Is the Triangle Zipper Pouch suitable for beginners?
Yes! It’s a great beginner project. You’ll learn how to work with zippers and lining while completing a small, manageable piece.
What size zipper should I use?
A 7″ zipper is ideal, but anything from 6″ to 9″ can work depending on the pouch size. Trim longer zippers if needed.
Can I quilt the fabric before sewing?
Absolutely! Quilting adds thickness and texture. Use batting and quilt straight or decorative lines before assembling the pouch.
Do I need a zipper foot?
It’s helpful but not required. A zipper foot allows you to sew close to the zipper teeth, resulting in a cleaner finish.
How long does this project take?
Most people can complete one pouch in 30–45 minutes, especially after making the first one.
What are the pouch’s dimensions?
Finished size depends on your fabric squares and boxing depth. A common size is around 5″ x 4″ x 2″ when using 6″ squares.
Conclusion
The Triangle Zipper Pouch is a delightful sewing project that’s both functional and fun to make. Whether you’re organizing your space, making thoughtful gifts, or trying something new in your sewing journey, this pouch offers the perfect blend of creativity and practicality.
With minimal materials, straightforward steps, and endless room for customization, it’s no surprise that the triangle pouch is a favorite among sewists and quilters of all levels.
Have you made your own Triangle Zipper Pouch? We’d love to hear about your experience! Share your tips, photos, and creative variations in the comments below—and let’s keep inspiring each other with handmade magic. 🧵✂️🎁


