The Lily of the Valley Curtain Tieback – Tutorial is a beautiful and practical crochet project that brings elegance and charm to your living space. Whether you’re a seasoned crocheter or a beginner looking for a delightful decorative piece, this tutorial offers a step-by-step guide to create a floral tieback that mimics the delicate look of the Lily of the Valley flower. This design not only holds your curtains stylishly but also adds a handmade, personal touch to your decor.
Crocheting a Lily of the Valley Curtain Tieback allows you to explore texture, color combinations, and stitch techniques that come together in a graceful way. It’s a project that’s both quick and rewarding, perfect for gifts, spring-themed decor, or a whimsical touch to a child’s room. The design’s versatility means you can experiment with different yarns and hook sizes, making it a fun project for customization.
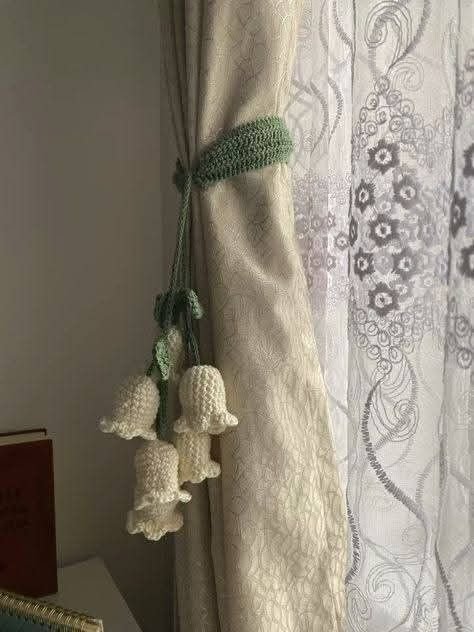
In this Lily of the Valley Curtain Tieback – Tutorial, you’ll learn how to create each part of the flower—from the stem to the bell-shaped blossoms—and assemble them into a cohesive, functional accessory. Keep reading to discover everything you need to complete this stunning crochet project and add floral elegance to your curtains today.
1. Materials Needed for the Lily of the Valley Curtain Tieback
To begin the Lily of the Valley Curtain Tieback – Tutorial, you’ll first need to gather your materials. Using the right supplies will ensure your final piece is sturdy, attractive, and easy to use on a daily basis.
DISCOVER MORE FREE PATTERNS HERE!
You will need yarn in at least two colors: green for the stem and leaves, and white for the iconic lily bells. Cotton yarn is highly recommended due to its durability and neat stitch definition.
You will also need a crochet hook suitable for the yarn weight, usually ranging between 2.5mm and 3.5mm. Having a smaller hook helps achieve a firmer structure, which is ideal for curtain tiebacks.
Other important materials include a tapestry needle for weaving in ends, scissors, and optional floral wire. The wire can help you shape the stem and make the tieback more flexible yet secure.
Starch or fabric stiffener can be used if you want your flowers to retain a very crisp shape, especially in humid environments. It’s optional but often adds a professional finish to your piece.
Don’t forget a ribbon or crochet cord to tie the entire accessory around the curtain. This ensures the Lily of the Valley Curtain Tieback is functional as well as decorative.
2. Crochet Techniques and Stitches Used
The Lily of the Valley Curtain Tieback – Tutorial is beginner-friendly but does involve some intermediate techniques. Understanding the key stitches will help you follow along more confidently.
The basic stitches you’ll need include chain (ch), single crochet (sc), and slip stitch (sl st). These are used to create the stem and base of the flowers.
For the bell-shaped blossoms, you’ll learn to crochet in the round and use increasing and decreasing techniques to shape the petals. These steps are crucial to achieving the characteristic droop of the lily flower.
The leaves are typically crafted with a combination of double crochet (dc) and half double crochet (hdc), forming a soft point that mimics natural foliage.
Attaching the flowers to the stem can be done by sewing or crocheting them directly, depending on your comfort level. Floral wire can be inserted during this step if desired.
Color changes may be involved if you’re using separate yarns for the flower and the stem. This is done using simple color-change techniques and is explained clearly in the Lily of the Valley Curtain Tieback – Tutorial.
Each part—stem, flower, and leaf—is made individually, then assembled together to form a unified and aesthetically pleasing curtain tieback.
3. Step-by-Step Instructions for the Curtain Tieback
Now we move to the step-by-step portion of the Lily of the Valley Curtain Tieback – Tutorial. Take your time through each phase to ensure accuracy and neatness.
Start by crocheting the stem. Chain a base that’s long enough to wrap around your curtain, then work single crochet stitches back and forth to form a sturdy band. Insert floral wire if using.
Next, create the blossoms. Each flower starts with a magic ring. Work a few rounds in the round, gradually increasing and then decreasing to form the bell shape. Make several depending on your desired fullness.
After the flowers, crochet the leaves. Start with a chain and work symmetrical rows of dc and hdc stitches to form a pointed leaf. Make at least two or three to add dimension.
Once you have all the parts ready, begin attaching the flowers along the stem. Space them evenly for a natural look, securing them tightly with your yarn needle.
Add the leaves to the ends or midway on the stem, depending on your design preference. You can use small stitches to keep them in place securely.
Finally, create a loop or tie mechanism at both ends of the stem. This can be a simple crochet chain or a ribbon sewn on. This completes your Lily of the Valley Curtain Tieback and makes it ready for display.
4. Customization and Styling Tips
The best part about the Lily of the Valley Curtain Tieback – Tutorial is how customizable it is. You can tailor the colors, sizes, and materials to match your room perfectly.
Consider using pastel colors for a soft, romantic look or bold colors for a more vibrant statement. Metallic or glitter yarns can add a festive touch for special occasions.
You can increase or decrease the number of flowers to suit different curtain sizes or personal style. Fewer flowers give a minimalistic appearance, while more make it lush and luxurious.
Vary the stem length based on where you plan to use it. For small windows or café curtains, a shorter tieback works best. Larger windows or thick curtains may need a longer version.
Try using beads or pearls inside the lily bells for a more decorative effect. This adds texture and shine, making your tieback feel like a work of art.
If you’re gifting the tieback, consider pairing it with a matching coaster or floral bookmark. Themed handmade sets are thoughtful and memorable presents.
Don’t be afraid to experiment with textures—mix cotton and bamboo yarn, or use a different stitch for the leaves. The Lily of the Valley Curtain Tieback is all about creative expression.
FAQ – Lily of the Valley Curtain Tieback
What type of yarn is best for the Lily of the Valley Curtain Tieback?
Cotton yarn is ideal due to its stiffness and stitch definition. It holds the flower shape well and withstands daily use.
Is this project suitable for crochet beginners?
Yes! While there are a few intermediate stitches, the Lily of the Valley Curtain Tieback – Tutorial is beginner-friendly with clear instructions.
Can I wash the finished curtain tieback?
Yes, but it’s best to hand wash gently with cold water, especially if you use wire or stiffener in the design.
How long does it take to complete one tieback?
On average, it takes 2 to 4 hours depending on your crochet speed and experience level.
Can I make this pattern using leftover yarn?
Absolutely! It’s a great scrap-busting project since each flower and leaf is made separately.
Do I need to use floral wire?
No, it’s optional. The tieback can be made without wire, though wire gives it more structure and flexibility.
Conclusion
The Lily of the Valley Curtain Tieback – Tutorial teaches you how to craft an elegant and charming accessory that adds beauty and functionality to your home. With just a few materials and simple crochet techniques, you can create a stunning piece that reflects your creativity. From mastering new stitches to customizing colors and shapes, this pattern offers an enriching crochet experience.
If you enjoyed this tutorial, please consider leaving a sincere comment or suggestion below. Your feedback helps improve our patterns and supports the crafting community. Happy crocheting! 💐