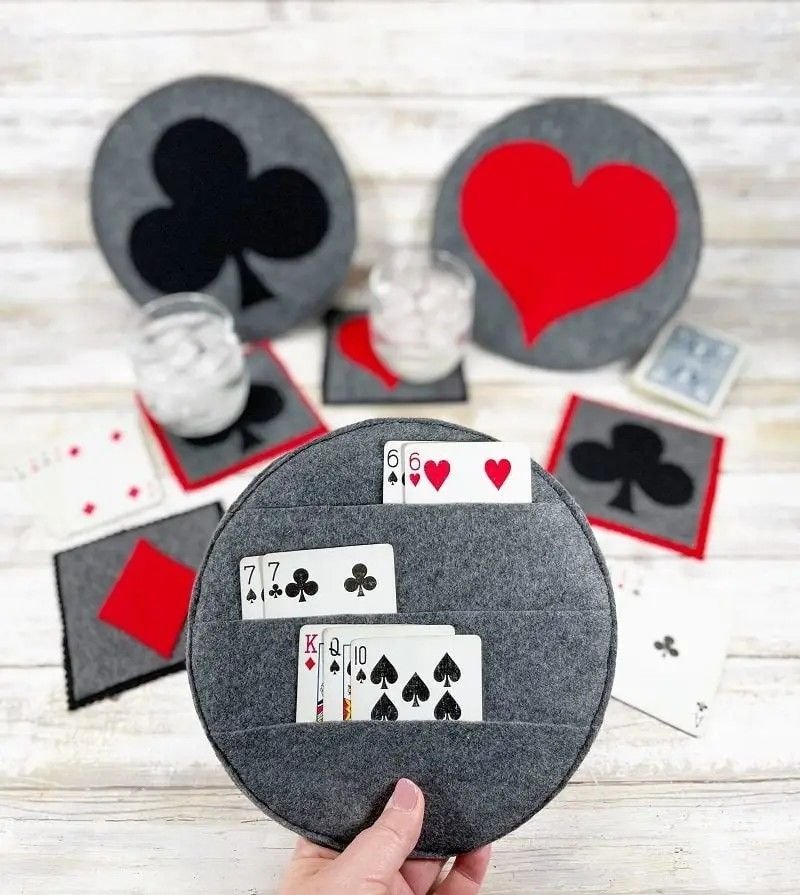
The Playing Card Holder Felt Project – Tutorial is the perfect creative endeavor for anyone who loves combining crafting with practicality. This delightful DIY project is ideal for family game nights, travel entertainment, or as a thoughtful handmade gift. Made from soft and durable felt, this card holder is especially handy for kids or individuals with limited hand mobility, making card games more accessible and fun.
Felt is a fantastic crafting material—it’s inexpensive, easy to work with, and available in a wide range of colors. This Playing Card Holder Felt Project – Tutorial guides you step-by-step through creating a functional yet adorable card organizer that can stand upright and hold multiple cards in place. Whether you’re a beginner in sewing or a seasoned fabric crafter, this project is a great addition to your handmade crafts.
Throughout this article, we’ll walk you through materials, cutting, sewing, assembling, and finishing your very own playing card holder using felt. So grab your felt sheets, scissors, and a bit of thread, and let’s jump into the colorful world of handmade accessories.

1. Choosing Materials for Your Playing Card Holder Felt Project
When starting the Playing Card Holder Felt Project – Tutorial, selecting the right materials is the foundation of your success.
SEE OTHER FACE PATTERNS HERE!
Start with high-quality felt sheets, preferably wool-blend or thick acrylic felt. These types offer durability and shape retention, which is crucial for keeping your playing cards upright.
You’ll also need a strong adhesive or fabric glue, or if you prefer a sturdier finish, you can opt for a basic hand stitch or use a sewing machine.
Gather sharp fabric scissors for clean cuts and consider a rotary cutter and cutting mat for precise curved edges if you want a more professional touch.
To make your card holder visually appealing, choose contrasting colors for the base and the slotted layers. This also makes it easier to see where each card slot is positioned.
You’ll need pins or clips to hold pieces in place during assembly. A fabric pen or chalk can help with marking slots before sewing or gluing.
Optionally, embellishments like buttons, embroidery, or ribbons can be added to personalize your card holder, making each piece a unique gift or decor item.
2. Cutting and Preparing the Felt Pieces
Accurate cutting is essential in this Playing Card Holder Felt Project – Tutorial, as the structure depends on even, symmetrical pieces.
Start by cutting one large rectangle that will serve as the backing. This piece should be slightly taller and wider than a playing card when turned horizontally.
Next, cut three to five smaller rectangles of the same width but decreasing in height. These will become the individual card slots that stack on top of each other.
Mark the positions where each slot will go on the backing felt. Be sure to leave a small space between each level for finger access and visual appeal.
If you’re planning to sew, mark a seam allowance on each side of the felt pieces. A quarter-inch seam usually works well with felt due to its non-fraying edges.
Stack your slot pieces from the bottom up, pinning or clipping them into place so they stay aligned while you work.
Before attaching, do a quick dry layout to ensure cards fit nicely in each slot and that the height progression is even and ergonomic.
3. Assembling and Stitching the Card Holder
The assembly stage is where your Playing Card Holder Felt Project – Tutorial begins to take its final shape.
Start from the bottom and sew or glue each slot piece to the backing felt. Be careful to stitch only along the sides and bottom to leave the top open.
Double-check alignment as you go. A straight stitch works well, or if hand sewing, a whip stitch adds a cute, handcrafted charm.
Use thread colors that either blend in or contrast—whichever matches your desired aesthetic. For kids, bright or multicolored thread can add excitement.
As you attach each layer, test it with a standard playing card to ensure the slot depth is appropriate and the card doesn’t fall out or sit too deep.
Once all slots are attached, reinforce the edges by sewing a border around the whole backing rectangle for extra stability.
Trim any loose threads and clean up glue edges (if used), then flatten the holder under a book or light weight for an hour to smooth out any bulging layers.
4. Personalizing and Finishing Touches
No Playing Card Holder Felt Project – Tutorial is complete without adding your personal flair to make it truly unique.
Add a decorative top flap or strap with Velcro or a snap button to close the holder and keep cards secure during transport.
If you’re gifting this to a child, consider using themed felt shapes (like stars, hearts, or animals) and glue them on the front of the card holder.
Use fabric paint or embroidery floss to write a name or monogram on the front—this is especially useful for keeping track of whose card holder is whose during group play.
Attach a small loop or handle made from ribbon, elastic, or more felt, so it can be easily carried or hung up when not in use.
Consider making multiple holders in different colors and sizes—perfect for sorting different decks like Uno, Go Fish, or collectible card games.
Store your holder in a dry place to avoid felt warping. A quick press with a warm iron (with cloth in between) can help remove minor creases.
FAQ – Playing Card Holder Felt Project
Q: Can I make this project without sewing?
Yes! You can use strong fabric glue or hot glue to attach all felt pieces instead of sewing. It will still hold up well for everyday use.
Q: What size should I cut the felt pieces?
The backing piece should be approximately 6 inches by 8 inches, and each slot should be 6 inches wide and 2-3 inches tall.
Q: How many cards can it hold?
Each slot can comfortably hold 4–5 cards, so with 4 slots, you can hold up to 20 cards.
Q: Can kids help make this?
Absolutely! This project is beginner-friendly and great for children with adult supervision, especially if you’re using glue instead of needles.
Q: Is felt durable enough for frequent use?
Yes, especially if you use wool-blend felt. It’s soft yet sturdy enough to maintain shape over time.
Q: Can I wash the card holder?
It’s not machine washable, but you can spot clean gently with a damp cloth if needed.
Conclusion
The Playing Card Holder Felt Project – Tutorial provides an easy and enjoyable way to create something functional, personal, and charming. Perfect for crafters of all levels, this DIY felt card holder makes gameplay more organized and inclusive. Whether you make it as a gift or for yourself, it’s a quick project that delivers big on creativity and usefulness.
If you tried this tutorial, let us know your experience in the comments! We’d love to hear your honest opinions, suggestions, or photos of your handmade card holders. Happy crafting!


