If you’re searching for a fun, portable, and creative crochet project, the Crochet Chicken Keychain – TUTORIAL is just what you need. This charming little accessory is not only adorable but also practical, making it the perfect handmade gift or personal keychain. Whether you’re new to crocheting or have years of experience, this step-by-step guide will help you create your own crochet chicken keychain with ease.
The Crochet Chicken Keychain – TUTORIAL offers a delightful combination of simple stitches and cheerful design. It’s small enough to finish in a single sitting but detailed enough to bring joy and charm to your keyring, backpack, or even as a cute addition to a gift package. This project is also a wonderful way to use up your yarn scraps creatively.
In this tutorial, you’ll learn how to crochet a miniature chicken using basic materials and beginner-friendly techniques. We’ll go over all the necessary supplies, stitches, and assembly tips to ensure your crochet chicken keychain turns out perfectly every time.
1. Choosing the Right Materials
Selecting the right materials is essential for the success of your Crochet Chicken Keychain – TUTORIAL. Opt for a lightweight cotton yarn to maintain shape and durability. Cotton holds its form well and offers vibrant colors, perfect for small amigurumi items like keychains.
DISCOVER MORE FREE PATTERNS HERE!
You’ll need a 2.5mm to 3mm crochet hook for tighter stitches, so the stuffing doesn’t show through. Safety eyes or tiny black beads will bring the chicken’s face to life, but if you’re making it for children, embroidered eyes are safer.
Don’t forget a small amount of polyester fiberfill stuffing. This will give your chicken keychain volume and softness without adding bulk. You’ll also need a tapestry needle to sew the pieces together.
Adding a metal keyring or lobster clasp will turn your crochet chicken into a functional accessory. Make sure the keychain attachment is securely sewn into the top of your chicken so it can withstand daily use.
You can also use stitch markers to keep track of your rounds if you’re working in continuous spirals. A pair of sharp scissors is helpful for trimming yarn ends neatly once the project is finished.
Lastly, gather all your materials in one place before you start to keep the process smooth and enjoyable. Preparation is key to an efficient and enjoyable crafting experience.
2. Step-by-Step Crochet Instructions
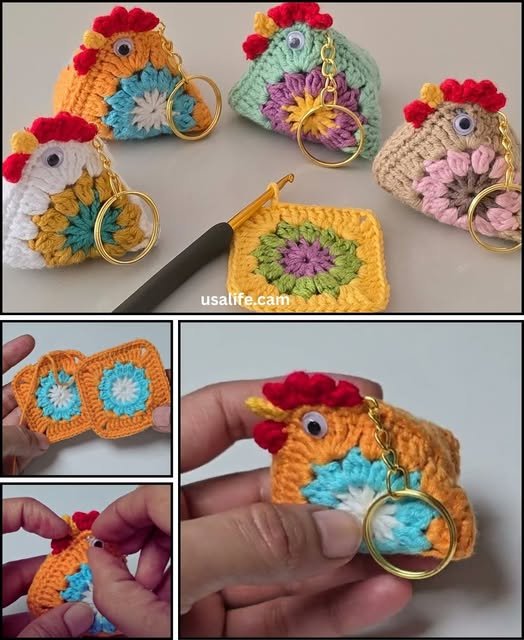
To begin your Crochet Chicken Keychain – TUTORIAL, start with a magic ring and six single crochets. This technique helps create a tight, closed bottom that forms the base of the chicken’s body. Use stitch markers if necessary to keep track of your rounds.
Continue to work in continuous rounds, increasing evenly to shape the body. Use single crochet increases to keep the form smooth. Around round 8 to 10, you’ll maintain the same stitch count to build height for the body of the chicken.
Once the body is the desired height, begin to decrease gradually. This helps create a rounded top. Before the final decreases, stuff the body firmly with fiberfill so it holds its shape without bulging.
The wings can be made separately using just a few rows of single crochets and sewn onto each side of the body. A contrasting color, like white or yellow, gives the wings a fun pop of texture and character.
Use red or orange yarn to make a tiny comb and beak. These can be crocheted with just a couple of chains and sewn securely onto the head area. Small details like these bring the chicken to life.
Finish by attaching safety eyes, embroidering small features if needed, and securing the keychain hardware. Weave in all ends for a clean and professional look. Your crochet chicken keychain is now ready to use or gift!
3. Customizing Your Chicken Keychain
One of the best things about the Crochet Chicken Keychain – TUTORIAL is the room for personalization. You can create an entire flock of chickens in different colors to reflect your mood or the season.
Experiment with color changes between the body and wings. Use pastel shades for springtime, bright colors for summer, or themed hues for holidays like red and green for Christmas or orange and black for Halloween.
Add tiny embellishments like mini bows, buttons, or even a small felt heart to the body. These accessories can add personality and uniqueness to each chicken you make.
Varying yarn texture can also change the look and feel. Try a slightly fuzzy yarn for a fluffier chicken or sparkly yarn for a fun twist. Just ensure it’s lightweight enough for a keychain.
You can even modify the size by adjusting your yarn weight and hook size. Thinner yarn with a smaller hook will result in a tinier chicken, perfect for earrings or bag charms.
Customizing these crochet chickens makes them great for craft fairs, party favors, or themed gifts. With the right touches, each chicken becomes its own little character.
4. Tips for Finishing and Gifting
Once your crochet chicken keychain is complete, you can enhance its presentation for gifting. Consider placing it in a small drawstring pouch or attaching it to a handmade gift card.
If you’re making a batch of them for a market or event, create small tags that say “Handmade with love” and include care instructions. This adds a professional touch and shows care.
Always double-check the strength of your stitches, especially around the keyring attachment. These parts experience daily wear and should be extra secure to ensure longevity.
Use fabric stiffener lightly on the comb or wings if you want them to stand upright more firmly. Be cautious not to overdo it as it can affect softness and appearance.
Store completed keychains in a cool, dry place away from direct sunlight to maintain color vibrancy and yarn quality.
Giving your crochet chicken keychain as a gift? Add a note about the significance of chickens — they symbolize prosperity and new beginnings, making your gift even more thoughtful.
FAQ – Frequently Asked Questions
How long does it take to make a crochet chicken keychain?
Most people can finish one in about 1 to 2 hours depending on skill level and stitch speed.
What type of yarn is best for the crochet chicken keychain?
Lightweight cotton yarn is ideal as it offers structure, vibrant color, and is easy to work with.
Can I sell the keychains I make from this tutorial?
Yes, you can sell your finished items, but it’s respectful to credit the pattern source if applicable.
Is this tutorial beginner-friendly?
Yes, the Crochet Chicken Keychain – TUTORIAL is great for beginners, especially those learning amigurumi basics.
How do I attach the keyring securely?
Sew the keyring base into the top of the chicken using multiple passes of strong thread or yarn.
Can I wash the keychain?
Spot cleaning is recommended, especially if safety eyes or stuffing are used inside.
Conclusion
In this Crochet Chicken Keychain – TUTORIAL, you learned how to choose materials, follow step-by-step instructions, personalize your project, and present it beautifully.
TUTORIAL VIDEO:
Whether you’re making one for yourself, a friend, or to sell, this project is both joyful and practical. We hope you enjoyed this creative journey! Feel free to share your honest opinion and suggestions in the comments — we love hearing from our fellow crocheters!