If you’re searching for an easy and chic summer accessory project, this Elegant Crochet Straw Hat – Tutorial is exactly what you need! This pattern combines fashion and function, giving you a lightweight, breathable hat that protects from the sun while complementing your outfit. Whether you’re heading to the beach or just want to enhance your crochet collection with stylish accessories, this is the perfect pattern to try in 2025.
The Elegant Crochet Straw Hat – Tutorial is ideal for beginners and experienced crocheters alike. Its elegant structure uses basic stitches that come together beautifully, and the result is a versatile hat that can be worn on a casual stroll or dressed up with a ribbon for a garden party. With warmer months ahead, now is the best time to start working on handmade accessories like this one.
Crochet fashion is trending, and the Elegant Crochet Straw Hat – Tutorial offers a great opportunity to explore how crochet can be modern, wearable, and sustainable. Made with raffia or straw yarn, this pattern is light, structured, and durable – perfect for sun protection with a stylish twist.
1. Materials and Tools You’ll Need
To begin your Elegant Crochet Straw Hat – Tutorial, you’ll need to gather a few essential supplies. Having the right tools and materials will make the process easier and help you achieve the polished, summery look this hat is known for.
DISCOVER MORE FREE PATTERNS HERE!
Start by choosing a high-quality straw or raffia yarn. These fibers give the hat its classic texture and structure. They are lightweight yet sturdy enough to hold shape. Natural colors like beige, ivory, and sand are popular, but bold colors can give your hat a unique personality.
Next, select a crochet hook appropriate for your yarn. Most straw yarns work well with hooks in the 3.5mm to 4.5mm range. Make sure the hook glides easily through the fiber without snagging.
Other tools include a yarn needle for weaving in ends, stitch markers to keep track of rounds, and a measuring tape to ensure your hat fits just right. You might also want ribbon or fabric to accessorize the finished piece.
The beauty of the Elegant Crochet Straw Hat – Tutorial is how simple the supply list is. With just a few items, you’re ready to craft a sophisticated, handmade accessory.
You can find these materials online or at local craft stores. For eco-conscious crafters, many sustainable and biodegradable straw yarns are now available, adding to the appeal of making your own hat.
Once your supplies are ready, set up a comfortable space to work. The process is meditative and relaxing – just what you need for a sunny weekend project.
Now that your toolkit is complete, it’s time to move on to creating the structure of the hat.
2. Building the Crown of the Hat
The first step in your Elegant Crochet Straw Hat – Tutorial is creating the crown. This is the rounded top of the hat that sits on your head. It starts with a magic circle, a common technique in crocheting rounded shapes.
You’ll begin with single or double crochet stitches in the round, gradually increasing to expand the diameter. Keep your increases even to ensure the crown is smooth and symmetrical. Most patterns suggest increasing every other stitch in the early rounds, then spacing increases more gradually.
Using a stitch marker is helpful here to track the start of each round. Precision is important, especially with straw yarn, which can be less stretchy than traditional yarns.
Continue building the crown until it’s roughly the width of the top of your head – typically around 6 to 7 inches in diameter. This will vary depending on the hat size you want to create.
Remember to crochet tightly to give the hat enough structure. If your stitches are too loose, the crown may not hold its shape properly.
By the end of this step, you’ll have a beautiful, dome-shaped crown that forms the base of your crochet hat.
Now you’re ready to crochet the body or sides of the hat, which gives it height and structure.
3. Creating the Sides and Forming the Brim
After finishing the crown, the next stage of the Elegant Crochet Straw Hat – Tutorial involves crocheting the sides, also known as the “body” of the hat. This section gives the hat depth and allows it to sit comfortably on your head.
To create the sides, continue crocheting in rounds without increasing. This maintains the diameter while adding vertical height. Most patterns recommend 6–10 rows depending on your desired style. More rows will create a deeper, bucket-style hat, while fewer rows give a shallower, cloche-like silhouette.
You can experiment here to personalize your hat. Some crocheters like to add texture by alternating stitch patterns like back loop only (BLO) to create ridges or visual interest.
Once the sides are complete, you’ll begin working on the brim. The brim is what sets this hat apart — it gives the hat its elegance and provides sun protection. To start shaping the brim, you’ll begin increasing again, adding 2 or more stitches every few spaces in each round.
It’s important to space your increases evenly. If you add too many too quickly, the brim may ruffle. If you don’t add enough, it won’t flare out. Aim for a gentle curve.
The brim can be as short or as wide as you prefer. A typical brim for an elegant straw hat ranges from 2 to 4 inches wide. Just keep working until you achieve the desired look.
This section allows for plenty of customization – try different stitch combinations, edge finishes, or even a contrast color on the edge for a modern twist.
4. Finishing Touches and Styling Your Hat
Once the crocheting is complete, the Elegant Crochet Straw Hat – Tutorial shifts focus to finishing and styling. These small details make your hat look polished and professional.
Start by weaving in all yarn ends neatly using a yarn needle. Straw yarn may fray, so use care and secure the ends with a discreet knot if needed.
You can block your hat to help it hold its shape. Lightly steam or dampen the hat, then place it over a bowl or round object to shape it as it dries. Avoid heavy heat, which can damage natural fibers.
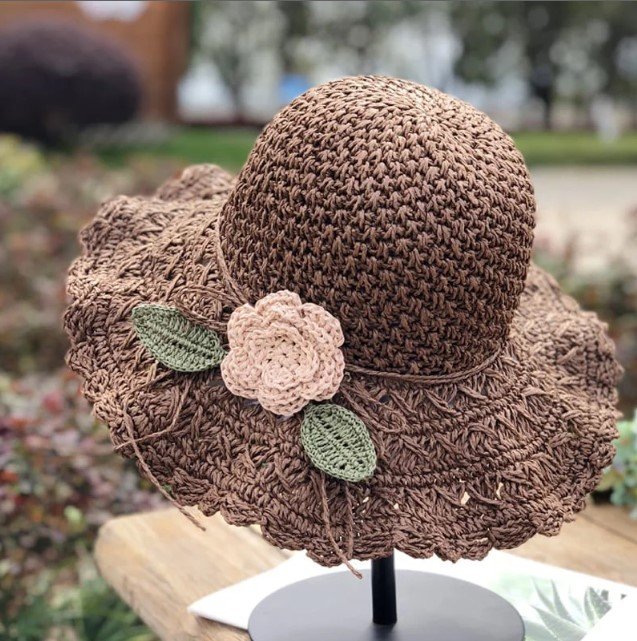
Adding accessories is where the fun begins. Classic options include tying a ribbon around the crown, adding a crocheted flower, or sewing on beads. A wide satin ribbon in black or blush pink looks timeless and elegant.
If you’re making this as a gift, personalize it with the recipient’s favorite color or embellishments. A handmade hat is a thoughtful and beautiful present.
You can also add a chin strap if you live in a windy area, or stitch in a sweatband for extra comfort and fit.
Finally, take care of your crochet hat by storing it flat or on a hook to keep its shape. Avoid folding or crushing it, especially if you used stiff yarn or blocking techniques.
And don’t forget to wear your hat proudly! Whether at a beach, picnic, or brunch, it’s sure to turn heads and spark compliments.
FAQ – Elegant Crochet Straw Hat
Q1: What kind of yarn is best for a straw hat?
A: Straw, raffia, or paper yarns are ideal for their stiffness and light weight. Natural fibers are breathable and hold shape well.
Q2: Can beginners make the Elegant Crochet Straw Hat?
A: Yes! The tutorial uses simple stitches and includes step-by-step instructions, making it beginner-friendly.
Q3: How long does it take to complete the hat?
A: Most crocheters complete the hat in 3 to 5 hours, depending on skill level and detail.
Q4: Can I wash my crochet straw hat?
A: It’s best to spot clean gently with a damp cloth. Avoid soaking or machine washing to preserve the structure.
Q5: What sizes can I make with this pattern?
A: You can adjust the size by increasing or decreasing rounds on the crown and body sections. Try measuring your head before starting.
Q6: How do I keep the brim from curling?
A: Use consistent tension and block the hat after finishing. Adding a single crochet edge can also help the brim lay flat.
Conclusion
The Elegant Crochet Straw Hat – Tutorial is more than just a DIY project—it’s a chance to combine style, creativity, and craftsmanship. From selecting your yarn to adding the final ribbon, every step allows for personal expression and joy.
We hope this guide helped you understand how to crochet this charming accessory and inspired you to give it your own twist. If you enjoyed the process, don’t forget to leave your honest opinion and share suggestions. Happy crocheting!