Looking for a smart and stylish way to keep your car tidy? This Car trash can with a pocket, quick and easy to make is the perfect beginner-friendly quilt project that blends functionality with creativity. Whether you’re a quilting enthusiast or just someone tired of car clutter, this DIY idea is a fun way to transform fabric scraps into a practical solution. Best of all, it’s a quick and satisfying sew you can complete in just an afternoon!
This handy quilted car trash can isn’t just for garbage — the added pocket makes it perfect for organizing small items like tissues, sunglasses, or charging cables. Plus, since you’re making it yourself, you can choose fabrics and colors to match your car’s interior or your personal style. It’s one of those rare quilt patterns that is both beautiful and extremely useful.
If you’ve been searching for a simple and unique sewing project, this Car trash can with a pocket, quick and easy to make is a fantastic way to improve your skills while creating something you’ll use every day. Read on to learn everything you need to know!
1. Choosing Your Materials for the Car Trash Can
To begin your Car trash can with a pocket, quick and easy to make, the first step is selecting the right materials. Quilters know that material choice can greatly affect the final product, both in terms of function and aesthetic. For this project, you’ll want durability and ease of cleaning.
SEE OTHER FACE PATTERNS HERE!
Look for medium to heavy-weight cotton or canvas for the main body of the car trash can. These fabrics provide structure without needing too much interfacing. You’ll also need batting or fusible fleece to give your project that soft quilted feel and support.
For the interior lining, choose a water-resistant or wipeable fabric. This will ensure that spills or crumbs don’t ruin the inside of your quilted trash can. If you’re an eco-conscious creator, consider repurposing old clothes or linens.
Don’t forget to pick a fabric for the pocket. A contrasting pattern can make the design pop, or go for a matching tone for a more uniform look. This step is great for showcasing your fabric stash or leftover quilting scraps.
Finally, gather your sewing tools: rotary cutter, mat, ruler, quilting clips or pins, and your trusty sewing machine. You’ll also need thread, scissors, and some velcro or snaps if you want to add a closure.
Cut your fabric according to the provided tutorial measurements, then quilt and assemble the layers. The pocket piece can be sewn directly onto the exterior panel before you stitch the trash can together. Easy and practical!
2. Quilting Techniques to Add Style and Structure
The Car trash can with a pocket, quick and easy to make allows for a variety of quilting techniques to enhance its beauty and strength. Straight-line quilting is one of the easiest and fastest methods you can use here.
You can quilt the front and back panels in diagonal lines, crosshatch patterns, or even simple horizontal stripes. These lines not only give texture but also reinforce the structure of the trash can so it stays upright.
For those feeling adventurous, try free-motion quilting for swirls, flowers, or fun geometric shapes. It adds a personal touch and can turn this humble trash can into a mini art piece.
Make sure your quilting layers are basted well so the fabric doesn’t shift. Use pins or basting spray before taking your project to the machine.
A walking foot attachment can help prevent bunching, especially with thick quilt layers. This is especially useful for beginner quilters still getting the hang of it.
The pocket panel can be quilted too! This is a great place to experiment with decorative stitching or contrasting thread for visual interest.
And remember, pressing each layer as you go makes a big difference in your project’s final polish. Take your time and enjoy the process!
3. Assembling Your Quilted Car Trash Can
Now that your fabric pieces are cut and quilted, it’s time to assemble your Car trash can with a pocket, quick and easy to make. Begin by sewing the pocket onto the outer fabric panel before you join the sides.
Fold the pocket edges inward, topstitch them neatly, and place the pocket where you’d like it on the trash can’s front. Sew along the sides and bottom, reinforcing the corners for durability.
Then, with right sides together, sew the main body panels. Add gussets or a boxy bottom shape if you want more capacity. Don’t forget to backstitch at the beginning and end of each seam for strength.
Next, create the lining in the same way, leaving a small opening in the bottom for turning the project inside out. If you’re adding a loop or handle, pin and stitch it to the top edge before assembling the exterior and lining.
Sew the lining and outer fabric together around the top edge. Then, turn the trash can right side out through the opening you left earlier and press everything flat.
Finish by closing the lining opening with a topstitch or ladder stitch. Optionally, topstitch around the upper edge for a crisp, finished look and extra durability.
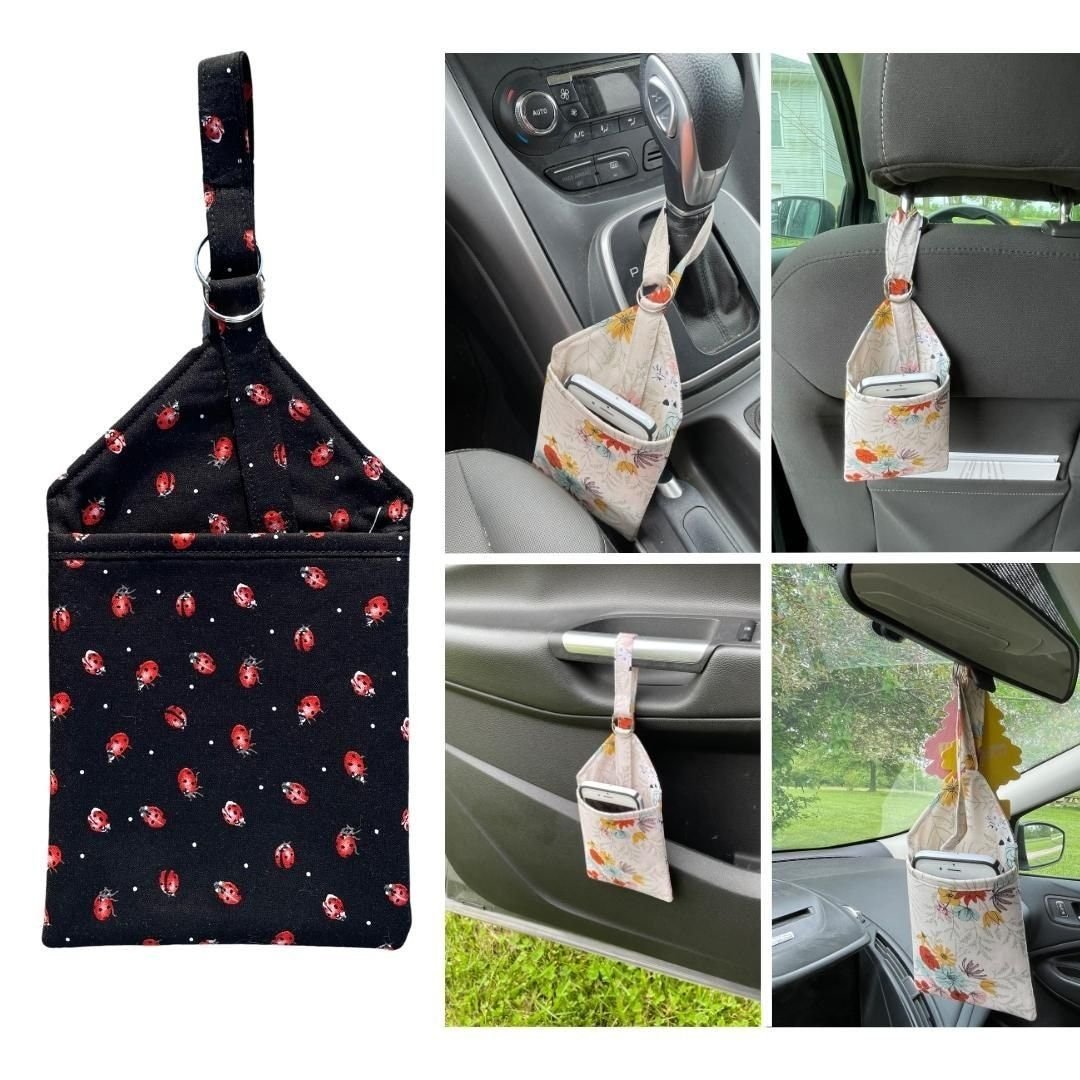
Now your quilted trash can is ready to use in your car! Slide it onto the back of a seat, hang it from a headrest, or place it in your console — the pocket will help keep essentials tidy too.
4. Customizing and Gifting Your Quilt Project
One of the best parts of the Car trash can with a pocket, quick and easy to make is how customizable it is. You can easily personalize it with embroidered initials, themed fabrics, or even applique designs.
This makes it an ideal handmade gift for friends or family. Whether it’s for a new driver, a busy mom, or a carpool enthusiast, they’ll appreciate the thoughtfulness and practicality of this quilted item.
Use novelty fabrics to match someone’s favorite hobby or profession — coffee cups, camping gear, florals, or cats are always fun options. You can also create matching sets with seat covers or travel pouches.
Consider adding compartments to the pocket for pens, receipts, or sanitizers. Or size up your pattern to hold even more trash or recyclables.
You can also experiment with closures. Adding a snap or velcro top helps keep things tidy and prevents messes if the trash can tips over during travel.
Lastly, don’t forget to label or tag your finished item with your name or brand if you’re selling or gifting it. Handmade quilt projects like this one are great for Etsy shops or craft markets!
FAQ – Car Trash Can Quilt Tutorial
What fabric is best for making a quilted car trash can?
Medium to heavy-weight cotton or canvas is ideal for the outside, while a wipeable fabric is best for the lining.
Do I need a quilting machine to make this project?
No! A regular sewing machine with a walking foot can handle this project perfectly.
Can I wash the quilted car trash can?
Yes, if all the fabrics are machine washable, you can toss it in the wash. Avoid dryer heat if you’ve used fusible interfacing.
Is this project suitable for beginners?
Absolutely. This Car trash can with a pocket, quick and easy to make is perfect for beginners who want a fun and fast quilting project.
How long does it take to complete this quilt project?
Most people can finish it in 2–3 hours, making it ideal for a weekend afternoon.
Can I add extra pockets or compartments?
Yes! You can fully customize your trash can with extra pockets, zippered compartments, or even cup-holder straps.
Conclusion
The Car trash can with a pocket, quick and easy to make is not just a quilting tutorial — it’s a fun, practical, and rewarding project for quilters of all levels. It combines creativity, organization, and sustainability in one stylish item that fits right into your everyday life.
TUTORIAL VIDEO:
We hope this tutorial has inspired you to sew your own and explore more functional quilting ideas. If you tried it, please leave us a comment with your honest opinion and share any suggestions or creative variations you came up with. Happy quilting!


