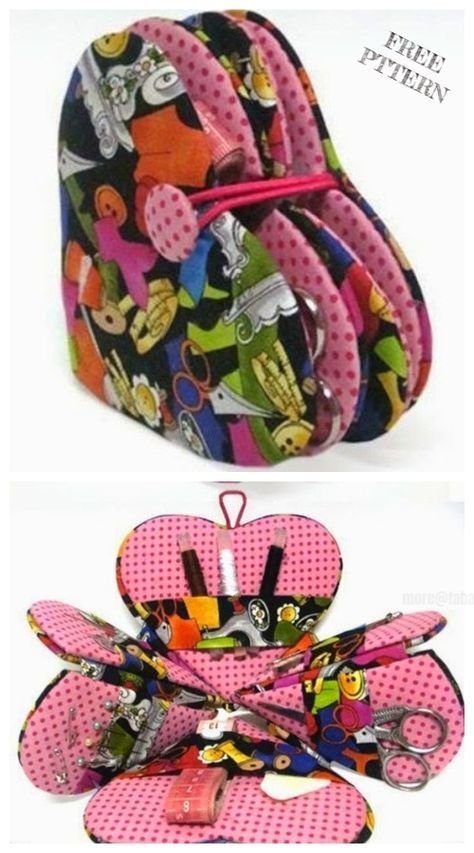
If you love sewing and quilting, the Foldable Heart-Shaped Needle Holder – Tutorial is a project you won’t want to miss. This adorable and functional accessory keeps your sewing needles neatly organized while adding a charming handmade touch to your sewing kit. Whether you’re making it for yourself, as a thoughtful gift for a fellow crafter, or even to sell, this heart-shaped design is both practical and eye-catching.
The Foldable Heart-Shaped Needle Holder – Tutorial is a beginner-friendly project that uses basic quilting and sewing techniques. It’s small enough to complete in an afternoon but detailed enough to feel truly special. The folding design keeps your needles safe and secure, while the heart shape makes it a joy to open and use.
This project is perfect for using up fabric scraps and experimenting with color combinations. By following this Foldable Heart-Shaped Needle Holder – Tutorial, you’ll learn how to create a portable, space-saving needle organizer that’s as pretty as it is functional.
1. Materials and Tools for the Foldable Heart-Shaped Needle Holder – Tutorial
To get started with your Foldable Heart-Shaped Needle Holder – Tutorial, gather all the necessary supplies to ensure a smooth sewing process.
SEE OTHER FACE PATTERNS HERE!
Choose two coordinating fabrics—one for the exterior and one for the interior. Quilting cotton is ideal because it’s easy to sew, durable, and available in endless patterns and colors.
For stability, you’ll need lightweight fusible interfacing. This will give your needle holder enough structure to fold neatly without feeling too stiff.
You’ll also need a small piece of felt for the needle-holding area. Felt works perfectly because it grips the needles without dulling them.
Basic sewing tools are essential: fabric scissors or a rotary cutter, sewing pins or clips, a ruler, and a fabric marker for tracing your heart pattern.
A sewing machine will make the process faster, but this project can also be done entirely by hand if you prefer.
Finally, consider adding embellishments like lace, buttons, or embroidery for a personalized touch to your Foldable Heart-Shaped Needle Holder – Tutorial.
2. Step-by-Step Instructions for the Foldable Heart-Shaped Needle Holder – Tutorial
Start by cutting out two heart shapes from your chosen fabrics and one from the interfacing. Use a template to keep the shapes consistent and symmetrical.
Fuse the interfacing to the wrong side of the exterior fabric following the manufacturer’s instructions. This will add structure without bulk.
Place the exterior and interior fabrics right sides together and sew around the edges, leaving a small opening for turning. Use a ¼-inch seam allowance for neat results.
Clip the curves carefully to help the heart shape turn smoothly. Turn the piece right side out and press flat, ensuring all edges are crisp.
Topstitch around the entire heart to close the opening and give a polished finish. This also reinforces the edges for durability.
Attach the felt piece to the center of the heart’s interior using a few stitches around the edges. Fold the heart in half, and if desired, add a snap, button, or ribbon tie to keep it closed.
3. Creative Customization Ideas for the Foldable Heart-Shaped Needle Holder – Tutorial
One of the best things about the Foldable Heart-Shaped Needle Holder – Tutorial is how easy it is to customize.
Use different fabrics for seasonal themes—red and pink for Valentine’s Day, green and gold for Christmas, or floral prints for spring.
Add embroidery to the exterior for a personalized look. You could stitch the recipient’s initials, a small motif, or decorative borders.
Experiment with patchwork or quilted fabric on the exterior. Using multiple scraps creates a unique, textured design that shows off your quilting skills.
Incorporate decorative trims like lace, rickrack, or bias binding to enhance the edges and add charm.
Make a set of needle holders in different sizes for various types of needles—regular sewing, embroidery, or quilting needles.
If gifting, package the needle holder in a small fabric pouch or box for a thoughtful and professional presentation.
4. Tips for Success with the Foldable Heart-Shaped Needle Holder – Tutorial
Always prewash your fabrics before starting to prevent shrinkage and color bleeding later.
Use a sharp sewing needle and fresh thread to achieve clean, even stitches on your Foldable Heart-Shaped Needle Holder – Tutorial.
When sewing curves, go slowly and pivot frequently to keep the heart shape smooth and symmetrical.
Press your work at each stage. A well-pressed project not only looks better but also sews more easily.
If you’re a beginner, make a practice version using scrap fabric before cutting into your favorite materials. This will help you perfect the folding and assembly.
Lastly, don’t be afraid to make it your own. The beauty of handmade quilting projects lies in the creative freedom you have to adapt patterns to your personal style.
FAQ – Foldable Heart-Shaped Needle Holder – Tutorial
Q1: Is the Foldable Heart-Shaped Needle Holder – Tutorial beginner-friendly?
Yes! It’s perfect for beginners since it uses basic sewing techniques and small pieces of fabric.
Q2: How long does it take to make one needle holder?
On average, it takes about 1 to 2 hours from start to finish.
Q3: Can I sew it by hand instead of using a sewing machine?
Absolutely. While a sewing machine speeds up the process, hand sewing works just as well for this small project.
Q4: What’s the best fabric for this project?
Quilting cotton is ideal for its durability and wide variety of prints, but you can also experiment with linen or lightweight canvas.
Q5: How do I keep the needle holder closed?
You can add snaps, buttons, Velcro, or ribbon ties to keep it securely folded.
Q6: Can I wash the needle holder?
Yes, but it’s best to hand wash gently to maintain the shape and prevent the felt from warping.
Conclusion
The Foldable Heart-Shaped Needle Holder – Tutorial is a delightful and practical quilting project that brings charm and functionality to your sewing kit. It’s quick to make, perfect for using up scraps, and highly customizable to suit any style or season.
With the step-by-step guide, creative ideas, and tips shared here, you’ll have everything you need to create a needle holder you’ll love using or gifting. Once you’ve made your own, share your honest opinion and suggestions—we’d love to see your heart-shaped creations.


