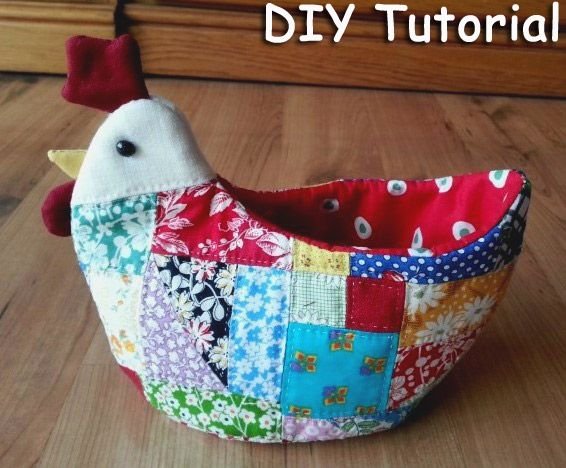
If you’re looking for a creative, colorful, and functional sewing project, the Patchwork Chicken Bowl – Tutorial is perfect for you. This charming project combines the traditional craft of patchwork quilting with the fun and whimsical shape of a chicken, resulting in a decorative yet useful fabric bowl. It’s ideal for storing sewing notions, holding snacks, or serving as a cute kitchen display piece. Whether you’re a beginner exploring fabric crafts or an experienced sewer looking for a delightful new idea, this tutorial will guide you step-by-step.
The Patchwork Chicken Bowl – Tutorial is not only a fun make but also an excellent way to use up fabric scraps. Patchwork designs naturally lend themselves to using various colors, textures, and patterns, allowing you to create a unique item every time. Because of its small size, it’s also a relatively quick project, making it perfect for weekend crafting sessions or gift-making marathons.
In this article, you’ll learn how to choose the right fabrics, cut and sew your pieces, assemble the chicken shape, and add finishing touches. You’ll also find customization ideas to make your chicken bowl uniquely yours, along with answers to common questions and a helpful summary at the end.
1. Choosing Materials and Preparing Fabrics
To start your Patchwork Chicken Bowl – Tutorial, you’ll need to gather the right materials. This project is versatile, so you can use a variety of fabrics to suit your taste. Cotton fabrics are the most popular choice because they are easy to sew, hold their shape, and come in endless prints. Consider mixing solids with patterned fabrics to give your chicken more personality.
SEE OTHER FACE PATTERNS HERE!
You will also need batting or interfacing to give your bowl structure. Fusible interfacing works well for stability, while a thin layer of batting can add softness. Keep in mind that the bowl should be sturdy enough to stand on its own, so don’t skip this step.
Basic sewing supplies like scissors, a rotary cutter, ruler, sewing pins, and a sewing machine are essential. If you prefer, you can sew parts of the bowl by hand, especially when attaching small decorative elements like eyes or a comb.
Before starting, wash and iron your fabrics. Pre-washing prevents shrinkage later, while ironing makes cutting and sewing easier. If you’re using a mix of fabric scraps, try to keep them in a similar weight and texture for an even finish.
Lastly, plan your color scheme. Bright and contrasting fabrics will make the chicken shape stand out, while neutral tones can create a more rustic, farmhouse look. Laying out your fabrics before cutting will help you visualize the final design.
2. Cutting and Arranging Your Patchwork Pieces
For the Patchwork Chicken Bowl – Tutorial, the cutting stage is crucial. You’ll need several small fabric pieces to create the patchwork body, as well as shaped pieces for the head, wings, comb, and tail. Templates can be made from cardboard to ensure consistent shapes.
Cut your patchwork pieces into uniform squares or rectangles for the main body. A good size is around 2×2 inches, but you can adjust depending on your desired look. Smaller pieces create a more detailed patchwork effect, while larger pieces will be quicker to sew.
Arrange your fabric squares on a flat surface before sewing. This allows you to balance colors and patterns evenly across the chicken’s body. Take a picture of the arrangement so you can refer back to it during assembly.
For the head, wings, comb, and tail, use coordinating fabrics that contrast with the body. This makes these features more distinct and visually appealing. If you want a more playful design, you can use bold colors like red for the comb or yellow for the beak.
Don’t forget to cut batting or interfacing pieces for the main body and base. These will be layered between the outer fabric and lining to add stability. Ensure that these pieces match the size and shape of your patchwork assembly.
Once everything is cut, organize your pieces into labeled sections. This will make sewing smoother and prevent any mix-ups during construction.
3. Sewing and Assembling the Chicken Bowl
Begin sewing your patchwork body by joining the fabric squares together in rows, then sewing the rows together to form a single panel. Press the seams open after each step to keep the fabric flat and neat. This will give your chicken bowl a polished appearance.
Next, layer your patchwork panel with batting or interfacing and quilt them together. You can stitch straight lines, diagonal patterns, or free-motion quilting designs depending on your skill level and style preference. Quilting not only adds decoration but also reinforces the fabric structure.
Sew the chicken’s head, wings, comb, and tail separately, then attach them to the body panel. Make sure they are positioned correctly so the chicken’s shape is clear when the bowl is formed. You can sew these pieces with a straight stitch or a zigzag stitch for extra durability.
Once the decorative pieces are attached, sew the side seams of the body to create the bowl shape. This is where you’ll see your flat patchwork piece transform into a functional 3D object. Clip the curves as needed to make the seams smooth.
Add the base by sewing it to the bottom edge of the bowl. This step may require some careful pinning to align the edges properly. Take your time, as a neatly sewn base will help your bowl sit evenly.
Finally, finish the edges with bias tape or fabric binding. This gives the bowl a clean, professional look and helps prevent fraying.
4. Customizing and Decorating Your Chicken Bowl
One of the best parts of the Patchwork Chicken Bowl – Tutorial is the opportunity to customize it. You can tailor every detail to suit your home décor, the recipient’s preferences, or a seasonal theme.
Add eyes using small black buttons, embroidery, or fabric paint. A felt circle can be sewn or glued in place for a softer look. For the beak, a small triangular fabric piece in bright yellow or orange works perfectly.
If you enjoy embroidery, consider adding stitched details like feathers, patterns, or even a name to personalize the chicken. Hand-sewn embellishments can make the bowl truly one-of-a-kind.
Seasonal designs are also popular. For example, pastel colors and floral prints work well for spring, while warm reds and browns can give an autumn harvest feel. Holiday prints can make your chicken bowl a festive decoration.
You can also play with size. Making a mini chicken bowl can be a cute way to hold jewelry or sewing supplies, while a larger version can serve bread or fruit on the dining table.
Lastly, don’t be afraid to mix textures. Combine cotton with linen, denim, or even lightweight canvas for a unique tactile effect. Just remember to keep the fabrics washable if the bowl will be used for food storage.
FAQ – Patchwork Chicken Bowl – Tutorial
Q: Can I make the Patchwork Chicken Bowl by hand sewing?
A: Yes, you can hand sew this project if you prefer, though it will take longer. Use small, tight stitches to ensure durability.
Q: How long does it take to complete this project?
A: Most people can complete it in 3 to 5 hours, depending on experience and complexity of the design.
Q: What type of fabric works best?
A: Quilting cotton is ideal because it’s easy to work with and holds its shape. Avoid fabrics that are too stretchy or slippery.
Q: Is this project suitable for beginners?
A: Yes, especially if you keep the patchwork simple. Beginners can skip advanced quilting and still achieve a beautiful result.
Q: Can the chicken bowl be washed?
A: Yes, if you use washable fabrics and secure all embellishments. Hand washing is recommended to maintain the shape.
Q: Can I sell the bowls I make using this tutorial?
A: Yes, as long as you create them yourself. Handmade versions are popular at craft fairs and online marketplaces.
Conclusion
The Patchwork Chicken Bowl – Tutorial offers a fun, creative way to combine quilting and sewing skills into a project that’s both decorative and practical. With simple materials, a bit of planning, and your personal touch, you can create a unique fabric bowl that brings charm to any room.
We’ve covered everything from choosing fabrics and cutting pieces to sewing, assembling, and customizing your chicken bowl. Now it’s your turn to bring this adorable project to life.
If you try this tutorial, please share your honest opinion and suggestions. Your feedback helps improve future projects and inspires other crafters to give it a try. Happy sewing!


