If you love bringing homemade dishes to potlucks, picnics, or family gatherings, the Totally Convenient Casserole Carrier – Tutorial is a must-try project. This clever and practical quilted creation makes transporting hot or cold dishes much easier, keeping them secure and at the perfect temperature. It’s a functional accessory that also showcases your sewing and quilting skills in a beautiful way.
The Totally Convenient Casserole Carrier – Tutorial is perfect for both beginner and experienced quilters. With straightforward instructions and a simple design, you can sew a carrier that is sturdy, insulated, and stylish. It’s a great opportunity to use quilting techniques to create something useful for everyday life or special events.
Beyond its practicality, this carrier also makes a thoughtful and personal gift. Whether it’s for a friend who loves cooking, a family member who enjoys hosting, or a newlywed couple, a handmade casserole carrier will be appreciated and used for years. In the sections ahead, we’ll cover the materials you need, the step-by-step process, creative ways to personalize it, and smart tips for using your carrier.
1. Choosing the Right Materials for the Totally Convenient Casserole Carrier – Tutorial
When starting your Totally Convenient Casserole Carrier – Tutorial, selecting the right materials is key to ensuring durability and functionality.
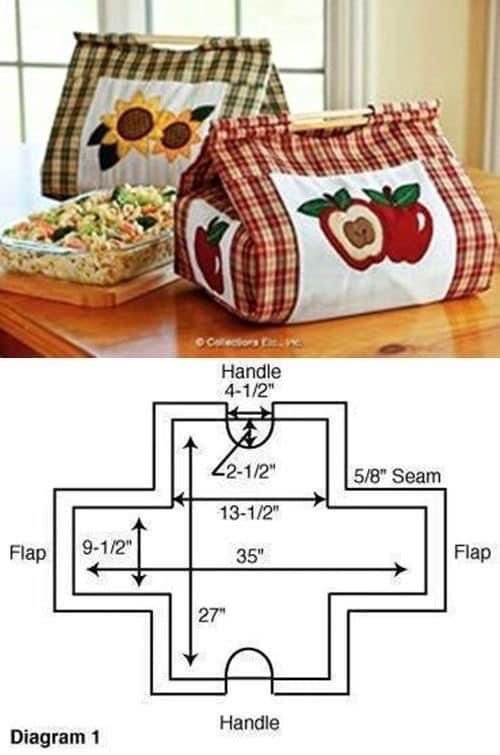
SEE OTHER FACE PATTERNS HERE!
Cotton quilting fabric is the ideal choice for the outer layer. It’s sturdy, easy to work with, and available in endless colors and patterns to suit any style.
For insulation, heat-resistant batting such as Insul-Bright is perfect. It helps maintain the temperature of your dish, whether hot or cold, during transport.
A plain cotton or polyester fabric works well for the lining, as it’s easy to clean and won’t interfere with insulation.
You’ll also need strong handles—cotton webbing, quilted straps, or reinforced fabric strips are great options.
Don’t forget coordinating thread, sturdy sewing needles, and optional embellishments like binding tape or decorative stitching to give your project a polished finish.
Choosing quality materials from the start will make your carrier last longer and look more professional.
2. Step-by-Step Guide to Making the Totally Convenient Casserole Carrier – Tutorial
Begin by measuring your casserole dish. This ensures the carrier will fit snugly and securely around it.
Cut your outer fabric, lining, and heat-resistant batting according to the measurements, allowing for seam allowances.
Layer the fabrics—outer fabric, batting, and lining—then quilt them together using your preferred quilting design. Straight-line quilting or simple grids work beautifully.
Attach the handles to the quilted panel, making sure they are positioned evenly and securely stitched.
Fold and sew the panel into the carrier’s shape, adding reinforced seams for strength, especially at stress points.
Finish the edges with binding or bias tape for a neat, durable, and professional look. Your Totally Convenient Casserole Carrier – Tutorial project is now ready for use.
3. Creative Ways to Use the Totally Convenient Casserole Carrier – Tutorial
The Totally Convenient Casserole Carrier – Tutorial isn’t just for casseroles. Its versatile design makes it useful for many different occasions.
Use it to carry lasagna, baked pasta, or roasted vegetables to a dinner party.
Bring cold desserts like cheesecakes or layered salads to a summer picnic without worrying about spills.
Carry homemade bread, pies, or pastries to family gatherings, keeping them fresh and protected.
Use it as a stylish tote for potluck events, showcasing your sewing talent while keeping dishes intact.
It’s perfect for camping trips or outdoor dining, ensuring your food stays at the right temperature.
The carrier can even serve as a gift wrap for a dish you’re gifting, combining practicality with presentation.
4. Personalization Tips for the Totally Convenient Casserole Carrier – Tutorial
One of the joys of sewing your own Totally Convenient Casserole Carrier – Tutorial is the ability to customize it to your liking.
Choose fabrics that reflect your personal style or match your kitchen décor. Seasonal prints are great for themed events or holidays.
Add embroidery with a family name, a fun cooking quote, or decorative motifs to make it truly one-of-a-kind.
Incorporate patchwork quilting for a vibrant, colorful look, using fabric scraps to create a unique design.
Experiment with handle designs—short and sturdy for heavy dishes, or longer straps for over-the-shoulder carrying.
Use contrast binding to make the edges pop and give the carrier a striking finish.
You can even make multiple carriers in different sizes to fit a variety of dishes, from small baking pans to large trays.
FAQ About Totally Convenient Casserole Carrier – Tutorial
Q1: Is this project suitable for beginners?
Yes, with basic sewing skills and attention to measurements, beginners can complete this project successfully.
Q2: Can I machine wash the casserole carrier?
Yes, but use gentle cycles and avoid high heat to protect the batting and fabric.
Q3: How do I make it more heat-resistant?
Use a double layer of heat-resistant batting or add a thermal lining for extra insulation.
Q4: What dish sizes will this carrier fit?
You can customize the measurements to fit anything from small square pans to large casserole dishes.
Q5: Can I make a reversible version?
Yes, by sewing with two outer fabrics and hiding the seams, you can create a reversible carrier for versatility.
Q6: Is it safe for both hot and cold dishes?
Absolutely. The insulation works for both temperatures, keeping food warm or chilled.
Conclusion
The Totally Convenient Casserole Carrier – Tutorial is a practical, stylish, and customizable sewing project that makes transporting dishes easier and more enjoyable. With the right materials, simple construction steps, creative uses, and personalization options, you can create a carrier that’s as functional as it is beautiful.
Whether you’re making one for yourself or as a thoughtful handmade gift, this project is sure to impress. Share your honest feedback and suggestions—we’d love to hear how your version turned out.