If you have ever wanted to combine creativity with functionality in your quilting journey, then the Panettone House – TUTORIAL is the perfect project to dive into. This design captures the warmth and coziness of a house while celebrating the festive charm of panettone. It is more than just a quilt block; it’s a storytelling piece that can be part of larger quilts, wall hangings, or even decorative items around your home.
Learning this pattern not only expands your quilting skills but also adds a touch of joy to your crafting projects. The Panettone House – TUTORIAL offers step-by-step guidance for both beginners and advanced quilters, making it a versatile and enjoyable design to master. By practicing it, you will improve your precision, fabric coordination, and overall quilting confidence.
Throughout this article, we’ll explore the main aspects of this pattern, providing you with insights into materials, methods, creative variations, and practical tips. By following along, you’ll be able to recreate the charm of the Panettone House while building your quilting expertise in a fun and inspiring way.
1. Understanding the Panettone House Design
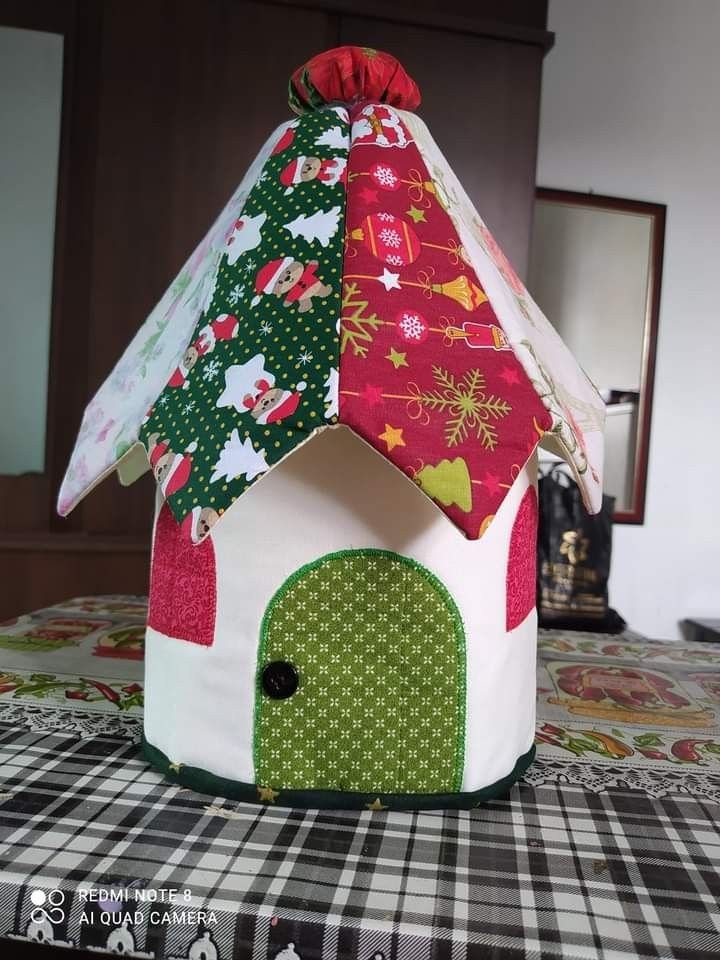
The Panettone House – TUTORIAL is based on a cozy, home-inspired block design, often reflecting the shape of a house decorated with warm, seasonal colors. It symbolizes comfort, family, and tradition, making it an ideal pattern to include in holiday-themed quilts or as a standalone decorative block.
SEE OTHER FACE PATTERNS HERE!
The design can be adapted to different quilt sizes, depending on whether you want it as part of a larger quilt or as an individual mini quilt. This flexibility is what makes the pattern so popular among quilting enthusiasts.
At its core, the pattern emphasizes geometric precision. Using squares, rectangles, and triangles, the house comes together through traditional piecing techniques that allow quilters to practice accuracy.
The charm of the Panettone House – TUTORIAL lies in its ability to be customized. You can experiment with various fabrics, from festive reds and greens to modern pastel shades, making the design suitable for any theme.
Many quilters find this pattern to be a beautiful way to tell a personal story. A house symbolizes belonging, and when paired with the idea of panettone—a holiday classic—it adds a sense of celebration.
Above all, understanding the design means appreciating its potential: a small block with big emotional impact, ready to become the centerpiece of a quilt.
2. Materials and Preparation
The success of the Panettone House – TUTORIAL begins with careful material selection. Choosing high-quality cotton fabrics is essential, as they ensure durability and easy handling during cutting and sewing.
When planning your project, gather fabrics in contrasting shades to make the house structure visible and distinct. Neutral tones can serve as backgrounds, while bolder fabrics highlight the roof, windows, and decorative details.
Accurate cutting tools are crucial. A rotary cutter, self-healing cutting mat, and quilting ruler will help you achieve sharp, precise pieces. This step should never be rushed, as exact cuts lead to a cleaner final design.
Thread choice is also important. Opt for a strong cotton thread that complements your fabrics without overwhelming the colors. Matching thread blends in seamlessly, while contrasting thread adds a playful touch.
Before you begin sewing, press your fabrics to eliminate wrinkles. Flat fabrics are easier to cut and sew, ensuring that seams align correctly.
Finally, organize your pieces before stitching. Labeling or arranging them in sequence avoids confusion, especially if you are making multiple blocks. Preparation saves time and enhances the quilting experience.
3. Step-by-Step Construction
Creating the Panettone House – TUTORIAL involves piecing together basic shapes into a charming house block. Start with the foundation of the house, typically a large square or rectangle, which serves as the central body.
The roof is usually created using triangles that form a clean peak. Precision here is vital, as misaligned seams can distort the overall look of the block. Pinning pieces before stitching helps maintain accuracy.
Add smaller rectangles and squares to represent windows and doors. These details bring the design to life and allow for creative fabric choices. A patterned fabric for the door or a bright window adds personality.
Assemble the block section by section, pressing seams open or to the side as needed. Pressing ensures the block remains flat and neat, which is essential for quilting.
Once the block is assembled, trim it to the correct size. Squaring up your block ensures it fits seamlessly into larger quilt layouts. This step is often overlooked but makes a significant difference.
Finally, repeat the process if you are making multiple blocks. Each block will have slight variations, especially if you experiment with colors, making every house unique.
4. Creative Uses and Variations
The Panettone House – TUTORIAL can be used in countless creative projects. While it works beautifully in a full quilt, it also shines as a wall hanging, cushion cover, or festive table runner.
One fun variation is to create a neighborhood effect by sewing multiple house blocks together, each in different colors. This creates a lively quilt that tells the story of a village.
For holiday projects, use fabrics inspired by Christmas, winter, or even New Year celebrations. A red roof with snowflake prints can transform the house into a winter wonderland.
Another creative option is to personalize the block by adding embroidery or appliqué. Small stitched flowers, vines, or even initials can make the quilt block uniquely yours.
This design is also excellent for teaching children or beginners, as its straightforward shapes make it less intimidating while still producing rewarding results.
Ultimately, the possibilities with the Panettone House – TUTORIAL are only limited by your imagination. Whether modern, traditional, or seasonal, this pattern adapts beautifully to any style.
FAQ about Panettone House – TUTORIAL
What skill level is required to make the Panettone House block?
This tutorial is suitable for confident beginners and experienced quilters alike. It uses basic shapes and straightforward piecing.
Can I make the Panettone House in different sizes?
Yes, the block can be scaled up or down depending on your quilt design. Simply adjust the measurements proportionally.
What fabrics work best for this pattern?
High-quality cotton fabrics are recommended, as they are durable and easy to sew. Choose contrasting fabrics to highlight the house features.
Do I need special tools for this project?
Essential quilting tools like a rotary cutter, cutting mat, and ruler are recommended. They help achieve precise and accurate cuts.
How can I personalize my Panettone House block?
You can add embroidery, appliqué, or unique fabric choices to customize the design. Seasonal colors also make it special.
Is this pattern beginner-friendly?
Yes, it’s a great project for beginners who want to practice precision and creativity while working with simple shapes.
Conclusion
The Panettone House – TUTORIAL is more than just a quilting project—it’s a creative journey that combines tradition, precision, and personal expression. From preparation to final assembly, this design teaches valuable quilting skills while leaving plenty of room for imagination. Whether you use it for festive quilts, wall hangings, or playful décor, the Panettone House brings warmth and charm to any project.
PATTERN HERE:
We hope this guide inspires you to create your own version of the Panettone House. Share your experience with this tutorial in the comments, and let us know your honest opinion and suggestions for future projects. Your feedback makes this quilting journey even more rewarding.


