The Granny Square Gloves – PATTERN is a creative and stylish way to combine the timeless charm of granny squares with the practicality of cozy gloves. Perfect for both beginners and seasoned crocheters, this pattern allows you to transform small squares of yarn into a functional accessory that adds warmth and a touch of vintage flair to your wardrobe. Using this tutorial, you can create gloves that are not only unique but also customizable in color and size to suit your personal style.
This project is a fantastic choice for anyone looking to try a crochet design that is quick to complete yet rewarding in its final result. Because granny squares are a fundamental crochet motif, they are excellent for practicing stitches and improving technique. Once assembled into gloves, the squares take on a whole new purpose, making this project a wonderful mix of traditional and modern crochet.
In this Granny Square Gloves – PATTERN, you will learn how to create individual squares, connect them, and shape them into a beautiful pair of gloves. With clear instructions, it becomes simple to follow along even if you are new to crochet. The end product is versatile, practical, and full of handmade charm. Now, let’s explore the step-by-step details.
1. Understanding the Granny Square Gloves – PATTERN
The first step in creating these unique gloves is understanding what makes the Granny Square Gloves – PATTERN so appealing. Granny squares have been a staple in crochet for decades, often used in blankets, scarves, and home décor. By applying this motif to gloves, you get a fun twist that brings functionality to a beloved pattern.
DISCOVER MORE FREE PATTERNS HERE!
Each glove is made up of multiple granny squares, arranged and stitched together in a way that comfortably fits your hands. This means you can adjust the number and size of the squares depending on how loose or snug you want the gloves to be. Beginners will appreciate the simple repetition of stitches, while more advanced crocheters can experiment with different variations and designs.
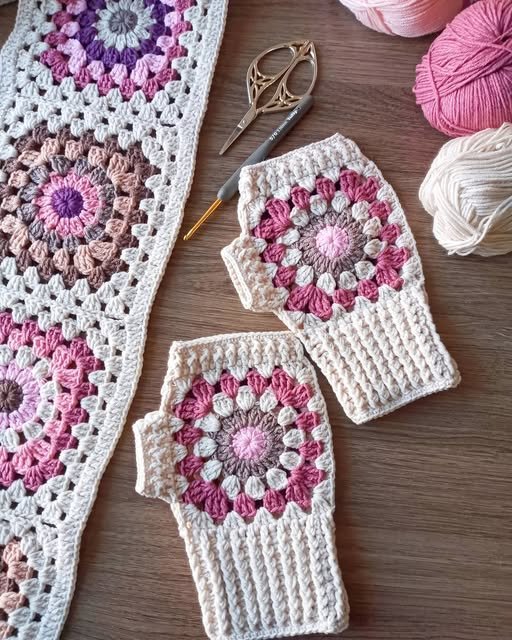
The pattern also opens endless possibilities for color play. You can stick with a single solid shade for a minimalist look, or use bold contrasting colors for a retro-inspired accessory. Choosing yarn textures such as soft wool, cotton, or blends also allows you to adapt the gloves to different seasons.
Another highlight of this Granny Square Gloves – PATTERN is its sustainability. Small leftover yarns from other projects can be used, making it a great eco-friendly crochet idea. This not only reduces waste but also adds unique character to every pair of gloves you make.
When completed, the gloves offer warmth, comfort, and a handmade touch that cannot be replicated by store-bought items. They are also perfect as gifts for family and friends, especially during the colder months.
Overall, learning this pattern is an opportunity to enjoy crochet in a practical and fashionable way while honing your skills.
2. Materials Needed for Granny Square Gloves – PATTERN
To create your Granny Square Gloves – PATTERN, gathering the right materials is key. Choosing the correct yarn, hook, and accessories will ensure your gloves are durable and comfortable.
First, select a yarn that feels soft against the skin. Acrylic yarns are budget-friendly and come in many colors, but wool or cotton blends can provide extra warmth and a natural finish. The thickness of the yarn will determine how bulky or lightweight your gloves will be.
Next, pick the appropriate crochet hook size recommended on your yarn label. Using the correct hook ensures that your stitches are consistent and that the squares are uniform in size. A mismatch between yarn and hook size may affect the final fit of the gloves.
You will also need a yarn needle for sewing the granny squares together. This step is just as important as crocheting the squares themselves since it ensures the gloves hold their shape.
Scissors are another essential tool for trimming yarn ends neatly. Having stitch markers handy can also help you keep track of your work, especially when joining pieces.
Optional embellishments such as buttons, beads, or decorative edging can be added to personalize your gloves further. These small touches elevate the look of your finished piece.
With these materials in place, you are ready to begin crocheting your granny squares and moving closer to completing your handmade gloves.
3. Step-by-Step Guide to Making Granny Square Gloves – PATTERN
Creating your Granny Square Gloves – PATTERN involves following a clear sequence of steps. With patience and practice, the process becomes enjoyable and rewarding.
Start by crocheting your granny squares. The basic granny square usually begins with a magic ring or chain loop, followed by rounds of double crochet stitches separated by chain spaces. Repeat these rounds until you reach the desired square size.
Make multiple squares in the same size for uniformity. The number of squares depends on the glove size you want to achieve. Typically, four to six squares per glove work well, but you can adjust as needed.
Once your squares are ready, arrange them into the shape of a glove. Lay them out flat to visualize the structure, ensuring there’s an opening for the thumb. This step helps avoid mistakes when sewing them together.
Use a yarn needle to stitch the squares along the edges. Secure them tightly but without pulling too hard, so the fabric remains flexible and comfortable to wear.
After assembling the glove body, crochet a small band or ribbed cuff at the wrist area. This helps the gloves stay in place and adds a neat finishing touch.
Finally, weave in all yarn ends and try on your gloves. Adjust any loose stitches or seams to make sure they fit snugly. Congratulations—you now have a handmade pair of granny square gloves!
4. Tips and Creative Variations for Granny Square Gloves – PATTERN
Once you’ve mastered the basics of the Granny Square Gloves – PATTERN, you can experiment with creative variations to make your project unique.
Try using multi-colored yarn for a vibrant, rainbow effect without needing to switch skeins. This adds a playful and modern twist to the traditional granny square design.
You can also alternate different granny square styles, such as flower-centered squares or textured stitches, to give your gloves a distinctive look. Mixing and matching designs keeps the project interesting and visually appealing.
If you want extra warmth, line your gloves with a thin fleece fabric. This addition makes them even cozier while still showcasing the crochet exterior.
For a more elegant finish, add decorative edging around the glove openings. Simple picot or scalloped borders work beautifully and add sophistication to your gloves.
These gloves can also be customized for children by using smaller squares and brighter colors. Making matching sets for family members can turn this into a fun group project.
Lastly, consider using this Granny Square Gloves – PATTERN as part of a set with other granny square accessories like scarves, hats, or bags. This creates a coordinated and stylish handmade collection.
FAQ about Granny Square Gloves – PATTERN
1. Are Granny Square Gloves suitable for beginners?
Yes, this pattern is beginner-friendly, as it uses basic crochet stitches and simple assembly techniques.
2. How many granny squares do I need for one pair of gloves?
Typically, you will need 8–12 squares depending on the size of your hands and the size of each square.
3. Can I make these gloves with leftover yarn?
Absolutely! This is a great project for using small yarn scraps and creating colorful designs.
4. How long does it take to make a pair of Granny Square Gloves?
On average, it takes a few hours to a day, depending on your crochet speed and experience level.
5. Can I wash my Granny Square Gloves?
Yes, but always follow the care instructions for your chosen yarn. Handwashing is recommended for delicate fibers.
6. What size hook should I use?
The hook size depends on the yarn you select, but most medium-weight yarns work well with a 4mm–5mm hook.
Conclusion
The Granny Square Gloves – PATTERN is a perfect project for anyone who loves crochet and wants to create a practical accessory with vintage charm. By learning how to make and assemble granny squares into gloves, you can enjoy a satisfying and creative experience while producing something warm and wearable. This tutorial not only enhances your crochet skills but also allows endless customization to reflect your personal taste.
PATTERN HERE:
Now that you know how to make your own, give it a try and share your results! We’d love to hear your thoughts, see your creations, and receive your suggestions for future tutorials.