The Patchwork Curtain – TUTORIAL is the perfect guide for anyone who loves quilting and wants to bring a cozy, handmade touch into their home décor. Curtains are often overlooked when it comes to quilting projects, but they can be transformed into stunning statement pieces using simple patchwork techniques. Whether you are a beginner learning how to handle fabric scraps or an experienced quilter seeking a creative new challenge, this tutorial will inspire you to combine colors, patterns, and textures into a unique and practical project.
Making a patchwork curtain allows you to personalize your space while also putting your quilting skills to good use. Instead of throwing away fabric leftovers, this project encourages sustainable crafting, helping you repurpose those precious scraps into something functional and beautiful. It’s a project that combines design and practicality, offering both decorative charm and privacy for your living spaces.
In this article, we will explore the steps of making patchwork curtains, tips for choosing fabrics, creative layout ideas, and sewing techniques to ensure that your curtain hangs beautifully. By following this Patchwork Curtain – TUTORIAL, you will not only learn valuable quilting methods but also create a handmade piece that adds warmth and character to your home.
1. Choosing Fabrics for Your Patchwork Curtain
When starting your patchwork curtain, the fabric selection is one of the most important steps. The overall look of your curtain will be influenced by your choice of colors, textures, and prints.
SEE OTHER FACE PATTERNS HERE!
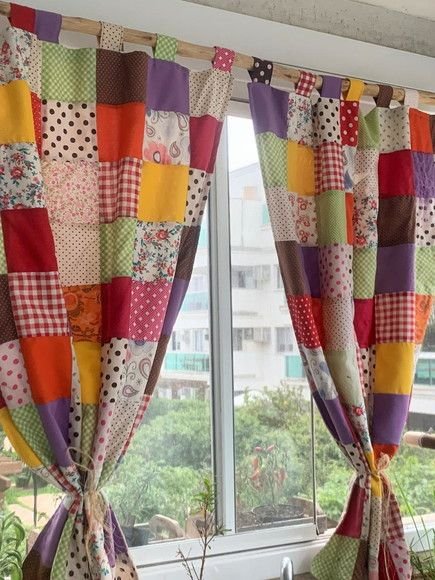
You can go for a coordinated palette to create a sophisticated look or mix bold patterns for a playful, bohemian style.
Cotton fabrics are the most commonly used materials in quilting and work beautifully for curtains, as they are durable and easy to sew.
Make sure to wash and iron your fabrics before starting so that they are clean and free of shrinkage once the curtain is complete.
For a light and airy curtain, use pastel shades and lighter fabrics, while darker tones or heavier cotton blends will create more privacy.
Scraps from previous quilt projects are perfect for this tutorial, making it a sustainable and cost-friendly option.
2. Planning the Layout of Your Patchwork Curtain
Before you start sewing, take some time to plan the layout of your curtain. Think of the curtain panel as a canvas where you can arrange your patchwork design.
You can choose a traditional block arrangement, like squares or rectangles, or experiment with asymmetrical layouts for a modern look.
If you want to achieve balance, place lighter and darker colors strategically so that they complement each other without overwhelming the space.
It’s helpful to lay out the pieces on the floor or a large table before stitching to visualize the final look.
Don’t be afraid to mix different textures—linen, cotton, and even denim can create interesting depth in your curtain.
Remember, the charm of patchwork lies in its imperfections, so embrace the creativity and let your personality shine through your layout.
3. Sewing Techniques for a Perfect Finish
Once your fabrics are cut and arranged, it’s time to sew them together with precision. Start by sewing small squares or strips, and then gradually join them to form larger sections.
Use a consistent seam allowance to ensure that all the pieces align neatly and the curtain hangs evenly.
Press the seams flat as you sew—this not only helps the curtain look professional but also makes the sewing process smoother.
After completing the patchwork panel, you can line the back of the curtain with a solid piece of fabric for extra stability.
Adding a lining also helps block out light and gives your curtain a polished finish.
Finally, hem the edges and add a casing at the top to insert a curtain rod, ensuring your handmade curtain is ready to hang.
4. Styling Ideas for Patchwork Curtains
Patchwork curtains are versatile and can be styled in many ways to match your home décor. They work perfectly in kitchens, where a cheerful mix of prints brings warmth and personality.
In living rooms, patchwork curtains add a cozy, handmade touch that pairs well with rustic or farmhouse styles.
Children’s rooms are also a great place for patchwork, where bright colors and playful patterns create a fun atmosphere.
For a minimalist home, you can use neutral tones and subtle patterns to create a calm and modern look.
Seasonal fabrics can also be used—think floral patterns for spring, warm tones for autumn, or festive prints for holidays.
Because they are easy to change, patchwork curtains allow you to refresh the look of your space without major redecorating.
FAQ about Patchwork Curtain – TUTORIAL
1. Can beginners make a patchwork curtain?
Yes! This project is beginner-friendly, and the patchwork technique is simple to learn with straight seams and easy cutting.
2. What fabric works best for patchwork curtains?
Cotton is the most recommended fabric, but you can experiment with blends, linen, or even repurposed fabrics for a creative touch.
3. Do I need a sewing machine for this project?
A sewing machine makes the process faster and neater, but you can also hand-sew if you prefer a slow, mindful approach.
4. How do I make the curtain more durable?
Adding a lining fabric at the back and reinforcing the seams will help increase durability and give your curtain a professional look.
5. Can I use patchwork curtains outdoors?
It is best to keep patchwork curtains indoors, but if you want them outside, choose weather-resistant fabrics and bring them in during bad weather.
6. How do I clean patchwork curtains?
Wash them on a gentle cycle with mild detergent, and always follow the washing instructions of the fabrics you used.
Conclusion
The Patchwork Curtain – TUTORIAL offers a wonderful way to blend quilting with practical home décor. With careful fabric choices, creative layouts, and simple sewing techniques, you can create a handmade curtain that reflects your personal style. Not only is this project sustainable and budget-friendly, but it also allows you to add warmth and uniqueness to any room.
PATTERN VIDEO – PART 1:
PATTERN VIDEO – PART 2
PATTERN VIDEO – PART 3:
We hope this guide inspires you to start your own patchwork curtain project. Share your honest opinions and suggestions in the comments—we’d love to hear about your experience and ideas!


