The Cell Phone Charging Station is a modern and highly practical quilt project that combines creativity, functionality, and style. In today’s world, where we rely on our devices daily, having a safe and attractive place to charge our phones is essential. This quilt pattern not only allows you to make a personalized charging station but also gives you the chance to explore your quilting skills while creating something useful. If you love sewing projects that are both decorative and functional, this tutorial is perfect for you.
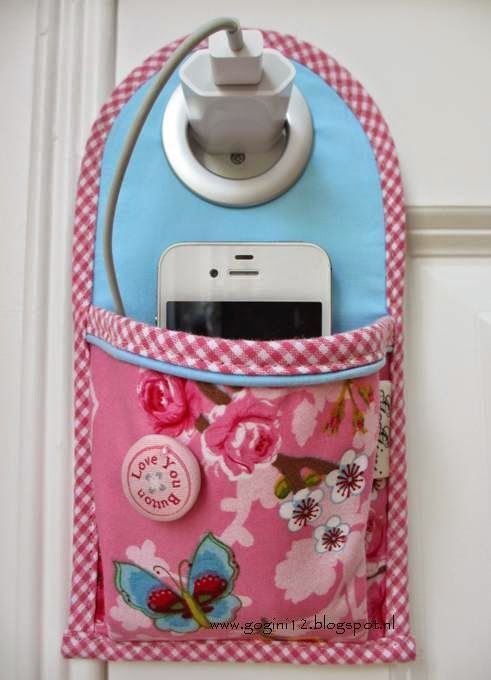
Quilting is often seen as a craft dedicated to blankets and wall hangings, but with innovative projects like the Cell Phone Charging Station, we see how versatile quilt patterns can be. This design works as a fabric pocket that can hold your phone while charging, keeping it off the floor and safe from damage. Plus, you can personalize it with your favorite fabrics, patterns, and colors to match your home décor.
Another advantage of this project is its simplicity. Even if you are new to quilting, you will find this tutorial approachable and rewarding. With just a few supplies and a bit of creativity, you can finish a charging station in no time and even make extra pieces as thoughtful handmade gifts for friends and family.
1. Why Make a Quilted Cell Phone Charging Station?
Creating a Cell Phone Charging Station using quilt techniques is more than just a fun sewing project. It brings together utility, creativity, and eco-friendly practices, especially when you use fabric scraps.
SEE OTHER FACE PATTERNS HERE!
First, it keeps your phone safe while charging. Many of us leave our phones on the floor or balance them precariously on small shelves when charging, which increases the risk of damage. This quilted station provides a dedicated, cushioned spot for your device.
Second, it is highly customizable. You can experiment with fabric designs, patchwork styles, and quilting motifs to create something that reflects your personal style. Whether you love minimalist patterns, bright colors, or traditional patchwork, the result is always unique.
Third, this project is beginner-friendly. It doesn’t require complicated piecing or quilting methods, which makes it an ideal project for anyone just getting started with quilting.
Fourth, the charging station is also portable. You can make different versions for your bedroom, kitchen, or office, ensuring that your phone always has a safe place while charging.
Fifth, it makes a great gift. With just a small amount of fabric, you can create a thoughtful handmade gift that friends and family will actually use.
Finally, making your own quilted charging station is budget-friendly. Instead of buying plastic holders, you can upcycle fabric scraps and create something durable and eco-conscious.
2. Materials and Tools You Will Need
To make your Cell Phone Charging Station, you don’t need many supplies. Most of the items can be found in your sewing kit or repurposed from leftover quilting projects.
First, you will need fabric. Choose a sturdy cotton fabric for the outside and a coordinating print for the lining. This will ensure durability and style.
Second, gather some batting or interfacing. A lightweight batting will provide structure and protect your phone, while interfacing can help the pocket hold its shape.
Third, you will need a sewing machine and basic sewing tools such as scissors, rotary cutter, pins, and thread. Matching thread is preferable, but you can also use contrasting thread for decorative stitching.
Fourth, grab some bias tape or binding strips. These will finish the edges of your project neatly.
Fifth, make sure to have an iron on hand. Pressing each step will make the final project look polished and professional.
Finally, consider adding embellishments. Small quilt blocks, appliqués, or embroidery details can give your charging station a personalized touch.
3. Step-by-Step Guide to Making Your Charging Station
Now that you have your supplies, let’s walk through the process of creating a quilted Cell Phone Charging Station.
First, cut two rectangles of fabric (outer and lining) and one piece of batting in the same size. The dimensions will depend on your phone size, but a good standard is 10 x 6 inches.
Second, layer the fabrics and batting to create a quilt sandwich. Place the outer fabric right side down, then the batting, and finally the lining fabric right side up.
Third, quilt the layers together. You can use simple straight-line quilting or try free-motion quilting if you feel adventurous. This step not only adds decoration but also keeps the layers secure.
Fourth, fold up the bottom edge to form a pocket. The size of the pocket should comfortably fit your phone, leaving space at the top for the charging cord. Pin in place.
Fifth, sew the sides of the pocket securely. Reinforce the stitching at the top edge since this area will get the most stress from holding the phone.
Finally, finish the edges with binding. This step gives your project a clean and professional look while also strengthening the seams.
At this stage, you can add an opening at the top or a loop to hang the charging station near an outlet.
4. Tips for Customizing Your Project
One of the best aspects of quilting is personalization, and the Cell Phone Charging Station offers plenty of room for creativity.
First, experiment with different quilt blocks. You could use half-square triangles, log cabin blocks, or even miniature star blocks to create a unique pocket design.
Second, try mixing fabrics. Use solids for a modern look, florals for a romantic touch, or novelty prints for a fun and playful vibe.
Third, don’t shy away from bold quilting stitches. Decorative stitches can add texture and style to your project.
Fourth, adjust the size to fit different devices. Tablets, e-readers, or even portable chargers can have their own customized quilted holders.
Fifth, consider making matching sets. A quilted charging station paired with a fabric organizer or quilted pouch makes a perfect gift set.
Finally, you can add functional details such as a small button closure, a Velcro tab, or even an extra pocket for holding earphones or cables.
FAQ – Cell Phone Charging Station
1. Can I make a charging station without a sewing machine?
Yes, you can hand-sew this project, though it will take longer. A sewing machine provides stronger seams, which are ideal for durability.
2. What type of fabric works best for this project?
Cotton quilting fabric is the best choice. It’s durable, easy to sew, and available in endless patterns and colors.
3. Can I wash the charging station?
Yes, if made with cotton fabrics and washable batting, it can be gently washed and air-dried. Avoid heavy machine washing if you added embellishments.
4. How can I make the station stronger?
Adding interfacing or using thicker batting will give your project more structure and durability.
5. Is this a beginner-friendly project?
Absolutely! The Cell Phone Charging Station is a simple quilt project suitable for beginners and experienced quilters alike.
6. Can I gift this project?
Yes, it makes an excellent handmade gift for birthdays, holidays, or just as a thoughtful surprise for someone who loves practical items.
Conclusion
The Cell Phone Charging Station is a perfect example of how quilting can be both creative and practical. With just a few supplies and basic sewing skills, you can create a stylish and functional piece that keeps your phone safe while charging. This tutorial shows how easy it is to transform fabric into something useful and beautiful. If you’re looking for a quick quilt project that also makes a thoughtful gift, this is the one for you.
Now it’s your turn! Try this project and let us know in the comments what fabrics you chose, how you customized your design, and any tips you discovered along the way. Your feedback and suggestions are always welcome!


