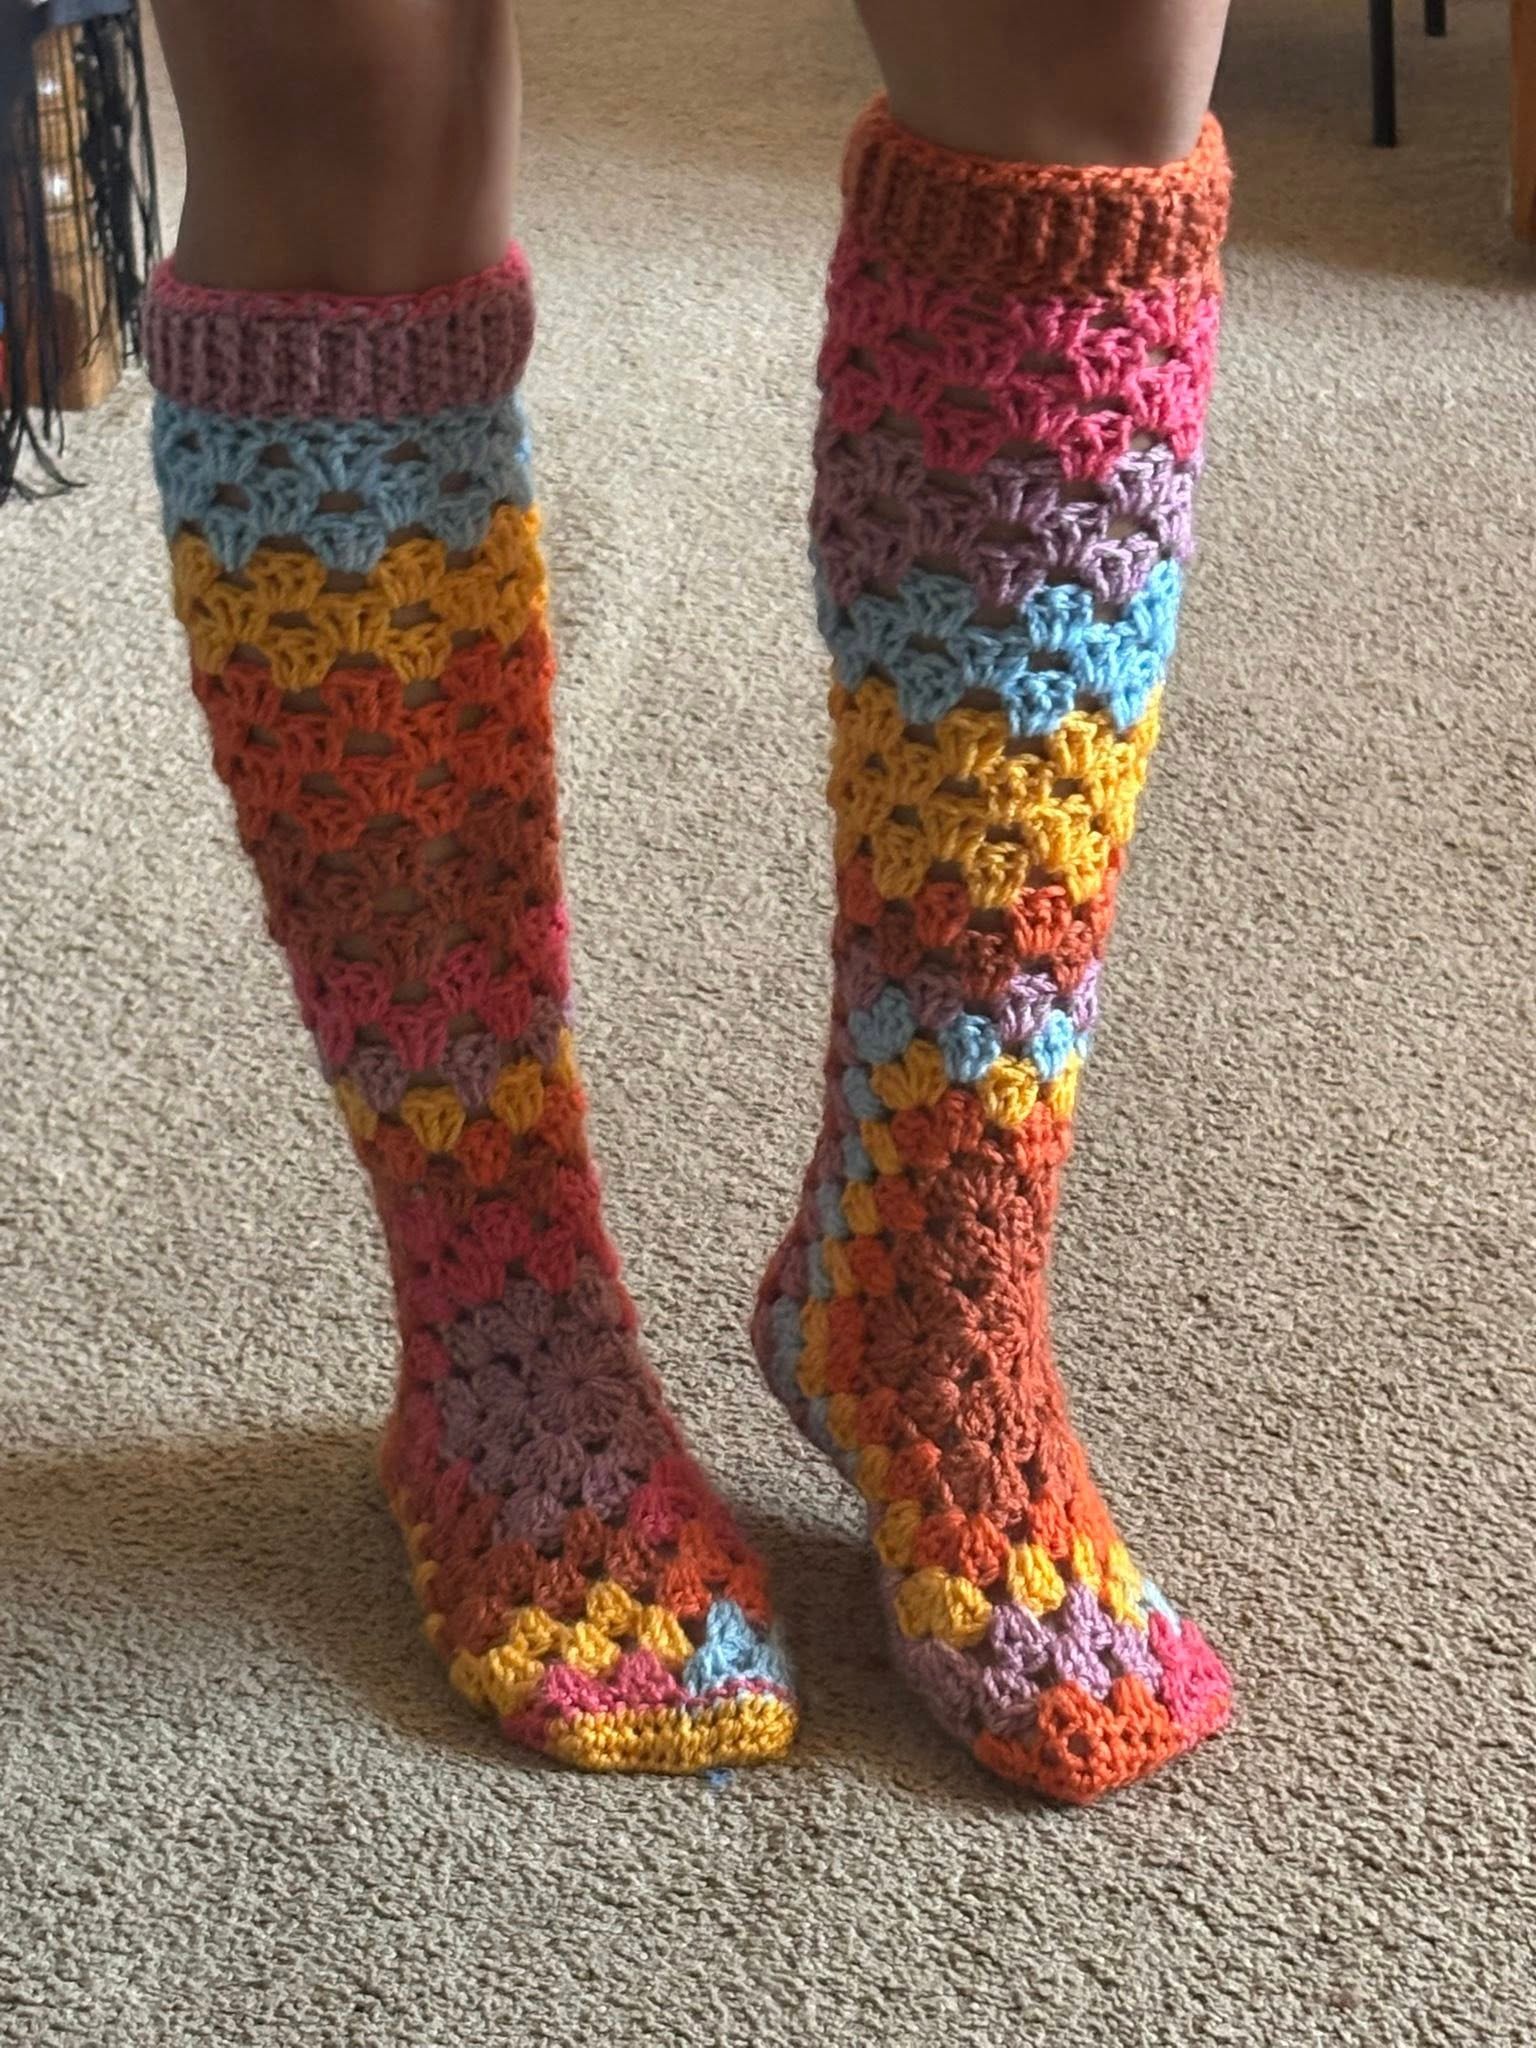
The Crochet Long Socks – TUTORIAL is a fun and cozy project for anyone who loves crochet and wants to create something both practical and stylish. Handmade socks are not only warm and comfortable but also allow you to showcase your creativity with yarn colors and stitch designs. With this tutorial, you can make your very own pair of long crochet socks that are perfect for chilly evenings at home or even as a thoughtful handmade gift.
What makes this project special is its versatility. You can adjust the size, color, and style to fit your needs. Whether you want a pair of vibrant socks with bold patterns or something more classic in neutral tones, the crochet long socks can be customized easily. They are also durable and washable, which means you will enjoy them for years to come.
In this Crochet Long Socks – TUTORIAL, you will learn the step-by-step process of making comfortable and beautiful socks using basic crochet stitches. Even if you are a beginner, this project is straightforward and will give you great practice while creating something useful. Let’s get started with all the details you need to know.
1. Materials Needed for the Crochet Long Socks – TUTORIAL
The first step in creating your crochet long socks is gathering the right materials. Having everything prepared will make the process smoother and more enjoyable.
DISCOVER MORE FREE PATTERNS HERE!
You will need yarn, and the best choice for socks is usually a soft yet durable yarn. Cotton or acrylic blends are popular options because they are breathable and comfortable. You may also consider wool blends if you want extra warmth for the winter season.
Choose a yarn that is medium or light weight. Too bulky of a yarn will make the socks uncomfortable, while yarn that is too thin may not provide enough warmth. Always check the label to make sure the yarn is suitable for wearable projects.
Next, you will need a crochet hook that matches the yarn size. Typically, a 3.5 mm to 4.5 mm hook works well for socks. The hook size will also influence the sock’s stretch and final fit.
Other essentials include scissors and a yarn needle. The scissors will help you cut your yarn neatly, and the needle will be used to weave in loose ends for a polished finish.
Lastly, it’s a good idea to have a measuring tape nearby. Since socks are fitted items, measuring your foot length and width ensures the finished pair will fit perfectly.
2. Step-by-Step Crochet Long Socks – TUTORIAL
To begin, you’ll start at the toe of the sock. Create a magic ring or chain a small circle, and then work single crochets or half double crochets into the round. Increase gradually until the toe part is wide enough to cover the front of your foot.
Once the toe is complete, you will move on to the foot section. This is usually made by working in continuous rounds of the chosen stitch. Single crochet, half double crochet, or a mix of stitches can be used, depending on the texture you want.
When you reach the heel, the construction changes slightly. You can make a short-row heel, which involves turning back and forth for several rows, creating a cup shape that fits around the heel. This part may take a little patience, but it is what gives the sock its proper shape.
After completing the heel, you continue crocheting in the round to create the ankle and the leg portion. Since these are long socks, you will keep working upwards until you reach the desired length. You can make them knee-high or just above the calf, depending on your preference.
For the finishing edge, many crocheters like to add a ribbed cuff. This can be done by alternating front post and back post double crochets or by creating a separate ribbing and sewing it onto the sock. The ribbed cuff ensures the sock stays in place and doesn’t slide down.
Finally, once your sock is complete, fasten off and weave in all the loose ends with a yarn needle. Repeat the same process to create the second sock, making sure both are the same size and length.
3. Creative Variations for the Crochet Long Socks – TUTORIAL
One of the joys of making crochet long socks is the freedom to customize them. You are not limited to just one style or color.
You can create striped socks by switching yarn colors every few rounds. This makes the socks look cheerful and unique. Variegated yarns also work beautifully and add color changes without extra effort.
Another variation is to add lace or openwork stitches to the sock’s upper portion. This creates a more breathable design and adds a touch of elegance, especially if you want socks that are fashionable as well as practical.
If you love textured designs, you can use popcorn stitches, shells, or bobbles on the leg portion. These patterns not only look decorative but also add a cozy feel to the socks.
Crochet long socks also make great gift ideas. You can personalize them with the recipient’s favorite colors or even add small embellishments like buttons, bows, or crocheted flowers. Handmade socks are thoughtful and show that you put time and effort into creating something special.
For those who sell handmade items, these socks can be a wonderful addition to your shop. Many people appreciate the uniqueness and comfort of handmade socks, making them a great product for craft fairs or online stores.
4. Tips for Perfecting the Crochet Long Socks – TUTORIAL
Creating socks requires attention to detail, especially because they need to fit comfortably. Here are some tips to make your project a success.
First, measure your foot carefully before starting. Write down your foot length, width, and ankle size. This ensures your socks will fit snugly but comfortably.
Second, always keep your tension consistent. Uneven tension may cause one sock to come out larger or smaller than the other. Practicing on a small swatch before starting can help maintain control.
Third, don’t be afraid to try the sock on as you work. Since crochet is flexible, you can check the fit regularly and adjust if needed. This prevents surprises once the sock is finished.
Fourth, choose yarn that is soft and comfortable against the skin. Since socks are worn directly on the feet, avoid rough or itchy yarns that may cause irritation.
Fifth, block your finished socks if needed. Blocking helps shape the fabric and makes the stitches look more even. This extra step gives your socks a polished look.
Lastly, enjoy the process! Making crochet socks is not just about the final product but also about the joy of creating something handmade. Take your time, and let your creativity shine.
FAQ about Crochet Long Socks – TUTORIAL
1. What yarn is best for crochet long socks?
Cotton, acrylic blends, or lightweight wool blends are the best choices for comfort and durability.
2. Can beginners follow this Crochet Long Socks – TUTORIAL?
Yes, the tutorial is beginner-friendly. Some patience is needed for the heel part, but it is easy to learn with practice.
3. How long does it take to make a pair of crochet long socks?
It usually takes between 6–10 hours, depending on skill level and complexity of the design.
4. Do crochet socks stretch with use?
Yes, crochet fabric naturally has some stretch. Choosing the right yarn and hook size helps maintain the shape.
5. How can I make the socks stay up on my legs?
Adding a ribbed cuff at the top ensures the socks stay in place and do not slide down.
6. Can crochet long socks be washed?
Yes, most yarns used for socks are machine washable. Always check the yarn label for specific washing instructions.
Conclusion
The Crochet Long Socks – TUTORIAL gives you all the steps and inspiration to create a cozy and stylish pair of handmade socks. From choosing the right yarn to shaping the heel and adding a ribbed cuff, you now know how to make socks that are both comfortable and beautiful.
This project is ideal for personal use, as a gift, or even as part of a handmade business. The customization options are endless, allowing you to create unique designs every time.
I would love to hear your thoughts! Share your opinion about this tutorial and leave suggestions for future crochet projects. Your feedback is valuable and helps inspire more creative ideas for the crochet community.