The Huggable Cat with Curly Tail – Pattern is an adorable and heartwarming quilt project that combines creativity, comfort, and a touch of whimsy. Perfect for cat lovers and quilters alike, this design transforms simple fabric pieces into a cuddly feline companion full of personality. With its rounded shapes, expressive face, and signature curly tail, this quilt pattern is not only fun to make but also a delightful gift or decorative piece for any home. Whether you’re new to quilting or an experienced crafter looking for something charming and unique, this pattern will surely bring a smile to your face.
Creating the Huggable Cat with Curly Tail is a wonderful way to blend traditional quilting techniques with soft toy-style design elements. The finished piece can be used as a quilt block, a soft pillow, or even a wall hanging. Each cat you make can have its own unique look depending on the fabrics and colors you choose—think calico, tabby, or even a playful patchwork cat made from your favorite fabric scraps. Let’s explore how to bring this lovable quilted cat to life step by step.
1. Materials and Preparation for the Huggable Cat with Curly Tail
Before starting your Huggable Cat with Curly Tail – Pattern, gather all your materials. You’ll need several pieces of high-quality cotton fabric in complementary colors. Choose one main fabric for the cat’s body, another for the tail, and smaller amounts for accents such as the inner ears, nose, or paws. Soft pastel shades give a cozy, gentle look, while bright, bold colors make your cat playful and eye-catching.
SEE OTHER FACE PATTERNS HERE!
You will also need background fabric if you’re making the cat as a quilt block. A neutral color such as cream, white, or light gray works beautifully to highlight your cat’s features. Other essential tools include scissors or a rotary cutter, a cutting mat, pins, thread, and a sewing machine.
If you plan to make your cat three-dimensional or stuffed, add some polyester filling to your supplies. For the tail, a thin wire can be inserted if you want it to hold a permanent curl—just make sure to enclose it safely.
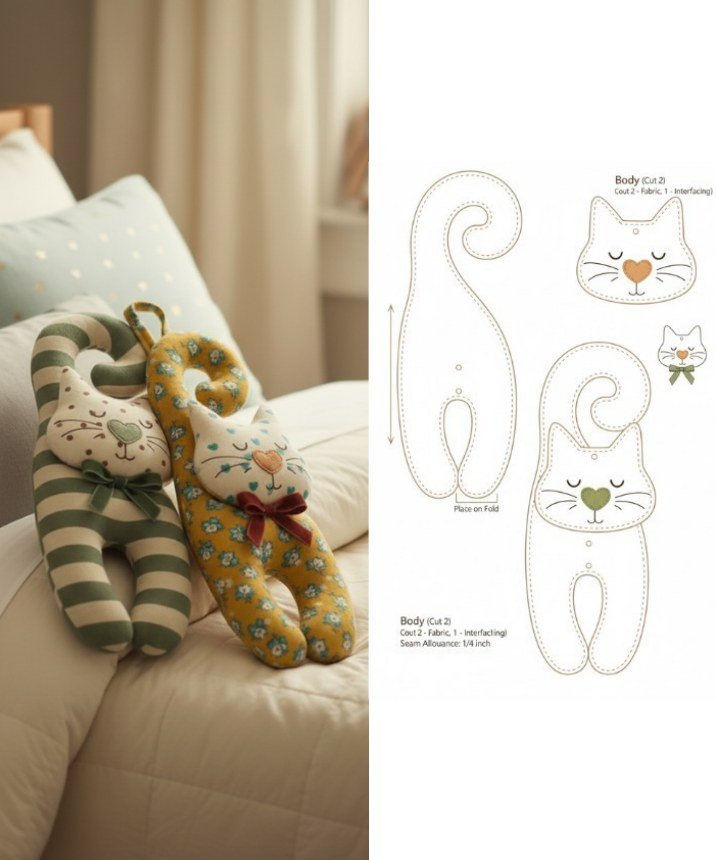
Print or draw your pattern templates for the body, head, and tail. Each section should fit together smoothly. Using templates ensures your pieces maintain consistent shapes and proportions, making the final quilt look polished and professional.
Taking time to organize your fabrics and tools before sewing helps the process flow smoothly and ensures your adorable Huggable Cat with Curly Tail comes out just right.
2. Cutting and Piecing Your Huggable Cat Quilt Pattern
Once your materials are ready, it’s time to begin cutting and assembling your cat. Start by tracing the pattern templates onto the fabric and carefully cutting out each piece. Be sure to label your pieces if needed so you can easily identify which part belongs where.
Begin by sewing the cat’s head and body together. Align the edges carefully and use a ¼-inch seam allowance for accuracy. If your pattern includes separate ear pieces, attach them next. You can keep them flat or lightly stuff them for a three-dimensional effect.
Next, focus on the tail—the most charming feature of this quilt! The curly tail can be created in two ways. For a flat quilt block, simply cut the tail from fabric and appliqué it in a spiral shape onto the background. For a plush or raised effect, sew two tail pieces right sides together, turn them right side out, stuff them gently, and stitch them in a curve to form that distinctive curl.
Once the body, head, and tail are ready, arrange all the parts on the background fabric. Adjust their placement until you’re happy with the proportions. The cat should look cozy, relaxed, and full of life—like it’s ready for a cuddle! Pin or baste all the pieces securely before sewing them in place.
Adding small details such as embroidered eyes, whiskers, and a tiny nose will give your Huggable Cat with Curly Tail its personality. You can use black thread for definition or experiment with colored threads for a playful, artistic touch.
Take your time during this step—the combination of precise piecing and creative detailing will make your finished project truly stand out.
3. Assembling and Quilting the Huggable Cat Block
With your cat design complete, it’s time to assemble it into a finished quilt block. Place your appliquéd cat block onto a layer of batting and backing fabric to prepare for quilting. This step adds softness, structure, and dimension to your project.
Decide on your quilting design. Straight-line quilting can give your piece a clean, modern look, while free-motion quilting adds texture and movement that complements the cat’s curves and tail. You can even quilt around the outline of the cat to make it “pop” against the background.
If you’re turning your cat block into a pillow, trim the block to your desired size and sew it to a backing piece, leaving an opening for stuffing. Once filled, close the opening securely, and you’ll have a soft, huggable companion ready to snuggle.
For a larger quilt, make multiple Huggable Cat with Curly Tail blocks using different fabrics for each one. You can arrange them in playful patterns—perhaps a group of cats curling together or sitting side by side in a row. Each cat can be given a different expression or color combination, making your quilt as unique as your imagination.
Remember to press your seams after quilting and trim any loose threads. This ensures your finished quilt looks crisp and professional.
Once all the blocks are joined, you can add a border to frame your design. A border featuring paw prints, hearts, or tiny fish patterns adds an extra touch of fun and personality. Finish with binding around the edges for a clean, polished result.
4. Finishing Touches and Personalizing Your Huggable Cat Quilt
Now comes the most delightful part—adding finishing touches that bring your Huggable Cat with Curly Tail to life. This is where your creativity shines. You can embellish your cat with ribbons, buttons, or fabric collars for a playful twist. Try adding a small bow near one ear or a heart-shaped patch on its chest for extra charm.
If you’re gifting the quilt to a child, consider using soft, cuddly fabrics like flannel or minky for the body. These fabrics make the quilt extra comforting and tactile. Just make sure any embellishments are securely attached for safety.
Adding embroidered names or messages can also make the quilt deeply personal. A small stitched “Made with Love” tag or the name of the person you’re gifting it to will transform your handmade piece into a keepsake.
For display, this pattern makes a beautiful wall hanging in a nursery, craft room, or reading nook. Its cozy and cheerful design fits perfectly in both modern and traditional interiors.
If you love making themed quilts, you can even adapt the Huggable Cat with Curly Tail – Pattern for different occasions—add a Santa hat for Christmas, pastel tones for spring, or a black cat for Halloween. The possibilities are endless!
Once complete, your huggable cat will be ready to brighten any space or bring joy to someone special. Every stitch tells a story of creativity, care, and love for the craft.
FAQ – Huggable Cat with Curly Tail – Pattern
Q1: Is this pattern suitable for beginners?
Yes! The Huggable Cat with Curly Tail pattern is beginner-friendly and an excellent introduction to appliqué and curved sewing techniques.
Q2: What fabrics are best for this project?
Quilting cottons are ideal, but you can also experiment with soft fabrics like flannel or felt for a plush effect.
Q3: Can I make the tail movable or flexible?
Yes, you can insert a thin craft wire into the tail before stitching it closed to make it bendable and poseable.
Q4: How can I make my cat look unique?
Use different fabrics, add accessories, or vary the facial expressions with embroidery. Every cat can have its own personality!
Q5: Can I use this design for a full quilt?
Absolutely! Combine multiple cats in different colors or poses for a lively, heartwarming quilt design.
Q6: What size should my block be?
The size is flexible. You can scale the pattern up for a large quilt or reduce it for smaller projects like cushions or mini wall hangings.
Conclusion
The Huggable Cat with Curly Tail – Pattern is a joyful project that combines the art of quilting with the charm of handmade design. From choosing your fabrics to stitching on the final whisker, every step allows you to express your love for creativity and comfort. Whether you make it as a gift, a decoration, or a personal keepsake, this pattern captures the warmth of home and the companionship of a beloved pet.
So gather your favorite fabrics, thread your needle, and start sewing your own cuddly, curly-tailed companion today. Your quilt will not only warm hearts but also bring a touch of playfulness and love to any room.