If you love festive handmade décor, this Christmas Tree House – TUTORIAL will bring the magic of the holidays straight into your home. Crochet enthusiasts will adore creating this charming piece that combines creativity, color, and Christmas cheer in one delightful project. A crochet Christmas Tree House makes the perfect addition to your seasonal decorations, adding warmth and personality to your holiday display. Whether you place it on your mantel, as a centerpiece, or even under your real Christmas tree, this tutorial will guide you step-by-step to make it both fun and easy.
Crafting a Christmas Tree House is an enjoyable project for both beginners and experienced crocheters. Using basic stitches, a few simple materials, and a bit of imagination, you can create a cozy and decorative miniature house that looks straight out of a winter fairytale. You can customize it with vibrant yarns, cute doors and windows, and even tiny lights for a whimsical glow.
Throughout this Christmas Tree House – TUTORIAL, we’ll explore the best materials to use, techniques for shaping the structure, and creative ideas for decorating your project. By the end, you’ll have a stunning handmade crochet piece that captures the joy and charm of Christmas — a treasure you can display year after year or give as a thoughtful handmade gift.
1. Gathering the Right Materials for Your Christmas Tree House
To begin this Christmas Tree House – TUTORIAL, it’s important to prepare all the necessary supplies. The beauty of crochet is that you can adapt it to what you already have, but choosing the right materials ensures your project looks professional and lasts through many festive seasons.
DISCOVER MORE FREE PATTERNS HERE!
You’ll need medium-weight yarn in shades of green, red, brown, and white to represent the tree, roof, and snow details. Acrylic yarn is ideal since it holds shape well and comes in a wide variety of colors. If you prefer a softer finish, cotton yarn works beautifully, especially for the smaller accents.
Select a crochet hook that matches your yarn’s weight — usually between 3.5 mm and 4.5 mm. You’ll also need fiberfill stuffing if you plan to make the tree house three-dimensional, as well as a tapestry needle for sewing pieces together.
Don’t forget the fun accessories! Small beads, ribbons, bells, or tiny crochet ornaments can add character and holiday spirit. Using gold or silver thread can give your Christmas Tree House a sparkling touch.
Having everything organized before starting will make the crocheting process smoother and more enjoyable. Set up your materials on a clean workspace and prepare to dive into this magical seasonal craft.
2. Crocheting the Base and Tree Structure
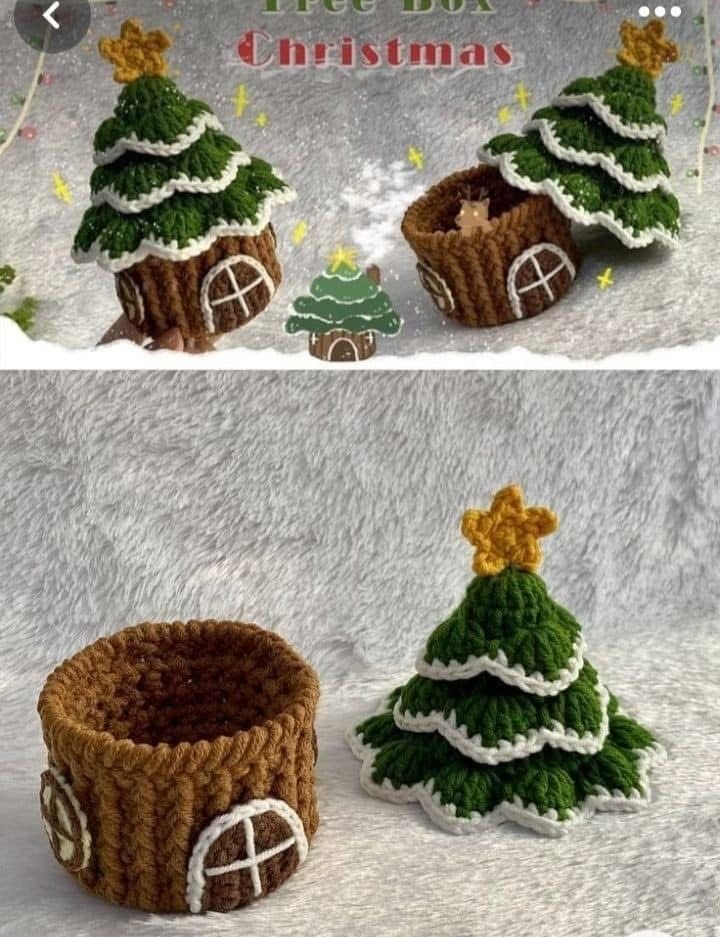
Now that your materials are ready, let’s start shaping the main structure of your Christmas Tree House – TUTORIAL. Begin with the base, which can be a simple round shape worked in continuous spirals. Use brown or neutral-colored yarn to resemble the ground or tree trunk foundation.
Once the base is complete, move on to the tree body. This is typically worked in rounds as well, gradually increasing and then decreasing stitches to create a cone-like shape. Using different shades of green can give the appearance of layered branches and natural texture.
To make your Christmas Tree House more realistic, consider crocheting small branch layers separately and attaching them to the main cone. This creates a three-dimensional look that mimics real pine branches.
If you want to add stability, you can insert a piece of cardboard or plastic inside the base before closing it. This ensures your tree house stands firmly on any surface.
Continue shaping the tree until it reaches your desired height — whether a small tabletop decoration or a larger centerpiece. The goal is to create a soft but stable structure that forms the heart of your festive design.
When you’re done, lightly stuff the body with fiberfill to maintain its shape and prepare for adding the adorable house features next.
3. Adding the House Details and Decorations
In this stage of the Christmas Tree House – TUTORIAL, you’ll transform your simple crochet tree into a whimsical Christmas home. Start by making the door and windows. These can be crocheted in contrasting colors like red or yellow to stand out beautifully against the green tree.
For the door, create a small rectangle using single crochet stitches. Add a little handle by sewing on a bead or a small button. For the windows, crochet small squares or circles and sew them onto the body, leaving a bit of room to add embroidered “windowpanes” using thin yarn or thread.
Now comes the fun part — decorating your tree house! Add small crochet stars, garlands, and tiny ornaments around the tree. You can use different yarn colors or even metallic threads to make your decorations shine.
To create a snowy effect, use white yarn and crochet small patches or edging around the tree branches and roof. This simple touch instantly makes your Christmas Tree House look like it’s covered in winter magic.
If you want to go a step further, weave in a small LED light string so your crochet tree house glows at night. Make sure to use battery-powered lights for safety.
Each decorative element adds character and warmth, turning your handmade creation into a stunning, festive work of art that’s full of personality and joy.
4. Finishing Touches and Display Ideas
The final section of this Christmas Tree House – TUTORIAL focuses on giving your creation a polished finish and deciding how to display it for the holidays. Once all pieces are securely attached, double-check that all loose yarn ends are neatly woven in and hidden.
You can place your finished tree house on a mantel, bookshelf, or as a centerpiece on your dining table. Surround it with fake snow, fairy lights, or miniature presents for a magical winter scene.
If you’d like to hang your Christmas Tree House on the tree itself, simply add a sturdy loop made of yarn or ribbon to the top. Make sure it’s well-balanced so it hangs straight and securely.
This project also makes a thoughtful handmade gift. Imagine the joy of giving someone a personalized crochet Christmas decoration that you made with love and care. You can even adapt the design — maybe create a tiny family of animals living inside, or add a chimney and other festive details.
To preserve your crochet creation, store it in a dry, dust-free container after the holidays. This keeps the yarn colors bright and prevents deformation.
Each year, when you bring it out again, it will remind you of the warmth and creativity of your handmade holiday traditions.
FAQ
1. Can beginners make this Christmas Tree House?
Yes! This project uses basic crochet stitches, making it perfect for beginners who want to try a festive decoration.
2. What type of yarn is best for this project?
Acrylic yarn works well for structure and durability, but cotton yarn can also give a softer, cozy look.
3. How can I make the tree stand upright?
Insert a piece of cardboard, plastic, or light foam at the base before closing it to provide support.
4. Can I wash my Christmas Tree House?
Spot cleaning is recommended to preserve the structure and decorations. Avoid machine washing if it contains lights or glued embellishments.
5. How can I personalize my Christmas Tree House?
You can embroider your family name, add tiny characters, or use glittery yarn to give it a custom holiday sparkle.
Conclusion
In this Christmas Tree House – TUTORIAL, we explored how to crochet a beautiful and festive holiday decoration that combines creativity, warmth, and charm. From building the tree base to adding decorative details and personal touches, each step brings your project to life.
PATTERN VIDEO:
This handmade piece not only decorates your home but also reflects the love and effort you put into your craft. Try making your own this holiday season and share your thoughts or suggestions below — your feedback helps keep the spirit of creativity alive in the crochet community!