If you love crochet projects that combine creativity, texture, and functionality, then this Crocodile Capuche Hat – Tutorial is exactly what you need! This unique crochet pattern blends the playful look of crocodile scales with the cozy comfort of a hooded hat, making it both stylish and warm. Whether you’re making it for yourself, as a gift, or even for a child who loves fantasy-inspired fashion, this Crocodile Capuche Hat – Tutorial will help you craft something truly extraordinary.
Crocheting your own capuche hat allows you to customize the design to your liking. You can choose bold colors for a dragon-like look, or go for neutral tones for an elegant, winter-ready accessory. With this Crocodile Capuche Hat – Tutorial, you’ll learn step-by-step how to create the famous crocodile stitch, shape the hood, and add finishing touches that make your hat stand out.
This project is perfect for crocheters who want to learn new techniques while making something functional. The crocodile stitch might look complex, but with clear instructions and a little patience, anyone can master it. By the end of this Crocodile Capuche Hat – Tutorial, you’ll have a one-of-a-kind piece that’s both practical and eye-catching — perfect for cold days or cosplay events!
1. Materials and Preparation
Before diving into the fun part of crocheting, it’s important to gather all your supplies. For this Crocodile Capuche Hat – Tutorial, you’ll need medium to bulky weight yarn, depending on how thick and warm you want your hat to be. Wool or acrylic yarns work best — they hold shape well and provide excellent warmth.
DISCOVER MORE FREE PATTERNS HERE!
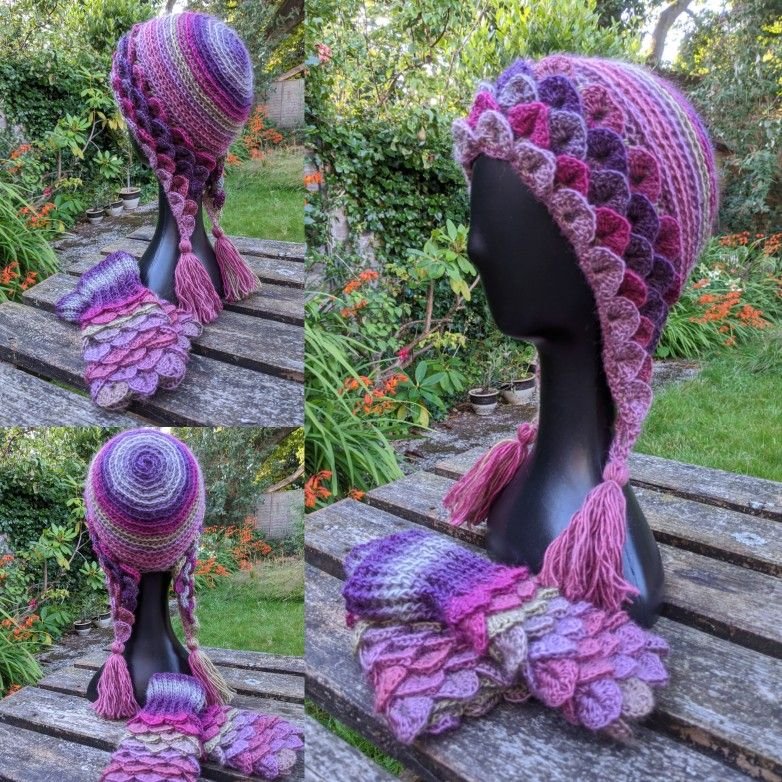
Choose your colors wisely. Greens and blues give a classic crocodile or dragon feel, while grays, browns, or purples can create a chic fantasy-inspired look. Don’t hesitate to mix shades for an ombré or gradient effect that enhances the texture of the scales.
You’ll also need a crochet hook that matches your yarn weight — usually a 5.0 mm to 6.5 mm hook works well. Keep scissors, a yarn needle, and stitch markers handy to help with assembly and weaving in ends later.
Before starting, take a few measurements. Measure around your head or the intended wearer’s head to ensure the capuche fits comfortably. Write down your measurements to refer to while crocheting.
It’s a good idea to make a small sample of the crocodile stitch first. This will help you understand how the scales form and how your tension affects the texture. Adjust your hook size if necessary.
Finally, set up a comfortable workspace. Working with textured stitches like crocodile scales takes time, so make sure your space is well-lit and you have everything within reach before starting.
2. Creating the Base of the Hat
The base of the hat is the foundation of the Crocodile Capuche Hat – Tutorial, and it’s where you’ll begin shaping the hood. Start by making a chain that matches the width of your hood. The length of this chain will determine how far the capuche falls on your shoulders.
Work double crochet rows back and forth to create a soft, flexible fabric. This will form the inner lining of the hood, giving it structure and warmth. Continue until you have a rectangle large enough to fit comfortably over your head.
Once you have your rectangle, fold it in half and join the top edge using slip stitches or single crochet to form the shape of a hood. Leave the front open — this is where you’ll later add the scales and edging.
If you want the hat to have a snug fit around your face, you can crochet a few extra rows around the opening to create a slight curve. This will make it more comfortable and help it stay in place.
For a professional finish, work single crochet stitches along all raw edges to create a neat border. This makes it easier to attach the decorative scales later.
At this point, you should have a basic hood shape that can already be worn. The next step is where the magic happens — adding the beautiful crocodile stitch texture.
3. Working the Crocodile Stitch Scales
The crocodile stitch is the signature feature of this Crocodile Capuche Hat – Tutorial. It creates a layered, scale-like pattern that gives your hat its striking reptilian or dragon-like look. Although it looks complex, it’s simply a series of double crochet stitches worked around previous stitches to form overlapping scales.
Start by making a base row of V-stitches (1 double crochet, chain 1, 1 double crochet in the same stitch). The scales will form around these V-stitches.
To make one scale, work five double crochets down the first post of a V-stitch, then five double crochets up the next post. This forms one complete scale. Skip the next V-stitch and repeat the process across the row.
For the next row, you’ll offset your scales. Crochet another row of V-stitches so that the new scales fall between the previous ones. This staggered arrangement creates a natural, scaly texture.
Continue repeating these rows until you have as many scale layers as you like. For a dramatic look, cover the entire hood. For a subtler style, add scales only along the edges or top of the hat.
If your hands get tired, take short breaks — the crocodile stitch can be heavy on your wrists due to the thick layers. Patience is key here; your efforts will pay off beautifully once you see the texture forming.
When you finish the scale section, secure the last row and weave in all loose ends. Now your hood has a luxurious, textured appearance that’s both whimsical and warm.
4. Adding Details and Finishing Touches
This part of the Crocodile Capuche Hat – Tutorial focuses on personalization and final adjustments. With the main body done, you can now add details that make your hat truly stand out.
Consider adding a drawstring or cord around the face opening. This not only helps adjust the fit but also gives a polished look. You can crochet a simple chain cord or braid a few strands of yarn together for added texture.
If you want extra flair, attach small crochet horns, spikes, or ears to the top of the hood. These fantasy-inspired additions make your capuche hat even more unique and fun to wear.
You can also crochet matching cuffs or a neck warmer to go with your hat, completing the set. Coordinating accessories help create a cohesive and cozy winter outfit.
For a neat finish, block your hat gently using steam or a damp towel. This step helps even out stitches and brings out the beautiful texture of the crocodile scales.
Finally, inspect your hat carefully. Trim any loose ends, and check that all seams are secure. Try it on — you’ll instantly feel the combination of warmth and creativity that makes this pattern special.
FAQ
1. Is the crocodile stitch hard for beginners?
It looks complex but is easy to master with practice. Follow this Crocodile Capuche Hat – Tutorial step by step, and you’ll get the hang of it quickly.
2. What kind of yarn should I use?
Use medium or bulky weight yarns for the best texture and warmth. Wool or acrylic blends work beautifully for this pattern.
3. Can I make this hat for children?
Yes! Simply reduce the starting chain and the number of rows to fit smaller head sizes.
4. How long does it take to finish this hat?
It depends on your crochet speed and experience. Most crafters complete it in 1–3 days.
5. Can I wash my crocheted capuche hat?
Yes, but it’s best to hand wash and air dry it to keep the scales from flattening.
6. Can I change the crocodile stitch placement?
Absolutely! You can place the scales only around the hood edge, down the back, or all over — it’s your creative choice.
Conclusion
Making your own Crocodile Capuche Hat – Tutorial is an exciting way to explore texture and design through crochet. You’ve learned how to prepare materials, crochet the base, master the crocodile stitch, and add personal finishing touches.
The result is a stunning, cozy, and artistic hat that’s as fun to make as it is to wear. If you enjoyed this tutorial, please leave your honest opinion and share your suggestions — your feedback helps inspire even more creative crochet projects for future makers!