If you’re looking for a fun, creative, and functional sewing project, this How to Make Pouch like Cake Shape – Tutorial is the perfect one to try! Combining charm, practicality, and a sweet aesthetic, this quilted pouch is designed to look just like a slice of cake — complete with layers, texture, and adorable detailing. Whether you want a cute accessory to hold small items or a handmade gift that will impress everyone, this How to Make Pouch like Cake Shape – Tutorial will teach you everything you need to know.
This delightful project is ideal for quilters, sewists, and crafters who love unique, three-dimensional designs. It allows you to play with fabric combinations, color contrasts, and decorative stitching techniques while creating something both beautiful and useful. The pouch can store makeup, stationery, sewing tools, or even serve as a special handmade gift box.
Using simple quilting techniques and basic sewing skills, this tutorial breaks down each step of making your own cake-shaped pouch from start to finish. Even if you’re new to quilting, you’ll enjoy the process and end up with a charming creation that looks good enough to eat!
1. Materials and Fabric Selection
Before starting your How to Make Pouch like Cake Shape – Tutorial, it’s important to choose the right materials. This project shines when you pick fabrics that mimic real cake colors and textures, such as creamy whites, chocolate browns, and soft pinks. Quilting cotton is the most recommended fabric because it’s easy to sew, sturdy, and comes in a wide range of prints.
SEE OTHER FACE PATTERNS HERE!
You’ll need:
-
Assorted cotton fabric scraps in cake-like shades (light cream, pink, brown, or tan)
-
Batting or interfacing for structure
-
Zipper (6–8 inches) to close the pouch securely
-
Sewing thread matching your fabrics
-
Scissors or rotary cutter
-
Sewing machine or needle (for hand-sewing)
-
Pins or clips
-
Optional embellishments such as lace, beads, or felt decorations for “frosting” effects
When selecting fabric, think about contrast. Use one fabric for the “cake layer,” another for the “icing,” and maybe a third for decorative toppings. You can even quilt lines into the fabric to create a textured, layered appearance that truly resembles a slice of cake.
Finally, consider using fabric stabilizer or lightweight fusible interfacing to give your pouch a clean, professional finish and help it hold its shape over time.
2. Cutting and Preparing the Quilt Pieces
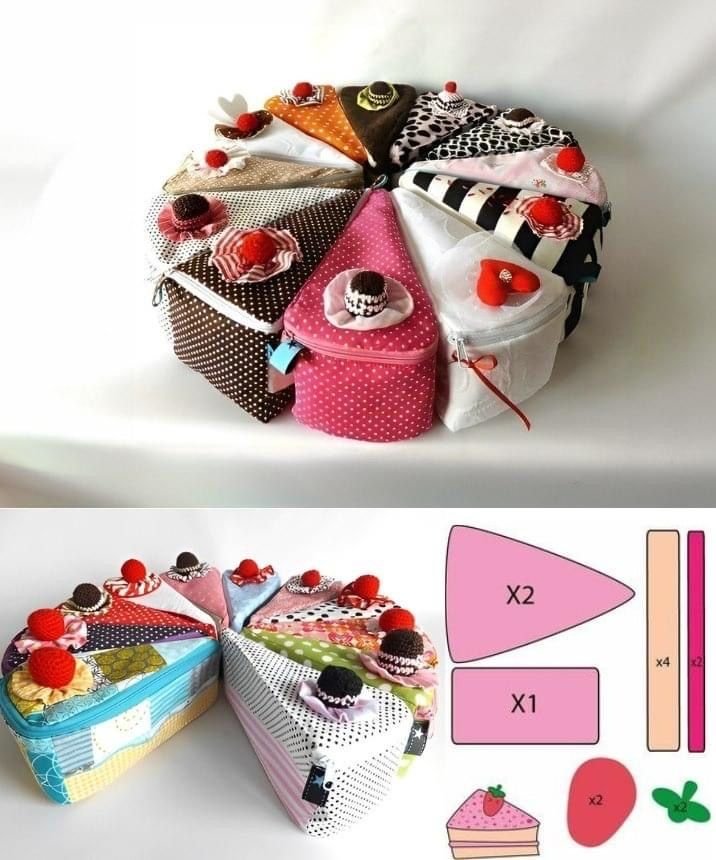
Now that your materials are ready, it’s time to cut the fabric pieces for your How to Make Pouch like Cake Shape – Tutorial. The basic structure of the pouch is triangular — just like a cake slice — with quilted layers that form the top, sides, and bottom.
-
Cut the Top and Bottom Pieces:
Cut two triangles of fabric about 6 inches wide at the base and 4 inches tall. These will form the top and bottom of the pouch. -
Cut the Side Panels:
Cut two rectangles measuring 6 inches by 3 inches for the sides. These represent the “cake layers” when the pouch is assembled. -
Add Batting:
Cut matching pieces of batting for each fabric section. Use your iron to lightly fuse the batting or interfacing to the wrong side of the fabric to create structure. -
Quilt the Layers:
Use straight or wavy quilting stitches across each fabric piece to mimic the texture of cake. For example, use horizontal stitching lines to create the illusion of cake layers and vertical stitches to give it a fluffy look. -
Decorate the Top:
If you want your cake pouch to have “frosting,” you can sew a strip of lace or felt along the top triangle edge. You can even add fabric “berries” or felt “cherries” as embellishments for a playful touch. -
Trim and Prepare:
Once all pieces are quilted and decorated, trim any excess batting or thread to make your fabric panels neat and ready for assembly.
3. Sewing and Assembling the Cake-Shaped Pouch
This is where your pouch begins to take shape! Follow these steps carefully to assemble your How to Make Pouch like Cake Shape – Tutorial.
-
Attach the Zipper:
Place one side panel right-side up, then position the zipper face down along the top edge. Sew it in place using a zipper foot. Repeat with the other side panel on the other zipper tape edge. Once done, your zipper will be neatly sandwiched between the two side panels. -
Sew the Bottom Piece:
With right sides together, attach the bottom triangle to the lower edges of the side panels. Use pins or clips to hold the fabric in place and sew along the edge slowly, pivoting at the corners. -
Attach the Top Piece:
Align the top triangle with the upper edges of the side panels. Pin and sew carefully, ensuring all seams meet neatly. -
Finish the Seams:
Turn the pouch inside out to check the seams. Trim any excess fabric or threads and use a zigzag stitch or bias tape to cover raw edges for a professional look. -
Turn Right Side Out:
Carefully turn the pouch right side out through the zipper opening. Gently push out the corners using a blunt tool. -
Press and Shape:
Use an iron to press the pouch lightly, shaping it into a realistic cake slice. The structured quilting and batting help it hold its 3D form beautifully.
Now you have your own adorable cake-shaped quilted pouch — perfect for holding small treasures, craft tools, or accessories!
4. Customization and Decoration Ideas
The fun part of the How to Make Pouch like Cake Shape – Tutorial is adding your personal touch. You can customize each pouch to look like different types of cakes — strawberry shortcake, chocolate fudge, or even rainbow layer cake!
-
Color Variations: Use bright fabrics to create a playful, dessert-inspired collection of pouches.
-
Toppings: Add crocheted cherries, felt strawberries, or fabric “whipped cream” details.
-
Frosting Trim: Sew lace, ric-rac, or ribbon around the edges to mimic icing.
-
Personalized Tags: Add an embroidered name tag or label for a cute finishing touch.
-
Zipper Charms: Attach a mini spoon, cherry, or cake charm to the zipper pull for extra sweetness.
-
Gift Ideas: Use these pouches as unique packaging for small gifts, makeup kits, or handmade jewelry.
Each version you make will be one-of-a-kind, making this pattern perfect for handmade markets, craft fairs, or thoughtful DIY gifts. It’s a wonderful project that lets you combine quilting creativity with practical sewing skills.
FAQ
1. Is this project beginner-friendly?
Yes! The steps are simple and clearly structured, making it accessible for beginners with basic sewing and quilting experience.
2. What type of fabric is best for this pouch?
Quilting cotton works best because it’s easy to sew, durable, and holds its shape with batting.
3. How can I make the pouch more structured?
Add a layer of interfacing or thicker batting to give it more body and durability.
4. Can I resize the pouch?
Absolutely. You can increase or decrease the triangle size to make larger or smaller “cake slices.”
5. How do I clean my quilted pouch?
Hand wash gently with mild detergent and air dry to preserve its shape and colors.
6. Can this pouch be machine-sewn entirely?
Yes! A sewing machine makes the process faster and gives professional results, though hand-sewing is also possible for small details.
Conclusion
The How to Make Pouch like Cake Shape – Tutorial is a delightful sewing project that combines quilting creativity with playful design. It’s a perfect way to explore color combinations, fabric textures, and 3D sewing techniques while ending up with something truly adorable and useful. Whether you make it for yourself or as a gift, this pouch will bring a smile to anyone who sees it.
PATTERN VIDEO:
Now it’s your turn to try this creative quilted cake-shaped pouch! Share your results and ideas in the comments below — we’d love to hear your thoughts and see how you’ve customized your own “sweet” creation!