If you’re looking for a festive and creative project this holiday season, this How to Make a Twister Christmas Tree – Tutorial is the perfect quilt pattern to bring warmth and cheer to your home. This project combines the charm of patchwork quilting with the fun of a Christmas theme, resulting in a beautiful fabric tree full of texture and color. Whether you’re a beginner or a seasoned quilter, this tutorial will guide you through every step of creating a stunning Twister Christmas Tree that can be displayed as a wall hanging, table topper, or holiday centerpiece.
A Twister Christmas Tree is a delightful twist—literally—on traditional quilting. It uses a special twister ruler or template to cut and rearrange fabric squares, giving the illusion of swirling motion and intricate design. The result is a quilt block that looks advanced but is surprisingly easy to make. This How to Make a Twister Christmas Tree – Tutorial will teach you how to select fabrics, assemble the blocks, and finish your quilt in time for the holidays.
Before getting started, prepare your favorite festive fabrics—greens for the tree, reds for accents, and golds or whites for background sparkle. With just a few simple materials and steps, you’ll create a joyful handmade decoration that reflects the true spirit of Christmas and showcases your quilting skills. Let’s dive into this fun and magical quilting journey!
1. Materials and Tools You’ll Need
To begin your How to Make a Twister Christmas Tree – Tutorial, gather all the necessary materials. You’ll need a selection of festive quilting fabrics—green prints for the tree, brown for the trunk, and a light or sparkly background fabric to make your design stand out. Fat quarters or charm squares work perfectly for this project since they provide a variety of coordinating prints.
SEE OTHER FACE PATTERNS HERE!
You will also need a twister ruler or template, which helps you achieve the characteristic pinwheel or twisted effect that gives the quilt its unique motion. If you don’t have one, you can find printable templates online or create one by measuring and marking your own square grid.
In addition to fabric and the twister ruler, you’ll need batting, backing fabric, and binding material. Choose a lightweight batting for easy quilting and a festive binding color to frame your piece beautifully.
Essential tools include a rotary cutter, cutting mat, quilting ruler, iron, and sewing machine. Thread in coordinating colors will help keep your stitches subtle and neat.
Finally, have a design board or flat workspace ready so you can arrange your fabric pieces and visualize your tree before cutting and sewing. Preparation is key to ensuring your Twister Christmas Tree – Tutorial turns out perfectly balanced and festive.
2. Cutting and Piecing the Fabric Squares
The first step in your How to Make a Twister Christmas Tree – Tutorial is to cut your fabrics into squares. Depending on the size you want for your finished tree, you can use 5-inch charm squares or cut your own from fat quarters.
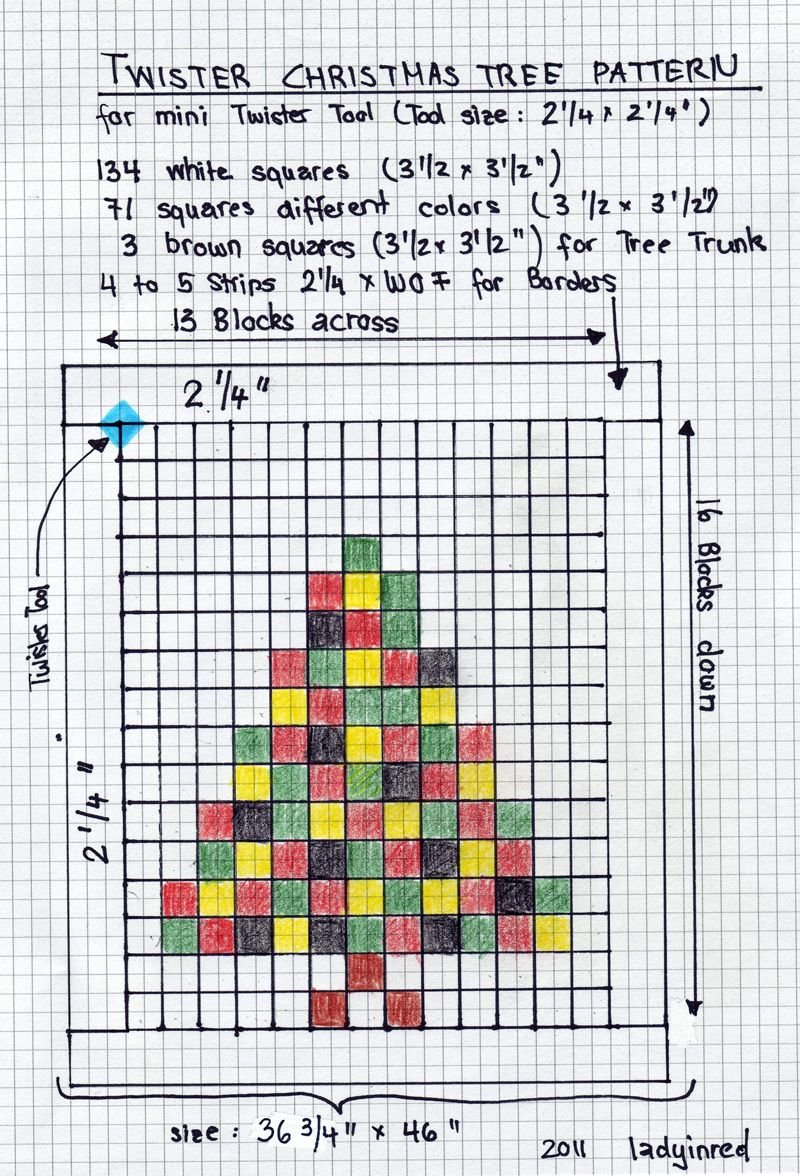
Lay out your squares in a triangle formation to resemble a Christmas tree, starting with one square at the top and increasing the number of squares in each row as you move downward. Use a brown square at the base to represent the tree trunk and lighter fabrics for the background.
Once you’re happy with your layout, sew the squares together row by row, pressing the seams flat after each row. This will create a simple patchwork base that will later be transformed into the signature “twister” effect.
Next, place your twister ruler over the sewn quilt top, aligning it according to the manufacturer’s instructions. Cut around the template to create new, slightly twisted pieces. This step may look intimidating, but it’s quite easy and gives your project a professional look.
After cutting, rearrange the twisted pieces in their new order to recreate the tree pattern. You’ll notice how the blocks now appear to swirl, giving the illusion of movement.
Finally, sew the new pieces together, pressing carefully to keep seams aligned. This stage completes the signature pieced section of your Twister Christmas Tree – Tutorial and brings your holiday design to life.
3. Assembling and Quilting the Twister Christmas Tree
Once your pieced top is complete, it’s time to assemble your quilt layers. Lay out the backing fabric with the wrong side facing up, place your batting on top, and then position your quilt top right side up. Smooth out all layers to remove wrinkles, then baste them together using pins or temporary spray adhesive.
Quilting is where your Twister Christmas Tree – Tutorial really shines. Choose a quilting pattern that enhances the movement of the twister design—swirls, loops, or diagonal lines work beautifully. Stitch carefully along your chosen design, making sure the quilting adds texture without overpowering the patchwork.
You can also add decorative quilting details like stars, snowflakes, or ornaments within the background fabric to emphasize the Christmas theme. These small touches make the finished piece feel even more festive.
Once quilting is complete, trim the edges evenly and prepare your binding. Use a red, green, or gold binding to complement your fabrics and add a pop of color to the edges. Attach the binding using your preferred method—either by machine for speed or by hand for a classic finish.
Give your quilt a final press to smooth it out, and admire your work. At this point, your Twister Christmas Tree – Tutorial is ready for display or gifting, spreading handmade holiday cheer.
4. Decorating and Displaying Your Twister Christmas Tree
The beauty of this How to Make a Twister Christmas Tree – Tutorial lies in its versatility. Once complete, there are countless ways to decorate and display your creation.
You can embellish your tree with small buttons, beads, or embroidery to mimic ornaments and lights. Metallic thread or fabric paint can add a touch of sparkle for an even more festive look.
If you prefer a minimalist aesthetic, leave the design as-is—the twister effect already provides plenty of visual interest. The subtle curves and twists naturally resemble the branches of a Christmas tree.
This project can also be adapted into different sizes. Create a small version for a wall hanging or make a larger one as a table topper or quilted centerpiece. You can even piece multiple trees together to form a full Christmas-themed quilt.
Another creative option is to add a hanging loop or dowel sleeve to the back so you can display it easily on a wall or door. It makes a beautiful handmade decoration that adds a cozy touch to your holiday décor.
Most importantly, have fun and let your personality shine through your fabric choices and embellishments. Every Twister Christmas Tree – Tutorial can be uniquely yours, full of love, joy, and creative energy.
FAQ about How to Make a Twister Christmas Tree – Tutorial
Q: Do I need a special ruler to make the Twister Christmas Tree?
A: While a twister ruler makes the process easier, you can create your own template using a square grid and a rotary cutter.
Q: Is this project suitable for beginners?
A: Yes! The Twister Christmas Tree – Tutorial is beginner-friendly, with simple piecing and cutting steps.
Q: How long does it take to complete the project?
A: Depending on size and quilting style, most people finish it in one or two days.
Q: What type of fabric works best?
A: 100% quilting cotton works best, especially in holiday colors like green, red, gold, and white.
Q: Can I use scraps for this project?
A: Definitely! This tutorial is perfect for using leftover Christmas-themed fabric scraps.
Q: How do I hang my finished quilt?
A: You can add a sleeve on the back or sew small loops for easy hanging on a rod or hook.
Conclusion
This How to Make a Twister Christmas Tree – Tutorial brings together creativity, skill, and festive spirit in one delightful quilting project. You’ve learned how to choose materials, piece and twist fabric squares, quilt your design, and decorate it beautifully. The end result is a one-of-a-kind holiday creation that will brighten your home year after year.
We hope you enjoyed this quilting journey and that it inspires you to keep exploring the art of patchwork and seasonal sewing. Please share your honest thoughts and suggestions—we’d love to hear your feedback and see how your own Twister Christmas Tree turns out!