How to Make the Hooded Scarf is a creative and cozy sewing project that blends style, warmth, and practicality into a single accessory. Whether you want something soft for winter, a fashionable piece to wear during seasonal transitions, or a handmade gift, a hooded scarf is an excellent project for beginners and experienced sewists alike. This tutorial guides you step-by-step while using the keyword How to Make the Hooded Scarf naturally throughout the text for clarity and strong SEO performance. You will learn essential techniques, simple tips, and ways to customize your scarf to match your personal style.
Before diving into the materials and instructions, it’s important to understand how versatile this accessory can be. A hooded scarf is more than just winter wear—it’s a multi-functional project that can include pockets, decorative stitching, or even reversible fabrics. This allows you to personalize your piece in ways that reflect your creativity while still following the core How to Make the Hooded Scarf pattern structure. The beauty of this project is that it remains simple enough for beginners, yet flexible enough for advanced crafters to embellish endlessly.
This article is written to help you fully enjoy the process, from cutting the fabric to sewing the final corner. You will find clear explanations, repeated use of the keyword How to Make the Hooded Scarf, and SEO-friendly structure designed to help people easily find this tutorial online. Now let’s begin stitching your new favorite accessory.
1. Understanding the Basics of the Hooded Scarf
Before learning How to Make the Hooded Scarf, you need to get familiar with the structure of this unique accessory. A hooded scarf blends two classic pieces—a hood and a long scarf—into one continuous item. This makes it both practical and stylish, allowing you to stay warm without having to wear multiple separate pieces.
SEE OTHER FACE PATTERNS HERE!
The base of the hooded scarf is shaped similarly to a standard scarf, but with a rectangular hood attached to one center section. This design ensures that it fits comfortably without slipping off. When learning How to Make the Hooded Scarf, understanding this structure helps you cut and assemble the fabrics correctly.
The fabric choice is also essential. Fleece, flannel, minky, wool blend, and lined cotton are some of the most popular options due to their softness and durability. When searching for the best materials, consider warmth, stretch, and ease of washing.
Another important element in How to Make the Hooded Scarf is mastering accurate measurements. A well-proportioned hood ensures both comfort and style. You can adjust lengths depending on whether you prefer a short, decorative scarf or a full-length, wrap-around version.
If you plan to add pockets, lining, or decorative topstitching, make sure these additions match the main fabric in weight and color. Balanced fabric choices ensure the hooded scarf lays flat and feels comfortable.
Lastly, read through instructions fully before starting. Understanding each step will prevent mistakes and make the sewing experience much smoother.
2. Materials You Need to Make the Hooded Scarf
Gathering materials ahead of time will make the How to Make the Hooded Scarf process smooth and enjoyable. Begin with your chosen main fabric—fleece is a top choice due to its warmth and stretch. Cotton is an excellent option if you prefer something lighter or want a decorative everyday accessory.
Next, choose a lining fabric if you want your hooded scarf to be reversible or extra warm. Many crafters enjoy mixing textures, such as pairing fleece with flannel for a cozy interior layer. This step is optional but recommended for a neat and professional finish.
You will also need sharp fabric scissors or a rotary cutter. Precision cutting is essential when following How to Make the Hooded Scarf, especially because symmetrical pieces help the hood sit comfortably around the head.
A sewing machine is the fastest tool for assembling your hooded scarf. You can sew it by hand as well, but machine stitching gives cleaner seams. Make sure you have matching thread to keep the final design cohesive.
Straight pins or fabric clips are helpful for holding layers together. Because some fabrics stretch or slip, clips can make the sewing experience more manageable and ensure your seams stay aligned.
Finally, prepare a measuring tape, ruler, and marking tools. Accurate measurements create a balanced hood and scarf, allowing the final piece to look and feel professional.
3. Step-by-Step Instructions: How to Make the Hooded Scarf
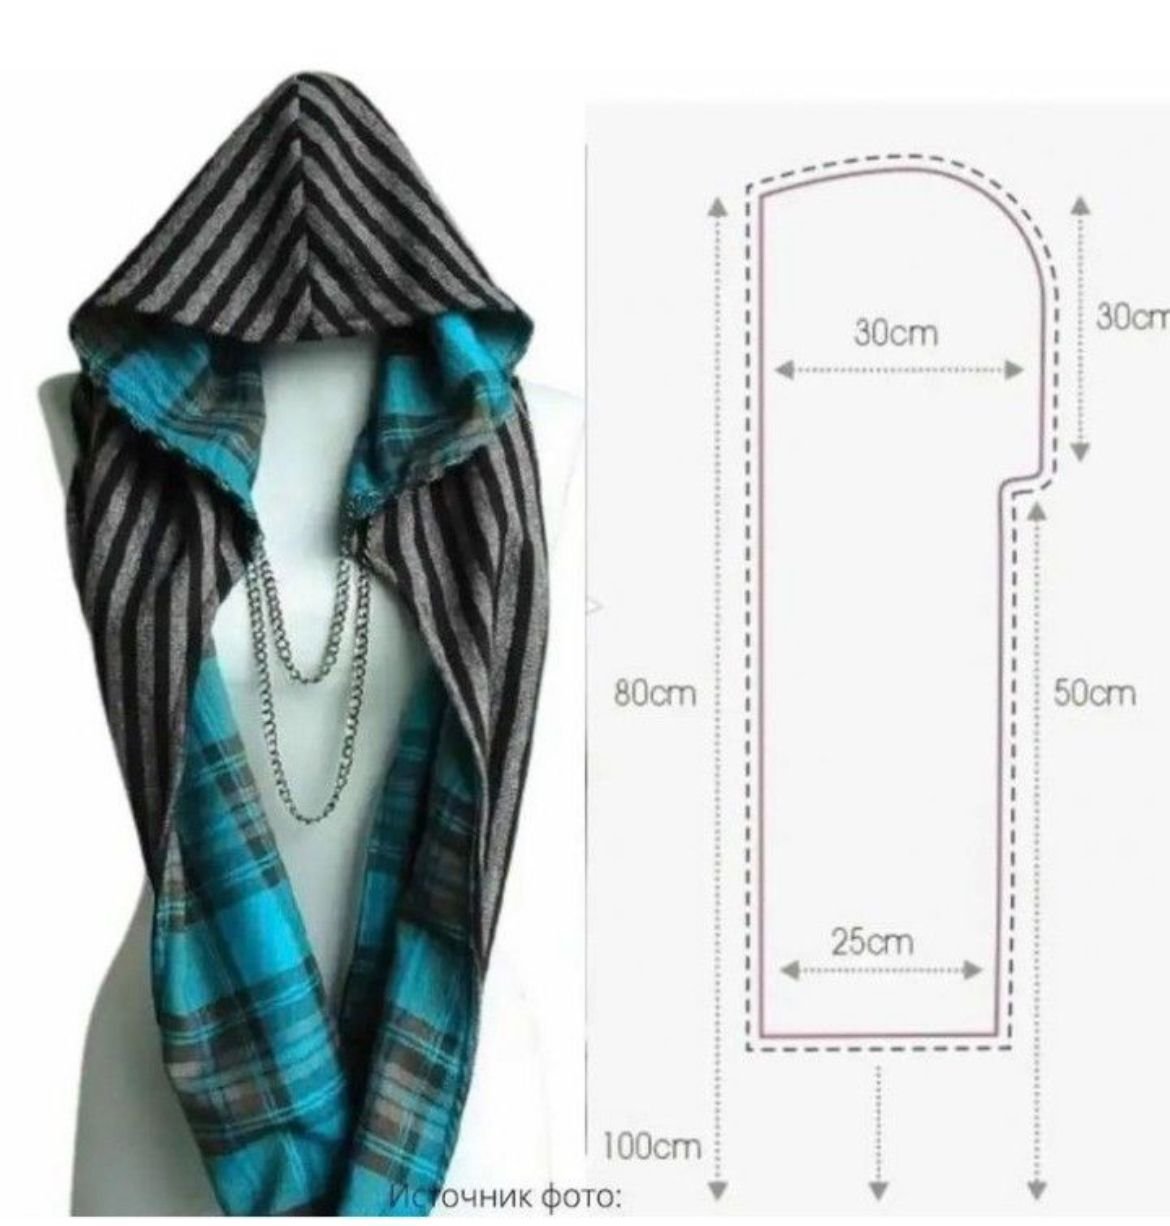
Now that your materials are ready, let’s walk through How to Make the Hooded Scarf step by step. Begin by cutting your scarf panels. A common size for an adult scarf is around 70 inches long by 10 inches wide, but you can adjust these measurements for personal preference or to make children’s versions.
Next, cut your hood piece. The classic shape is a large rectangle that folds in half to form the hood curve. One common size is 16″ x 24″ for adults, but feel free to adjust based on head size or desired drape.
Sew the hood piece along one of the shorter edges to create the rounded back seam. When you follow How to Make the Hooded Scarf, this step is crucial because it forms the main hood shape and ensures a comfortable fit.
Attach the hood to the center of the scarf. Pin it carefully along the opening edge so that both pieces create a smooth transition. Sewing these areas together will form the full scarf-hood shape.
Once assembled, stitch the entire perimeter of the hooded scarf. If you’re making a lined version, place the outer and lining layers right sides together, sew around, and turn the piece inside out to hide seams.
Finish with topstitching around the edges. This step adds durability and helps the fabric lay flat, giving your hooded scarf a polished look.
4. Tips for Customizing Your Hooded Scarf
One of the most exciting parts of learning How to Make the Hooded Scarf is the ability to personalize your creation. Adding pockets to the ends of the scarf is a popular customization. These pockets can keep your hands warm or serve as cute decorative elements.
You can also personalize the hood. Adding faux fur trim to the hood opening creates a winter-themed design and adds extra warmth. Decorative stitching along the edges gives your accessory a unique touch.
Another fun customization is making the hooded scarf reversible. Selecting two beautiful fabrics that complement each other gives you two looks in one. This is especially useful for everyday wear.
Consider adding buttons, toggles, or embroidery. These small touches make your piece unique and let your personality shine through the accessory while still following the basic How to Make the Hooded Scarf method.
Color blocking is another modern trend. Sew different fabric sections together to create a stylish patchwork effect. This adds visual interest and makes your scarf stand out.
Lastly, experiment with lengths. Shorter hooded scarves are cute and decorative, while longer ones are practical for windy weather. Choose what fits your lifestyle best.
FAQ – How to Make the Hooded Scarf
1. Is the hooded scarf beginner-friendly?
Yes, the hooded scarf is excellent for beginners because the shapes are simple rectangles, and the sewing steps are easy to follow.
2. What fabrics are best for a hooded scarf?
Fleece, flannel, cotton, and minky are all great choices. Fleece is the warmest, while cotton is best for lightweight versions.
3. Can I make a hooded scarf without a sewing machine?
Yes, you can sew it by hand using strong, even stitches, though it will take more time.
4. How long should the scarf be?
A good adult size is around 60–70 inches, but you can adjust the length depending on your preference.
5. Is it possible to add pockets?
Absolutely! Many people add pockets to the ends for warmth or decoration.
6. Can I make it reversible?
Yes, simply sew two fabric layers together and turn them inside out to hide the seams.
Conclusion
In this tutorial, you learned How to Make the Hooded Scarf from start to finish, including fabric selection, construction techniques, and creative customization ideas.
This project is warm, practical, and a wonderful way to express your sewing creativity. If you enjoyed this guide, feel free to share your honest opinion and leave suggestions for future tutorials. Your feedback helps improve and inspire new ideas!