The Granny Square Cardigan – TUTORIAL is one of the most beloved and versatile crochet projects for makers who enjoy combining creativity with comfort. Right from the first stitch, this piece offers a relaxing experience and results in a cardigan full of color, style, and personality. Whether you are a beginner exploring your first wearable or an experienced crocheter looking for a unique project, this tutorial provides everything you need to bring your cardigan to life.
Working with Granny Square Cardigan – TUTORIAL techniques allows you to experiment with colors, textures, and layouts without feeling overwhelmed. Its modular construction makes the process simple and enjoyable, as you focus on one square at a time. This gives you the freedom to crochet at your own pace while watching your cardigan gradually grow.
In this article, you will learn essential steps, helpful tips, and important insights to create a beautiful granny square cardigan. Using SEO-friendly explanations and clear instructions, this guide ensures you feel confident throughout your crafting journey. From choosing yarn to assembling your squares, you will find everything you need right here.
1. Understanding the Granny Square Cardigan Structure
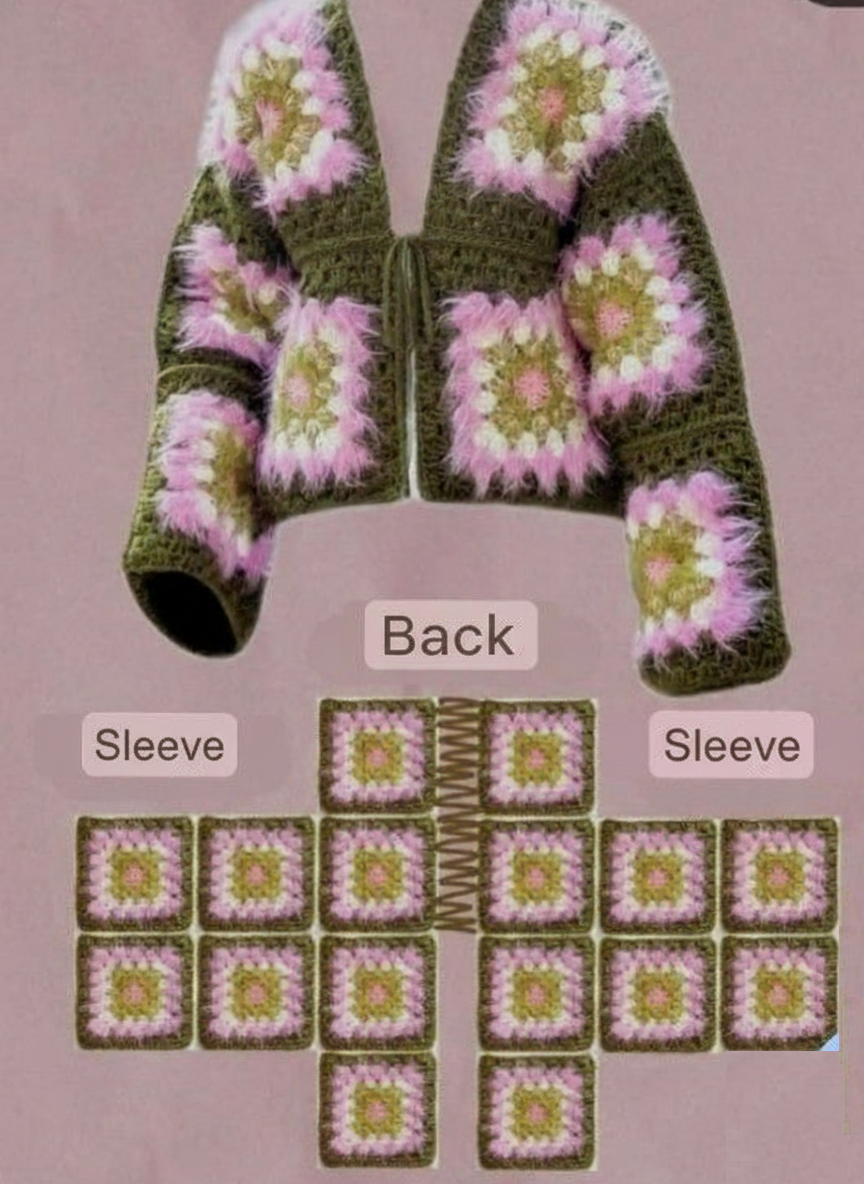
The Granny Square Cardigan – TUTORIAL begins with learning the structure of this iconic wearable. A classic granny square pattern is the foundation, and these squares are later joined to form panels such as the back, front, and sleeves. Understanding how each part connects will make the assembly phase simpler and more enjoyable.
DISCOVER MORE FREE PATTERNS HERE!
Most cardigans made from granny squares follow a traditional arrangement, typically using the same size square throughout the entire piece. This keeps the design consistent and makes it easy to calculate how many squares are needed. The number of squares required depends on the size you want to achieve, so planning ahead is helpful.
One major advantage of this type of cardigan is its flexibility. You can customize each square with different colors or keep them monochromatic for a more minimalistic aesthetic. This versatility is one of the reasons why the Granny Square Cardigan – TUTORIAL has remained so popular over the years.
To create a more fitted cardigan, you may need to add or reduce the number of squares, especially around the sleeves and shoulders. Many crocheters also choose to block their squares before assembly to create a cleaner finish. This ensures that the squares are uniform in size and lie flat when joined together.
The construction method usually involves sewing or crocheting the squares together using slip stitches or single crochet. Both techniques create strong seams and help maintain the cardigan’s durability. Once the panels are built, finishing touches like collars or borders can be added for an extra polished result.
Taking time to understand how the structure works will make the entire process smoother. It allows you to visualize your final piece while also giving you the confidence to adjust the pattern to fit your personal style.
2. Making the Granny Squares for Your Cardigan
Creating each granny square is the heart of the Granny Square Cardigan – TUTORIAL, and this step is where your creativity truly shines. Begin by choosing your favorite yarn weight, usually medium-weight yarn, which provides warmth and structure without making the cardigan too heavy. A 4.0 mm or 5.0 mm hook often works well, but any size that matches your yarn will do.
Traditional granny squares are worked in rounds, starting with a center ring and expanding outward. You will typically use double crochet stitches and chain spaces to form the iconic square shape. Once you create your first square, measure it to ensure it matches the dimensions needed for the cardigan size you want.
Consistency in the size of each square is essential. Even slight variations can affect the final fit of your garment. For this reason, many crocheters like to block their squares once completed, especially when working with cotton or acrylic yarn.
Color planning is another exciting part of making your granny squares. You can keep all squares identical or make each one unique for a bold and joyful look. The Granny Square Cardigan – TUTORIAL encourages experimenting with harmonious shades or vibrant contrasts.
To speed up the process, consider creating your squares assembly-line style. This means working all the centers first, then adding consecutive rounds until each square reaches the same size. This method not only keeps your tension consistent but also saves time.
Once your squares are finished, lay them out on a flat surface to visualize the final placement and color arrangement. This step helps you identify any color pairing you may want to adjust before joining everything together.
3. Joining the Squares and Shaping the Cardigan
Once you have all your squares ready, the next step in the Granny Square Cardigan – TUTORIAL is joining them to create the cardigan panels. There are several joining techniques, and your choice depends on the finish you prefer. Many crocheters love the join-as-you-go method, while others prefer sewing the squares together using yarn and a tapestry needle.
Joining squares with slip stitches creates a strong yet flexible seam. On the other hand, single-crochet seams create a slightly raised border that adds texture to the garment. Some makers even mix joining techniques to highlight specific sections of the cardigan.
Start by assembling the back panel, which is usually the largest section. Next, create the two front panels, and then work on the sleeves. The sleeves may require fewer squares depending on the length you want them to be. Shorter sleeves typically use fewer squares and offer a lighter overall look.
After assembling the main panels, join them at the shoulders first. This helps stabilize the structure before attaching the sleeves. Once the shoulders are joined, attach the sleeves to the armholes, ensuring the seams are smooth and comfortable.
The final shape of your cardigan depends on how the squares are positioned. Vertical placement gives a different effect compared to horizontal placement. Experimenting with layout before joining can help you create a more personalized design.
Once all the panels are joined, you may add a border around the hem, sleeves, and collar. This finishing touch helps bring everything together and creates a cohesive, polished look.
4. Adding Finishing Details and Personal Touches
The last step in the Granny Square Cardigan – TUTORIAL is adding details that make your cardigan stand out. Borders, buttons, collars, and edging can transform a simple granny-square garment into a customized, stylish piece.
A single crochet border around the entire cardigan is simple and effective. It helps straighten the edges and adds a clean frame to the squares. If you want a more decorative finish, consider picot edging, shell stitches, or scalloped designs.
Buttons are optional but can add charm and practicality. Wooden buttons work beautifully with boho-style cardigans, while metal buttons give a more modern appearance. Place buttons evenly along the front panels for the best result.
Adding a collar can also elevate the design. A ribbed collar made from front-post and back-post stitches adds warmth and texture. Alternatively, a simple fold-over collar made from double-crochet rows creates a cozy, relaxed style.
Pockets are another fun addition. To create them, make extra granny squares and attach them to the front panels. This not only adds functionality but also contributes to the cardigan’s overall aesthetic.
Finally, weave in all loose ends using a tapestry needle. This step is essential for keeping your cardigan neat, durable, and comfortable to wear. Taking time with these finishing touches ensures a garment you will proudly show off for years.
FAQ – Granny Square Cardigan – TUTORIAL
How many granny squares do I need for a cardigan?
The number of squares varies depending on the size, but most adult cardigans require between 30 and 60 squares.
What yarn works best for a granny square cardigan?
Medium-weight yarn is ideal for durability and warmth, though lightweight yarn can be used for a more breathable cardigan.
Do I need to block my granny squares?
Blocking is not mandatory but highly recommended to ensure uniform sizing and smoother seams.
What is the easiest joining method?
Slip-stitch joining is simple and strong, making it a favorite among beginners.
Can I customize the cardigan length?
Yes, you can lengthen or shorten the cardigan by adding or reducing the number of squares.
Is this a beginner-friendly project?
Absolutely. Granny squares are beginner-friendly, and assembling them is straightforward.
Conclusion
The Granny Square Cardigan – TUTORIAL is an enjoyable and rewarding project that lets you explore your creativity while producing a cozy, beautiful garment.
PATTERN VIDEO:
By understanding the structure, creating consistent squares, joining them thoughtfully, and adding your personal touches, you can craft a cardigan that feels truly unique. I hope this article has inspired and guided you through every step of the process. Feel free to leave your honest opinion and share suggestions so I can continue creating tutorials you’ll love!