The Beginner-Friendly 3D Quilt – TUTORIAL is one of the most inspiring and visually striking quilting projects for anyone wanting to explore dimension and texture in fabric art. Right from the first stitches, this pattern invites new and experienced quilters to play with shape, contrast, and color in a way that feels approachable and creatively freeing. Using the Beginner-Friendly 3D Quilt – TUTORIAL, you’ll discover how even simple geometric units can transform into dynamic, raised designs that stand out beautifully on any project.
This technique creates a quilt that appears complex yet stays accessible thanks to clear construction methods and straightforward block assembly. Because the Beginner-Friendly 3D Quilt – TUTORIAL focuses on textures and visual angles, it becomes a perfect choice for quilters who want to elevate their craft while still working within beginner-friendly methods. The project blends creativity, structure, and a touch of illusion — making it a satisfying and rewarding experience.
Throughout this article, we’ll explore how to prepare fabrics, assemble the 3D-style blocks, choose color combinations, and apply important finishing touches. The Beginner-Friendly 3D Quilt – TUTORIAL will guide you step-by-step with clarity so you can craft a quilt that feels polished, dimensional, and full of character. Whether this is your very first quilt or you’re expanding your skills, this pattern offers everything you need to succeed.
1. Understanding the 3D Structure in the Beginner-Friendly 3D Quilt – TUTORIAL
The idea of creating a three-dimensional look may seem advanced, but this pattern shows how it can be easily achieved with thoughtful fabric placement. The 3D effect comes from strategic color contrast and angled seams. These elements work together to form the illusion of blocks rising off the quilt surface.
SEE OTHER FACE PATTERNS HERE!
This tutorial breaks the concept down into small, manageable steps. Each block is designed to help you understand how light and shadow operate visually. This is why choosing the right fabrics matters. High contrast creates stronger illusions, and low contrast makes a softer, more blended look.
Because this project is intentionally beginner-friendly, the pattern avoids complicated folds or intricate piecing. Instead, it relies on simple shapes arranged in smart ways. This makes it an excellent learning opportunity for quilters wanting to master visual tricks in fabric art.
You will also notice that the Beginner-Friendly 3D Quilt – TUTORIAL encourages creativity in color selection. The 3D effect can be enhanced or softened based on your design choices. Switching colors around will dramatically change the final look.
The construction of the blocks is repetitive and comforting, helping new quilters build confidence. Once you assemble a few units, your hands will move naturally through the process. Many people find this meditative and enjoyable.
By the end of this section, you will have a clear understanding of the foundation of the 3D design. This prepares you for the next steps, where assembly becomes easier and more intuitive.
2. Fabric Selection and Color Strategy for Strong 3D Effects
Color selection plays a crucial role in making the 3D elements stand out. In the Beginner-Friendly 3D Quilt – TUTORIAL, we emphasize choosing fabrics with clear contrast between light, medium, and dark tones. These ranges mimic how real shadows and highlights work.
Begin with a palette of three main tones for each block. This will help maintain consistency across the quilt. A light color represents the “highlight,” a medium tone provides balance, and a dark shade stands in for shadow. When these tones meet along angled seams, the 3D illusion emerges.
Natural light can change the appearance of fabrics, so examine your selections under the type of lighting you’ll typically view the quilt in. This will ensure that the 3D effect appears just as striking once completed. Good lighting makes all the difference.
If you prefer a softer appearance, choose analogous colors that sit close together on the color wheel. This creates a gentle, dimensional look that still retains depth without being too bold. It’s perfect for a more subtle aesthetic.
For a dramatic and bold 3D quilt, choose complementary colors. These combinations naturally create strong contrast, enhancing the illusion and giving your quilt a highly graphic look. This style is especially popular for modern quilting.
The tutorial also encourages mixing textures within your fabrics. Tone-on-tone prints, solids, and low-volume patterns can all contribute to a more interesting dimensional finish. A balanced mix adds personality without overwhelming the design.
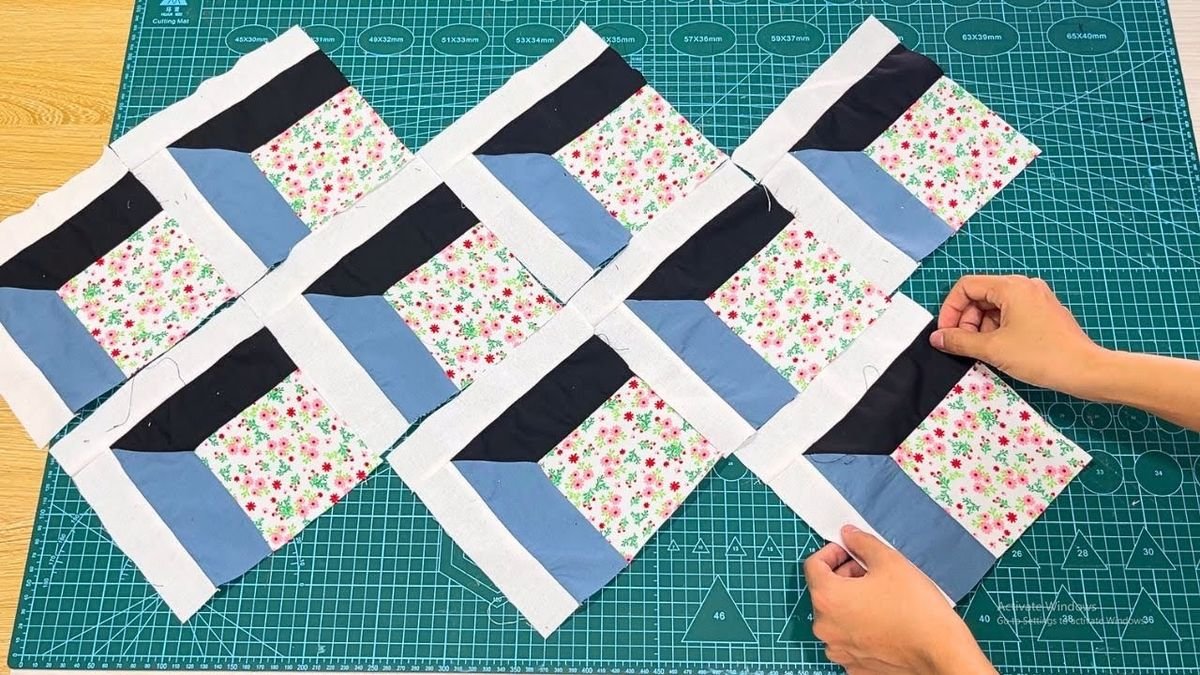
3. Step-by-Step Construction of the Beginner-Friendly 3D Quilt – TUTORIAL
The construction process is designed to be smooth and supportive for beginners. Each unit follows a simple sequence of cutting, piecing, and pressing. With clear measurements and consistent trimming, your quilt blocks will come together beautifully.
Start by cutting your fabrics according to the measurements provided in your pattern. Accurate cutting ensures that seams line up properly and that the 3D effect appears clean and crisp. Take your time here — precision matters.
Next, begin piecing the units that will form the triangular or angled shapes. Pressing seams as you go is essential to keeping your blocks flat. Proper pressing also helps the illusion look more defined. Use a light hand to avoid stretching the fabric.
Assemble each block following the layout guide. You’ll notice how the tones interact to create a dimensional appearance. Seeing the 3D effect come to life is one of the most exciting parts of this project.
Once your blocks are complete, arrange them on a design wall or flat surface. This gives you a chance to preview the quilt top before sewing the rows together. It also allows easy adjustments if you want to shift colors or change the overall look.
Sew the blocks into rows and then join the rows to complete the quilt top. The tutorial emphasizes keeping seams aligned and pressing carefully to ensure the quilt top lies smooth and balanced.
By the end of this stage, you will have assembled the full quilt top. The visual depth created from the block arrangement will now be clear, showing the effectiveness of the Beginner-Friendly 3D Quilt – TUTORIAL.
4. Finishing Touches: Quilting, Binding, and Final Details
Finishing the quilt is where everything comes together. Selecting the right quilting pattern will enhance your 3D effect even further. Straight-line quilting adds structure, while free-motion designs add movement and softness.
Use a batting that complements the loft you desire. Lower loft creates a flatter finish, while higher loft emphasizes texture. Both work beautifully depending on the look you want to achieve.
When choosing backing fabric, consider how often the quilt will be used. Soft cottons are ideal for comfort, while sturdier weaves are good for decorative quilts or wall hangings. Match the backing visually or choose a contrast for fun surprise.
Binding frames your quilt and gives it a polished look. You can use a binding that blends with the quilt or one that stands out. A contrasting binding can highlight the edges beautifully.
After binding, give your quilt a final press to ensure smooth seams and crisp edges. Be gentle and avoid pressing too heavily over thick seams.
Finally, admire your finished quilt. The dimensional look you created will be both eye-catching and impressive, and the Beginner-Friendly 3D Quilt – TUTORIAL will have guided you through every step with clarity and ease.
FAQ – Beginner-Friendly 3D Quilt – TUTORIAL
What makes this quilt beginner-friendly?
It uses simple shapes and clear instructions, making it perfect for new quilters.
Do I need special tools to create the 3D look?
No. Standard quilting tools like a rotary cutter, mat, and ruler are sufficient.
Can I use scraps for this quilt?
Yes, as long as your scraps fit the color and size requirements for consistent blocks.
What fabrics work best for the 3D effect?
Solids or tone-on-tone fabrics with distinct light, medium, and dark values work best.
How long does this quilt take to finish?
Beginners often finish within a few days or weeks depending on working pace.
Can I make the quilt larger or smaller?
Yes, simply adjust the number of blocks to achieve your desired size.
Conclusion
The Beginner-Friendly 3D Quilt – TUTORIAL offers an approachable way to explore dimensional quilting with confidence and creativity. Through intentional fabric choices, simple construction, and thoughtful finishing techniques, you can create a stunning quilt full of depth and charm.
PATTERN VIDEO:
I hope this guide inspires you to start your own 3D quilting journey. Please feel free to share your honest opinion and any suggestions so I can continue improving future tutorials.