Creating Easy Embroidered Felt Christmas Ornaments – Tutorial is a charming and accessible way to add warmth, personality, and handmade beauty to your holiday décor. These ornaments are beginner-friendly, budget-friendly, and incredibly versatile, making them a perfect project whether you’re new to quilting and hand embroidery or already familiar with needlework. Because felt is soft, stable, and easy to handle, the process becomes enjoyable and relaxing, and this project works wonderfully as a seasonal gift or craft-fair item. Throughout this article, you will see the term Easy Embroidered Felt Christmas Ornaments – Tutorial highlighted to help reinforce the main keyword and improve SEO naturally.
What makes these ornaments so special is that they blend quilting techniques with embroidery details, resulting in small pieces of art that look detailed but require only basic stitches. With the right materials and simple steps, you can create multiple designs that reflect your personal holiday style – from classic Christmas colors to modern combinations. Whether you prefer stars, stockings, hearts, snowflakes, or gingerbread-inspired motifs, the possibilities with Easy Embroidered Felt Christmas Ornaments – Tutorial are endless.
In this guide, you’ll learn the steps, materials, and techniques needed to successfully complete these adorable ornaments. You’ll also discover practical tips that help your ornaments look polished and long-lasting. Using SEO-optimized language and human-friendly explanations, this tutorial ensures clarity, accessibility, and a smooth crafting experience for every skill level.
1. Understanding the Easy Embroidered Felt Christmas Ornaments – Tutorial
Working with the Easy Embroidered Felt Christmas Ornaments – Tutorial begins with understanding the simplicity of felt and why it’s perfect for small quilt-inspired pieces. Felt does not fray, which means no complicated edge finishing is required, making the process especially comfortable for beginners who may feel intimidated by traditional quilting.
SEE OTHER FACE PATTERNS HERE!
Another important point is that felt ornaments come together quickly. Because each piece is small, you can complete one ornament in a short crafting session. This makes the Easy Embroidered Felt Christmas Ornaments – Tutorial ideal for those who want to craft last-minute decorations or handmade gifts without the need for large tools.
You can personalize the designs in countless ways. Add names, dates, initials, or embroidered holiday phrases to turn each ornament into a keepsake. Hand embroidery allows you to incorporate unique details that cannot be found in store-bought decorations.
Color combinations also play a crucial role. Classic red, green, and white create a traditional holiday look, while pastel shades, metallic felt, or minimalist tones produce a modern aesthetic. Your choice of palette helps define the final personality of each piece.
The designs inspired by quilting patterns—such as stars, diamonds, or patchwork blocks—can be simplified to fit the felt format. This is another reason the Easy Embroidered Felt Christmas Ornaments – Tutorial appeals to both quilters and embroidery enthusiasts.
Lastly, this type of project is kid-friendly. With supervision, young crafters can practice basic stitching and assembling, making this a fun holiday family activity.
2. Materials Needed for the Easy Embroidered Felt Christmas Ornaments – Tutorial
To begin your Easy Embroidered Felt Christmas Ornaments – Tutorial, you only need a small list of materials, most of which are inexpensive and widely available. High-quality felt sheets are essential because they hold their shape and keep stitches even and neat.
Embroidery floss is another must-have item. Choose colors that complement your felt and reflect your desired holiday theme. Metallic thread can also be used for accents like stars or snowflakes, providing beautiful shimmer and dimension.
A basic embroidery needle with an eye large enough for floss works perfectly. You don’t need advanced tools, which keeps the project approachable for all levels. Fabric scissors or small craft scissors will help you cut smooth shapes without fuzzing the edges.
You’ll want to prepare stuffing if you plan to make 3D ornaments. Polyester fiberfill works best because it’s lightweight and easy to distribute inside smaller shapes. However, flat ornaments require no stuffing at all.
Ribbon, twine, or yarn will serve as the hanging loop. Pick a texture that complements your ornament’s style. You can also add beads, sequins, or buttons for extra decorative touches.
Finally, prepare a simple printed template if you prefer precise shapes. Templates ensure consistency, especially if you plan to create multiple ornaments for gifts or holiday décor.
3. Step-by-Step Process for the Easy Embroidered Felt Christmas Ornaments – Tutorial
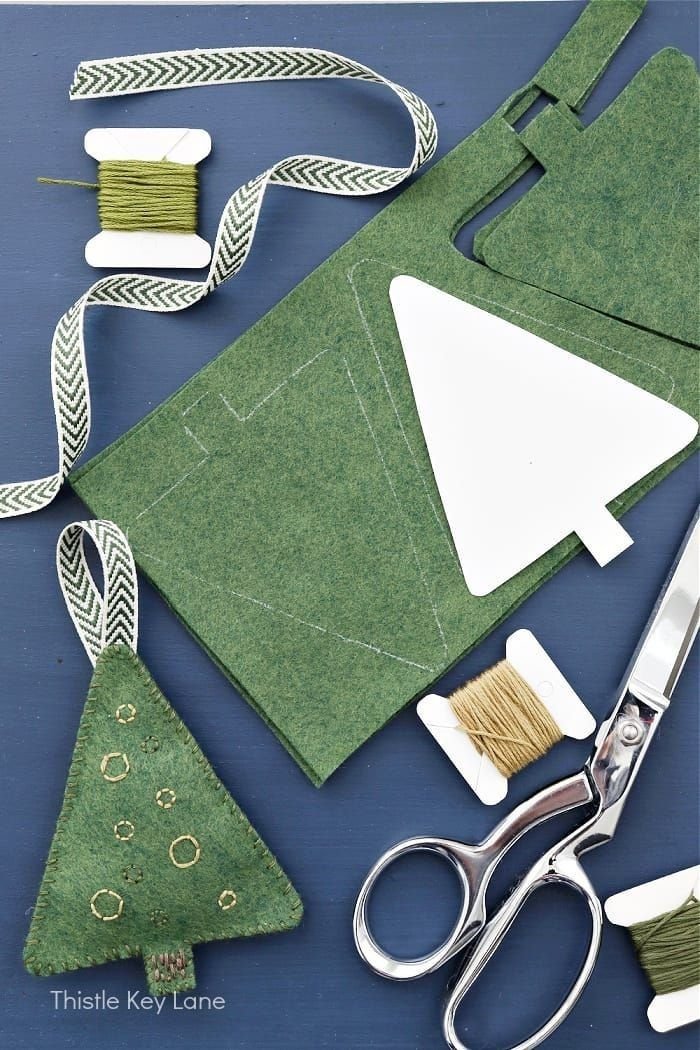
To start your Easy Embroidered Felt Christmas Ornaments – Tutorial, trace your chosen ornament shapes onto the felt and cut two identical pieces for each design. This creates the front and back of your ornament and ensures a clean, symmetrical result.
Next, begin embroidering the front piece. Start with simple stitches like backstitch, running stitch, or French knots. These stitches create beautiful details without requiring advanced skills. Plan your design before you begin stitching to achieve neat placement.
Once the embroidery is complete, position both felt pieces together. If you want a stuffed ornament, add a small amount of fiberfill inside. Avoid overstuffing so the ornament retains its flat, elegant look.
Use a blanket stitch or running stitch around the edges to join the two layers. This decorative seam gives the ornament a handmade charm and reinforces the structure at the same time.
Before closing the seam completely, insert a ribbon loop at the top. Secure it between the felt layers so it stays in place when the ornament is hung on the tree.
Finish the ornament by trimming any uneven edges and checking that all stitches are secure. Your handcrafted felt ornament is now ready to decorate your home or gift to someone special.
4. Tips to Personalize the Easy Embroidered Felt Christmas Ornaments – Tutorial
To give your Easy Embroidered Felt Christmas Ornaments – Tutorial a personal touch, experiment with shapes such as mittens, bells, trees, gingerbread men, cottages, or patchwork stars. Custom shapes add charm and variety to your holiday collection.
Adding embroidered names or dates transforms each ornament into a keepsake. This is especially meaningful for families who enjoy collecting handmade decorations over the years.
Color layering is another creative idea. Combine several felt shades in a single ornament to replicate quilting blocks or to create unique dimensional effects.
Beads, sequins, and miniature buttons offer extra sparkle. Use them sparingly to avoid weighing down the ornament but enough to highlight festive elements like snowflakes or wreaths.
Consider making themed sets. For example, create a set of red-and-white Nordic ornaments or a pastel winter wonderland collection. Themed sets make beautiful gift ideas.
Lastly, experiment with decorative stitches. Even simple designs can look professional when outlined with clean embroidery, making your ornaments stand out with refined handmade beauty.
FAQ – Easy Embroidered Felt Christmas Ornaments – Tutorial
1. Are felt Christmas ornaments easy for beginners?
Yes! Felt does not fray and is easy to stitch through, making it perfect for beginners.
2. Can I complete these ornaments without embroidery experience?
Absolutely. Simple stitches are enough, and you can use glue for some accents if needed.
3. What type of felt works best?
Wool blend felt holds stitches well and provides durability, but acrylic felt is affordable and still works nicely.
4. Do I need a sewing machine for this tutorial?
No. These ornaments are entirely hand-stitched.
5. Can children participate in creating these ornaments?
Yes, with supervision. It’s a wonderful holiday craft for families.
6. How do I make the ornaments look more professional?
Use clean cuts, consistent stitches, quality felt, and coordinated colors.
7. Can I sell the ornaments I make?
Yes, handmade felt ornaments are popular craft-fair and online shop items.
Conclusion
The Easy Embroidered Felt Christmas Ornaments – Tutorial is a heartwarming and accessible project that adds handmade charm to the holiday season. With just a few materials and basic stitches, you can create meaningful and beautiful ornaments that brighten any Christmas décor.
From selecting colors to stitching unique details, each piece becomes a small work of art filled with personal expression. I hope this guide has inspired you to create your own collection of felt ornaments this festive season. Please feel free to leave your sincere opinion and suggestions—I’d love to hear your thoughts!