The Woo’s Hollow Quilt – PATTERN is a charming and creative project that brings warmth, texture, and personality to any quilting collection. Right from the first stitch, this pattern invites quilters of all levels to explore color coordination, traditional patchwork techniques, and a cozy aesthetic perfect for all seasons. As you dive into this tutorial, you’ll discover how this inspiring quilt pattern blends simplicity with captivating design, making it an ideal choice for beginners and experienced quilters alike. Using the Woo’s Hollow Quilt – PATTERN throughout your creative process helps keep your focus steady while adding SEO value for readers seeking detailed quilt instructions.
Creating the Woo’s Hollow Quilt is not just about following directions; it’s about enjoying a comforting journey where fabric, imagination, and craftsmanship come together. This pattern encourages slow stitching, mindful creativity, and the excitement of watching a quilt come to life block by block. Whether you are preparing a handmade gift or looking to upgrade your home décor, this pattern adapts beautifully to various color stories and fabric styles.
As you explore each step of this Woo’s Hollow Quilt – PATTERN, you will notice how accessible and customizable the design is. From choosing fabrics to assembling the quilt top, the instructions guide you with clarity, helping you gain confidence in your quilting skills. Before we begin breaking the tutorial into stages, let’s first understand the foundational elements that make this quilt so beloved.
1. Understanding the Woo’s Hollow Quilt Design
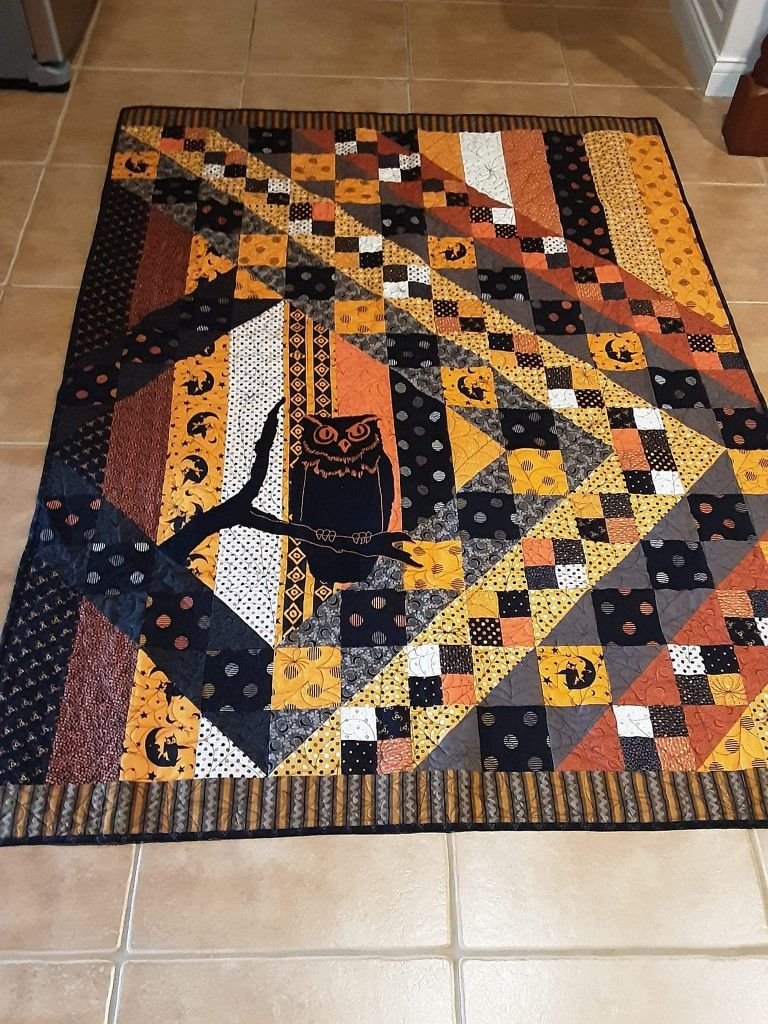
The Woo’s Hollow Quilt is known for its harmonious combination of geometric balance and inviting warmth. The pattern often features repeating blocks that create a sense of rhythm throughout the quilt top. This design makes it ideal for quilters who want a structured yet visually engaging project.
SEE OTHER FACE PATTERNS HERE!
Each block in the Woo’s Hollow Quilt – PATTERN uses simple shapes, allowing beginners to build familiarity with cutting and piecing techniques. Even with straightforward components, the final result looks intricate and professionally crafted.
Fabric selection is one of the most exciting parts of working with this pattern. The quilt looks stunning with seasonal palettes, scrappy collections, or even monochromatic tones. Because the pattern is so versatile, you can personalize it to reflect your style or the recipient’s taste.
Along with being beginner-friendly, this pattern is also perfect for quilters who enjoy repetitive, relaxing stitching. The consistency of the blocks helps maintain momentum as you move through each stage of assembly.
Once you understand the structure and flow of the quilt, the next step is planning your materials. Having all your supplies organized ensures a smooth and enjoyable quilting experience from start to finish.
2. Materials and Fabric Requirements
To begin your Woo’s Hollow Quilt – PATTERN, gather high-quality quilting cotton in coordinating colors. This pattern often benefits from contrast, so consider mixing light and dark shades to enhance the visual effect of the design.
Always pre-wash your fabrics if you prefer preventing shrinkage. This step helps maintain the quilt’s long-term durability and consistency, especially if you’re gifting it or planning daily use.
A rotary cutter, self-healing mat, and acrylic ruler are essential tools for achieving precise cuts. Clean edges and accurate measurements make assembling the quilt blocks far easier and more enjoyable.
You’ll also need a reliable sewing machine with a quarter-inch presser foot. Using an accurate seam allowance ensures your blocks fit together perfectly, keeping the quilt top flat and uniform.
Thread selection is important too. Choose a high-quality cotton thread in a neutral shade unless you want decorative stitching to stand out. Neutral colors help blend seams smoothly across different fabrics.
Don’t forget batting and backing fabric to complete your quilt. Whether you prefer lightweight cotton batting or something with more loft, choose materials that reflect your preferred texture and finish.
3. Step-by-Step Assembly Instructions
Start by cutting all your fabric pieces according to the measurements in the Woo’s Hollow Quilt – PATTERN. Accurate preparation makes the rest of the process smooth and enjoyable.
Lay out your cut pieces before sewing to visualize the color placement. This step helps ensure your quilt flows harmoniously and prevents last-minute design changes.
Next, sew the smaller units together to assemble block components. Press seams carefully as you work; consistent pressing helps keep the quilt blocks crisp and aligned.
Once the block units are complete, join them to form each quilt block. Take your time to match seams and ensure clean intersections. These details enhance the finished look.
Assemble all blocks into rows, and then stitch the rows together to complete the quilt top. When the top is finished, press it thoroughly to prepare for the quilting phase.
Layer the backing, batting, and quilt top. Baste securely, then quilt using your preferred technique—straight lines, free-motion quilting, or hand-quilting all complement this pattern beautifully.
4. Finishing Your Woo’s Hollow Quilt
Once quilting is complete, trim the layers to square the edges. This step prepares the quilt for applying binding, the finishing detail that frames your work.
Choose a binding fabric that complements your quilt’s color scheme. Whether you go for a bold contrast or a subtle blend, the result depends on the mood you want to create.
Attach the binding carefully using a quarter-inch seam. Fold it over to the back and secure it by machine or hand-stitching for a polished finish.
Before considering your quilt complete, give it a final press. This helps set the seams, flatten the layers, and create a smooth, professional appearance.
Consider adding a label with your name and the date of completion. Quilt labels add sentimental value and preserve the story behind your creation.
Finally, enjoy your finished quilt! Whether displayed on a bed, shared as a heartfelt gift, or added to your collection, your Woo’s Hollow Quilt becomes a lasting piece of handmade beauty.
FAQ About the Woo’s Hollow Quilt – PATTERN
What skill level is needed for this pattern?
This pattern is ideal for beginners but enjoyable enough for experienced quilters who love relaxing, repetitive block work.
How long does it take to complete the quilt?
Time varies based on your pace, but most quilters can complete it in a few days to a couple of weeks.
Can I use scrap fabrics?
Yes! The Woo’s Hollow Quilt looks amazing as a scrappy project with coordinated or contrasting fabrics.
What size does the finished quilt typically measure?
Sizes may vary depending on the instructions you follow, but it’s commonly made as a throw or lap quilt.
Do I need special quilting tools?
Basic quilting tools—rotary cutter, ruler, cutting mat, sewing machine—are sufficient.
What quilting method works best?
Straight-line quilting enhances the structured look of the pattern, but free-motion quilting also works beautifully.
Conclusion
The Woo’s Hollow Quilt – PATTERN offers a warm, accessible, and creative quilting experience suitable for all skill levels. Through the steps in this article, you’ve learned how to choose fabrics, assemble the blocks, quilt the layers, and finish your masterpiece with confidence.
I hope this tutorial inspires you to begin or continue your quilting journey with joy and curiosity. If you enjoyed this guide, please leave a sincere opinion and share suggestions for future tutorials—I’d love to hear from you!