The Crocheted Christmas Tree Gift Tag – Tutorial is a delightful and creative project that brings a handmade touch to your holiday gifting. Using this Crocheted Christmas Tree Gift Tag – Tutorial, anyone can craft charming and personalized tags that add warmth and character to any Christmas package. These tags are not only practical but also a lovely keepsake that friends and family will appreciate long after the holidays.
Creating a Crocheted Christmas Tree Gift Tag is a simple yet rewarding project that suits both beginners and advanced crocheters. Because this design is worked in small pieces, it comes together quickly, making it a perfect option for last-minute gifts or stocking stuffers. The Crocheted Christmas Tree Gift Tag – Tutorial also encourages creativity, as you can experiment with yarn colors, embellishments, and shapes.
As the holiday season approaches, handmade decorations and personalized touches become even more special. This Crocheted Christmas Tree Gift Tag – Tutorial helps crafters express love and creativity through a charming, practical item that stands out on any gift. Whether you create them for your own family or to sell at holiday craft fairs, these tags are both festive and functional.
1. Understanding the Crocheted Christmas Tree Gift Tag Pattern
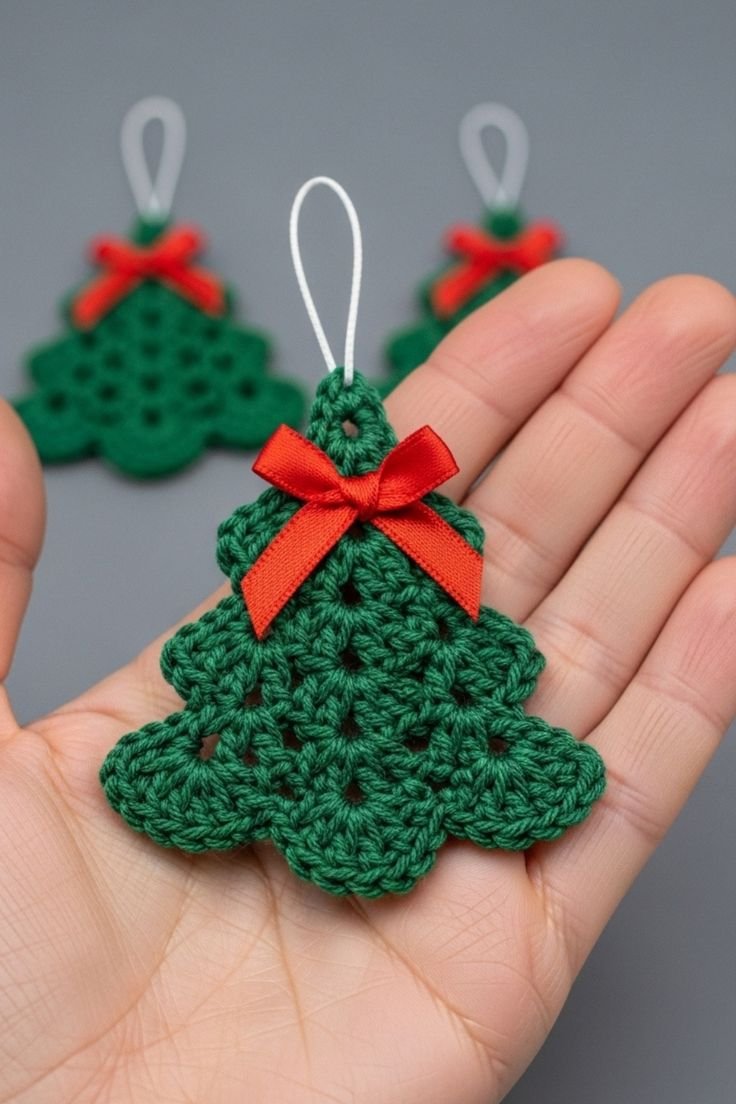
The Crocheted Christmas Tree Gift Tag – Tutorial begins with a simple triangle shape that forms the classic silhouette of a Christmas tree. The design is easy to customize, making it suitable for crocheters of all skill levels. Because the project is small, it also allows you to use leftover yarn, making it both economical and environmentally friendly.
DISCOVER MORE FREE PATTERNS HERE!
This pattern typically uses basic stitches such as single crochet, double crochet, and slip stitches. These approachable stitches help beginners feel confident while also giving experienced crocheters room to experiment. The Crocheted Christmas Tree Gift Tag – Tutorial provides a clear structure while leaving room for creativity.
The key to a neat tree shape is maintaining even stitch tension. With consistent stitches, your tree will have crisp edges and a balanced appearance. The pattern often includes instructions for shaping the tree layer by layer, ensuring a symmetrical and polished look.
Once the base tree is complete, a small loop or hole is added at the top so the tag can be attached to a gift bag, ribbon, or bow. This makes the tag functional as well as decorative. The Crocheted Christmas Tree Gift Tag – Tutorial emphasizes both beauty and practicality.
Many crafters enjoy adding embellishments to personalize each tag. Tiny beads can mimic ornaments, metallic yarn can resemble tinsel, and embroidery can add elegant details. These creative touches bring the tree to life and allow each gift tag to tell its own festive story.
Finally, you can attach a small cardstock label to the back or simply write directly onto the yarn using a fabric marker. Either method transforms your crochet piece into a special, personalized tag that elevates any Christmas gift.
2. Materials Needed for the Crocheted Christmas Tree Gift Tag
The Crocheted Christmas Tree Gift Tag – Tutorial typically requires only a few simple materials, most of which you may already have on hand. This makes it a perfect project for crocheters who enjoy quick, low-cost crafts that still look beautiful and polished.
The main material is yarn, and you can use cotton, acrylic, or a blend depending on the texture you prefer. Cotton gives a crisp shape, while acrylic adds softness and warmth. Green is the most common choice, but you can also make trees in red, gold, white, or even pastel tones for a modern twist.
A small hook, usually between 2.5 mm and 4 mm, is ideal for creating compact, well-defined stitches. A smaller hook helps the tree maintain its shape and prevents the fabric from becoming too floppy. The Crocheted Christmas Tree Gift Tag – Tutorial typically suggests choosing a hook size appropriate for your yarn.
You will also need scissors, a yarn needle, and possibly some small decorative items. Beads, buttons, sequins, tiny bows, or leftover embellishments from past craft projects can all enhance the look of your crocheted gift tag.
If you want your tag to double as a keepsake ornament, you may also add a ribbon loop or a small wooden bead to the top. This turns the crocheted tag into a charming tree decoration that can be used year after year.
Some crafters like to stiffen their tags using fabric stiffener or a water-and-glue mixture. This step is optional but recommended if you want your tags to hold their shape very firmly. The Crocheted Christmas Tree Gift Tag – Tutorial leaves this decision up to your personal preference.
Finally, consider preparing small gift cards to attach to the back of each tag. This adds a polished finish and ensures the tag can be used functionally while still highlighting your handmade crochet work.
3. Step-by-Step Instructions for the Crocheted Christmas Tree Gift Tag
The Crocheted Christmas Tree Gift Tag – Tutorial usually begins with a small foundation chain that forms the bottom width of the tree. By working in rows and gradually decreasing stitches, the tree shape naturally forms a triangular silhouette.
Each row builds on the last, and by following the decreases consistently, you create a clean and even outline. The project moves quickly, and because the tag is small, it can be completed in just a few minutes.
After the tree shape is finished, the pattern often includes instructions for creating a small trunk using brown yarn. This adds a realistic touch and helps give the tag a balanced, grounded appearance.
Next, a loop is created at the top—this can be crocheted, tied with ribbon, or made using a metal ornament hook. The loop ensures the tag can be easily attached to gifts or hung as a Christmas tree decoration.
Once the basic form is ready, this is the stage where creativity shines. You can stitch on beads to mimic ornaments, embroider lines to resemble tinsel, or attach a small star to the top for added charm. The Crocheted Christmas Tree Gift Tag – Tutorial encourages crafters to personalize their work.
When finished, weave in all ends carefully to keep the back neat. This ensures your gift tag looks polished from all angles and is sturdy enough to be handled during the holiday season.
4. Creative Uses for the Crocheted Christmas Tree Gift Tag
The Crocheted Christmas Tree Gift Tag – Tutorial gives you a craft that can be used in countless ways beyond traditional gift tagging. Many crafters love turning these little trees into multi-purpose holiday decorations.
You can use them as Christmas tree ornaments by simply adding a ribbon loop. Their lightweight nature makes them perfect for real or artificial trees of any size. These tags also make charming additions to advent calendars or holiday garlands.
Another creative use is attaching them to handmade holiday cards. This transforms a simple paper card into a memorable keepsake that the recipient can reuse as décor. The Crocheted Christmas Tree Gift Tag – Tutorial lends itself beautifully to mixed-media crafting.
These trees can also be displayed as part of a holiday table setting. Place one at each seat with the guest’s name attached, turning the tag into a festive name card. This adds warmth and a handmade touch to your Christmas dinner.
Crafters who enjoy selling handmade items often include these tags as freebies or packaging accents. They elevate the presentation and leave customers with a gift they can treasure.
Finally, these crocheted tags can be saved year after year. Because they are durable and handmade, they become part of your family’s holiday traditions, adding meaning and memory to each season.
FAQ – Crocheted Christmas Tree Gift Tag
1. How long does it take to make a Crocheted Christmas Tree Gift Tag?
Most tags take 10–20 minutes to complete, depending on your skill level and embellishments.
2. What yarn is best for this project?
Cotton is ideal for crisp shapes, while acrylic works well for softer textures. Both function perfectly.
3. Can beginners use the Crocheted Christmas Tree Gift Tag – Tutorial?
Yes, the pattern is beginner-friendly and uses basic stitches.
4. How do I attach the tag to a gift?
Use ribbon, twine, or the crocheted loop at the top to tie it onto bags or wrapped boxes.
5. Can I sell items made from this pattern?
Most designers allow selling finished items, but always credit the original source.
6. How can I make the tag sturdier?
Apply fabric stiffener or block it lightly for a firmer shape.
Conclusion
The Crocheted Christmas Tree Gift Tag – Tutorial is a heartwarming and versatile project that adds handmade charm to any holiday celebration.
PATTERN VIDEO:
You learned what materials to use, how to follow the pattern, and creative ways to personalize and display your crocheted tags. If you try this tutorial, I would love to hear your honest opinion and suggestions—your feedback helps improve future guides and inspires new ideas.