Vintage Quilt – Tutorial is a project that brings together tradition, creativity, and the timeless charm of classic quilting. Right from the first stitch, the beauty of a vintage quilt starts to unfold, making this pattern an ideal choice for anyone who appreciates handcrafted artistry with a nostalgic touch. Whether you’re new to quilting or already experienced, working on a Vintage Quilt – Tutorial offers the perfect chance to develop skills while creating something truly memorable. The warm textures, soft tones, and classic patchwork style give the pattern an emotional depth that feels comforting and heartwarming.
A vintage quilt is more than just a blanket. It is a piece filled with stories, personality, and the beauty of handmade tradition. This pattern allows you to recreate the feeling of old-fashioned quilts passed down through families, while still adapting it to your own sewing style. The Vintage Quilt – Tutorial focuses on simple steps, accessible techniques, and fabric options that make the project achievable even for beginners who want to make something meaningful and long-lasting.
As you work through the tutorial, you will discover that the design is beautifully flexible. You can play with colors, add layers of personalization, and adjust the layout to match your vision. The combination of classic patterns and modern sewing instructions creates a smooth experience from start to finish, and the result is a quilt worth cherishing or gifting with love.
1. Understanding the Structure of the Vintage Quilt
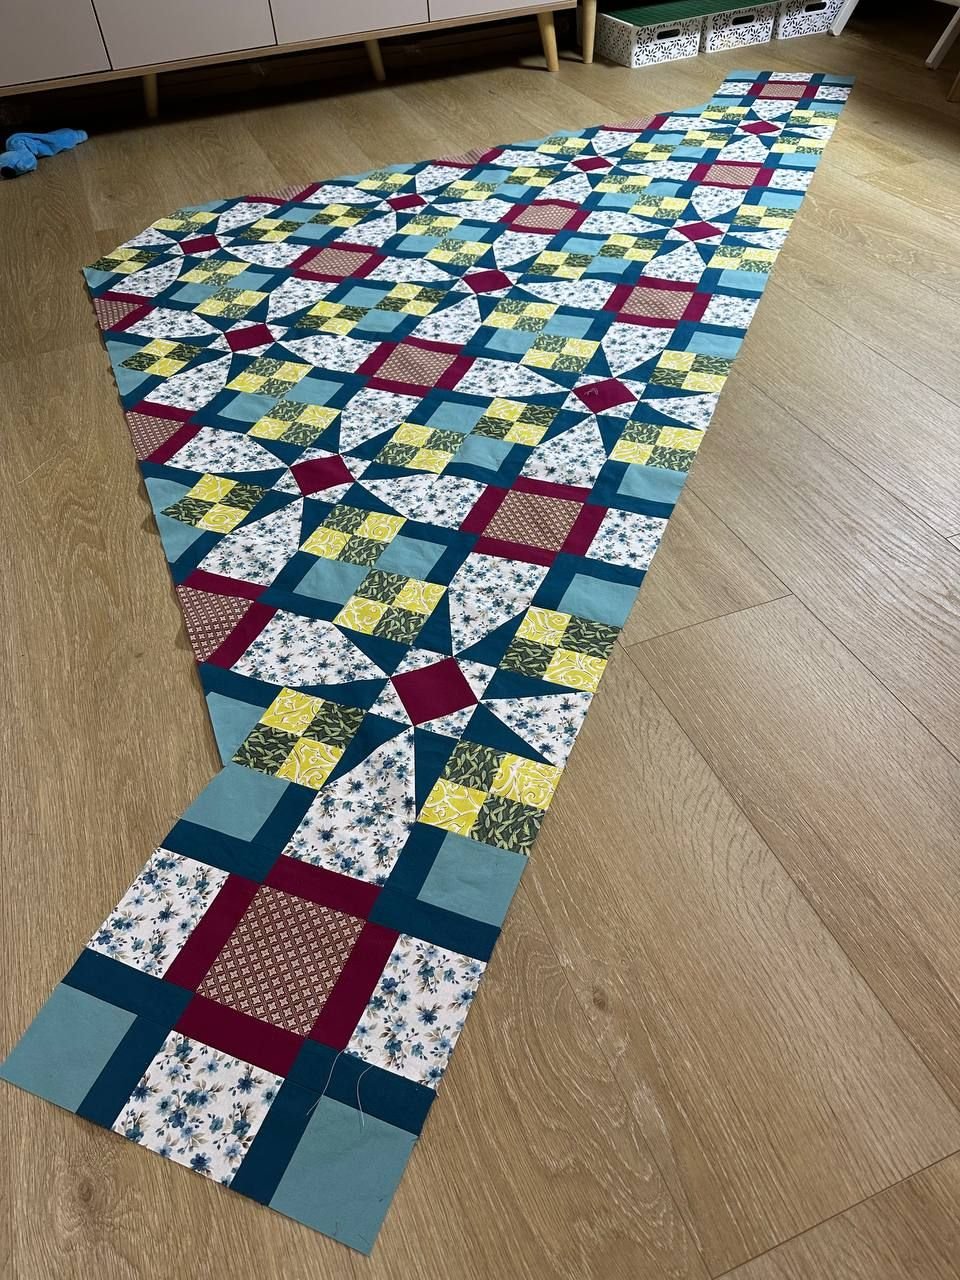
Creating a Vintage Quilt – Tutorial begins by understanding its unique structure. This quilt typically uses timeless blocks arranged in a harmonious layout that gives it an antique charm. Each block contributes to the classic patchwork feel, combining fabrics that create depth and softness in every detail. The structure is simple enough to follow but artistic enough to be admired by experienced quilters.
SEE OTHER FACE PATTERNS HERE!
When selecting fabrics, it’s essential to choose prints or colors reminiscent of traditional quilting styles. Florals, muted tones, and warm color palettes work well for a cozy antique appearance. The Vintage Quilt – Tutorial encourages choosing fabrics that evoke nostalgia or mimic the look of treasured heirlooms. This makes your final quilt feel both authentic and beautifully intentional.
Cutting the blocks carefully is the key to achieving a polished look. Precision helps maintain symmetry and balance throughout the quilt. Even beginners can follow the instructions by using standard quilting tools, such as cutting mats, rulers, and rotary cutters. Maintaining consistent measurements ensures that each block fits perfectly into the final layout.
Once your fabric pieces are ready, the next step is assembling the blocks. This is the part where personality begins to shine. The Vintage Quilt – Tutorial walks you through easy piecing techniques that help bring your blocks together cleanly and neatly. Stitching slowly and pressing seams as you go makes the construction process smoother and more enjoyable.
After assembling the blocks, arranging them into the final quilt layout becomes an exciting creative moment. You have the freedom to play with color placement and pattern flow. Even slight variations can make your quilt visually interesting and uniquely yours. The classic feel of the quilt comes to life as the arrangement forms a unified, harmonious design.
When the quilt top is complete, adding borders is optional but highly recommended. Borders help frame the quilt beautifully while giving it a polished, classic finish. This step reinforces the timeless look associated with the Vintage Quilt – Tutorial, making your final piece stand out with elegant charm.
2. Step-by-Step Sewing Guidance
The sewing steps in the Vintage Quilt – Tutorial were designed to be simple, efficient, and beginner-friendly. From threading the needle to assembling large sections, each instruction contributes to building confidence and steadying your hand for more advanced quilting techniques. Even if you’ve never attempted a quilt before, you will find these steps clear and manageable.
Begin sewing the blocks by joining smaller fabric pieces together in a precise and relaxed rhythm. Keeping your seam allowance consistent is important, as it helps the block retain its shape once assembled. The tutorial encourages practicing on scrap fabric if you need a little warm-up before starting the actual quilt pieces.
Chain piecing is a helpful technique used in many quilt tutorials, and it is especially useful in this one. By sewing multiple pieces in a continuous line, you save time and keep your workflow organized. The Vintage Quilt – Tutorial recommends chain piecing whenever possible because it increases efficiency without compromising the vintage look.
After completing your individual blocks, pressing them properly is essential for a clean result. Pressing, rather than ironing, helps maintain the integrity of your seams and prevents fabric distortion. This step might seem small, but it significantly improves the final appearance of your quilt top.
Sewing rows or larger sections together can feel intimidating, but the tutorial guides you through alignment techniques that make the process stress-free. Matching seams, pinning strategically, and sewing slowly will help ensure your quilt lays flat and stays square. These techniques help reinforce the handcrafted beauty of your Vintage Quilt – Tutorial.
Once your quilt top is fully assembled, it’s time to move on to layering. This involves preparing your quilt sandwich: the quilt top, batting, and backing fabric. The tutorial provides tips for smoothing, pinning, and checking alignment so that your layers stay secure and wrinkle-free when quilting begins.
Finally, you will begin quilting your layers together. Whether you choose straight-line quilting or a gentle free-motion pattern, both options enhance the classic feel of the project. The stitches add texture, depth, and personality to your vintage quilt, making it not just beautiful but also sturdy and long-lasting.
3. Choosing Fabrics and Colors for a Vintage Effect
One of the most exciting parts of following the Vintage Quilt – Tutorial is selecting fabrics. This step gives you the chance to bring personality, emotion, and creativity into the project. Choosing vintage-inspired fabrics helps strengthen the nostalgic feeling of the finished quilt.
Muted tones such as soft blues, gentle creams, dusty rose, and warm browns are excellent choices. These colors work together to create a calm and harmonious palette that fits the theme. Traditional florals, geometric patterns, or small-print fabrics add depth and visual texture. The Vintage Quilt – Tutorial suggests mixing fabrics that contrast subtly while still working well together.
Fabric quality matters just as much as fabric style. Using high-quality cotton ensures that your quilt will age gracefully and stay comfortable over time. Since vintage quilts often become family heirlooms, picking durable materials ensures your quilt can be enjoyed for many years.
Don’t be afraid to incorporate fabric scraps or repurpose materials. Many traditional vintage quilts were made using leftover textiles from clothes or old fabric bundles. This adds authenticity and sentimental value to your project, making it even more special. The tutorial encourages creative use of resources to reflect the history behind vintage quilting.
If you prefer a more modern twist, you can introduce brighter tones or contemporary prints while still maintaining a vintage feel. The key is balance. Combining modern and classic fabrics can give your Vintage Quilt – Tutorial a fresh charm without losing its nostalgic essence.
You can also add embellishments, embroidery, or applique elements for a more personalized finish. These optional decorations enhance the vintage style and make the quilt uniquely yours. It’s an opportunity to tell your story through small details carefully added to each block.
4. Finishing Touches to Complete Your Vintage Quilt
The final steps of the Vintage Quilt – Tutorial are all about polishing and protecting your work. Binding the quilt is the last major construction step. It frames your quilt and gives it the completed, professional look associated with traditional quilts. The tutorial walks you through measuring, cutting, and attaching your binding neatly.
Hand-sewing the binding is a popular choice among quilters seeking a truly vintage feel. The stitches are small, subtle, and filled with care. Although it takes a bit more time, the result enhances the authenticity of your finished quilt. Many quilters find this step relaxing and emotionally rewarding.
After binding, inspect your quilt for any loose threads or uneven edges. Taking a moment to trim and tidy up helps ensure your finished piece looks polished. This attention to detail is one of the reasons vintage-style quilts stand out—they reflect patience and love poured into every stitch.
Washing your quilt for the first time must be done carefully. A gentle wash cycle with mild soap keeps the fabric looking fresh without compromising color or shape. As the quilt dries, it softens beautifully, giving it the cozy, familiar feel of a treasured vintage piece.
Storing your quilt properly helps protect it for years to come. Keep it in a cool, dry place away from direct sunlight. Folding it loosely or using a quilt hanger prevents creases and preserves its shape. With proper care, your Vintage Quilt – Tutorial project becomes an heirloom-worthy creation.
Finally, display your quilt proudly. Whether draped over a couch, laid across a bed, or hung on a wall, it brings warmth and artistic charm to any room. The effort and creativity you invested will always be visible in its beauty.
FAQ
1. Is the Vintage Quilt – Tutorial suitable for beginners?
Yes, the pattern was developed to be accessible for beginners, offering simple steps and clear instructions.
2. How long does it take to complete a vintage quilt?
Timing varies, but most people finish within a few days to a couple of weeks depending on pace and complexity.
3. What fabrics work best for a vintage look?
Muted tones, florals, small prints, and warm colors help create the nostalgic vintage feel.
4. Do I need a sewing machine to make this quilt?
A machine is recommended for efficiency, but it can be done by hand with more time and patience.
5. Can I customize the layout?
Absolutely. The pattern is flexible, allowing creativity with colors, block placement, and fabric selection.
6. Is it okay to mix modern fabrics with vintage ones?
Yes, mixing can create a unique blend as long as the tones and patterns remain balanced.
Conclusion
The Vintage Quilt – Tutorial is a heartfelt project that blends tradition, creativity, and craftsmanship into a beautiful handmade piece.
Throughout this article, you learned how to choose fabrics, assemble blocks, sew with confidence, and add finishing touches that make your quilt truly special. If you enjoyed this tutorial, feel free to share your honest opinion and any suggestions. Your feedback helps improve and inspire future quilting guides!

