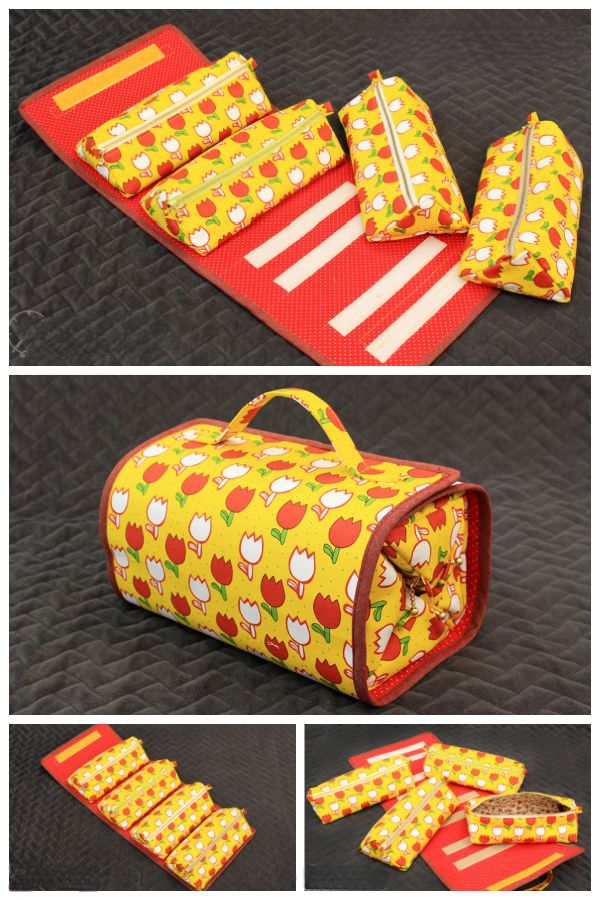
The Rollie Pollie Travel Organizer Sewing – TUTORIAL is one of the most practical and delightful quilting projects for anyone who loves mixing organization with creativity. This pattern is especially popular among quilters who enjoy making useful gifts, travel accessories, and everyday essentials that reflect personal style. Because the Rollie Pollie Travel Organizer Sewing – TUTORIAL is both functional and stylish, it has become a favorite for beginners and experienced sewists alike. Its quilted structure, soft finish, and customizable pockets make it a satisfying project from start to finish.
When you create a travel organizer using this tutorial, you not only sew something beautiful but also something that truly improves daily life. The project encourages you to experiment with fabrics, textures, stabilizers, and quilting lines, allowing for endless customization. Whether you prefer bold prints, delicate florals, or modern minimalism, the Rollie Pollie Travel Organizer Sewing – TUTORIAL adapts easily to your aesthetic.
Its compact size hides a surprisingly roomy interior, making it perfect for storing makeup brushes, travel toiletries, craft tools, or even quilting notions. Many makers choose this pattern for holiday gift-giving or craft fairs because it is quick to assemble and loved by anyone who receives it. As you explore this article, you’ll learn everything needed to create your own unique organizer while also gaining inspiration to personalize it however you wish.
1. Materials and Preparation for Your Rollie Pollie Organizer
Gathering the right materials is the foundation of success when working with the Rollie Pollie Travel Organizer Sewing – TUTORIAL. You will need quilting cotton, a suitable stabilizer, thread in matching or contrasting colors, and the basic sewing tools you already use daily. Many sewists choose to incorporate scrap fabrics, which makes this project eco-friendly and budget-friendly. Choosing high-quality cotton helps ensure your organizer remains durable and easy to clean.
SEE OTHER FACE PATTERNS HERE!
Cutting your fabric accurately is a key step that will make sewing smoother later on. When preparing your materials, take the time to press each piece so it lies flat while cutting. Precise measurements help your pockets, folds, and bindings match perfectly. This careful preparation also enhances the finished look of the organizer, making it appear professionally crafted.
Selecting a stabilizer depends on the level of firmness you prefer. Some sewists enjoy a soft, flexible organizer, while others prefer a stronger structure using foam or heavy interfacing. The Rollie Pollie Travel Organizer Sewing – TUTORIAL allows you to adapt easily to either preference without changing the measurements. Adjusting the stabilizer is one of the easiest ways to personalize functionality.
Once your materials are prepared, examine your thread and needles. A universal needle works perfectly for most quilting cottons, and polyester thread ensures strength and durability. Color-coordinating thread creates a subtle finish, while contrasting thread adds a bold, decorative touch. This is one of the creative decisions that makes each organizer one of a kind.
Organize your sewing area before starting the project. Having your zipper, binding, clips, pins, and rotary cutter within reach will speed up your workflow. The project is not complicated, but it does require several steps that are easier to follow when your workspace is tidy. A well-organized sewing table contributes greatly to creating a beautifully structured organizer.
Finally, prepare your sewing machine by cleaning out lint and checking tension. Quilted layers and stabilizers can be slightly thicker than normal garment sewing, so a machine that runs smoothly will help you achieve clean, even stitches. Taking these small steps before beginning will make the entire Rollie Pollie Travel Organizer Sewing – TUTORIAL experience more enjoyable and efficient.
2. Assembling the Body of the Organizer
The first part of construction involves building the quilted outer shell. This step gives your organizer its signature softness, texture, and durability. Start by placing your chosen fabric and stabilizer together and quilting them with straight or decorative lines. The quilting method is completely up to you—curved, diagonal, or free-motion designs all look beautiful with this pattern.
Once quilted, trim the panel to ensure clean edges. Keeping precise lines will help the rest of your organizer fold neatly. The Rollie Pollie Travel Organizer Sewing – TUTORIAL focuses heavily on structure, so ensuring the base is accurate supports the assembly of pockets and interior sections later on. This is the step where your craftsmanship begins to shine.
Next, fold the quilted body to check spacing and shape. This helps you visualize how the organizer will roll and where the pockets will sit. It can also guide your decisions about whether to add additional internal padding or decorative stitching. Small adjustments at this stage make a big difference in the final finish.
Before attaching pockets, mark placement lines using chalk or a washable marker. These guidelines ensure each pocket sits evenly and symmetrically. The Rollie Pollie organizer’s clean geometry is part of what makes it visually pleasing and practical. Precise pocket placement ensures every item inside stays secure and easy to access.
Sew the sides of the organizer with care, keeping the layers aligned. The thickness may vary depending on your stabilizer, but sewing slowly and guiding the fabric with both hands will create smooth results. Reinforce the stress points where straps or closures will attach, ensuring long-term durability.
Finally, test the overall structure by gently rolling and folding the body. This step confirms that the shape is flexible but sturdy. If anything looks uneven or bulky, now is the time to trim, reshape, or adjust. The organizer should roll effortlessly while maintaining its shape, making it practical for anyone on the go.
3. Adding Pockets, Compartments, and Closures
This is the step where the organizer becomes truly functional. The Rollie Pollie Travel Organizer Sewing – TUTORIAL includes room for zipped pockets, slip pockets, elastic holders, and tool compartments. You can customize these sections depending on whether the organizer will hold beauty products, travel gear, or crafting tools.
Start by sewing the zipper pockets, which give the organizer a professional appearance. Use zipper tabs to create clean ends and prevent bunched fabric. Place the pockets according to your markings and sew around them carefully. Every added pocket increases the usability of your finished piece.
Slip pockets are great for brushes, pens, scissors, or small tools. These are usually created from folded fabric pieces sewn directly onto the inner panel. Adjust the width of each pocket depending on the items you want to store. The flexibility of pocket customization is one of the biggest strengths of this tutorial.
Add elastic bands if you want secure slots for smaller items. Measure carefully before attaching the elastic to ensure each slot is snug enough to hold items firmly. Elastic gives the organizer a modern, multi-functional design appreciated by frequent travelers.
Closures are the final element: many sewists choose snaps, velcro, or even decorative buttons. Each closure style affects how tightly the organizer rolls and how quickly it can be opened. Choose a closure that matches your intended use and aesthetic. A strap with a D-ring adds extra elegance and durability.
Stitch all elements securely and test their sturdiness. Pockets and closures experience the most stress, so reinforcing stitches ensures the organizer lasts for years. Paying attention to these structural details elevates the professionalism of the project.
Once everything is attached, check the spacing and alignment. The organizer should fold neatly with no bulging or misalignment. If adjustments are needed, this is the time to refine placement so the organizer rolls smoothly and evenly.
4. Final Assembly, Binding, and Personalization
Binding gives your organizer its polished finish. Choose fabric that contrasts or complements the outer shell. Attach binding carefully, keeping it smooth around corners and curves. A clean binding is often considered the final marker of a well-made quilted project.
Before securing the binding completely, check that all layers are aligned. Binding should hold the entire organizer together firmly. Sewing slowly through thick layers ensures that stitches remain even and strong. Take your time here to achieve the best visual result.
Once the binding is complete, test the roll again. The Rollie Pollie Travel Organizer Sewing – TUTORIAL is meant to glide into shape effortlessly. If it folds cleanly, your structure is correct. If it feels bulky, try pressing the seams or adjusting the closure placement slightly.
Personalizing the organizer is one of the most enjoyable steps. Add appliqués, embroidery, labels, or quilting motifs that reflect your personality. Many makers quilt initials or names onto the outer panel when gifting the organizer to someone else. Personalization turns a simple travel accessory into a thoughtful and meaningful creation.
Press the entire organizer to give it a fresh, crisp look. This step brings out the beauty of quilted lines and fabric patterns. A well-pressed project looks instantly more professional. Your organizer is now ready for daily use or gifting.
Finally, take a moment to appreciate your work. Completing a structured quilted organizer requires patience, creativity, and attention to detail. You’ve not only followed the Rollie Pollie Travel Organizer Sewing – TUTORIAL but transformed it into something unique and personal.
FAQ – Rollie Pollie Travel Organizer Sewing – TUTORIAL
1. Is this tutorial beginner-friendly?
Yes, beginners can follow this tutorial easily, although some sections like zippers may require patience. The step-by-step structure makes it accessible to new sewists.
2. What fabrics work best?
Quilting cotton is ideal. It is easy to sew, holds structure well, and comes in endless prints.
3. Can I make the organizer larger or smaller?
Absolutely. Adjusting measurements is simple. Just keep pockets proportional to the items you want to store.
4. How long does the project take to complete?
Most sewists finish within a few hours, depending on the number of pockets and customizations.
5. Do I need a special sewing machine needle?
A universal needle is typically enough. For thicker stabilizers, a slightly stronger needle may help.
6. Can I wash the organizer?
Yes, but hand washing is recommended to preserve pockets, closures, and quilted structure.
Conclusion
The Rollie Pollie Travel Organizer Sewing – TUTORIAL is a functional and charming project that blends quilting skills with everyday practicality. Throughout this article, you learned how to assemble the organizer, personalize it, and choose materials that result in a durable and beautifully crafted accessory.
Whether you are making it for yourself or as a thoughtful handmade gift, this pattern always delivers joyful results. If you enjoyed this tutorial, feel free to leave your sincere opinion and share any suggestions you’d love to see in future articles.