The Dresden Circles – TUTORIAL is one of the most charming and timeless quilt techniques, loved for its elegant petals and incredible versatility. Right from the first stitches, this pattern allows quilters of all skill levels to explore creativity through fabric selection, color combinations, and layout choices. By using the Dresden Circles – TUTORIAL, you can create table toppers, wall hangings, quilt blocks, pillows, or even large quilts that stand out with beauty and detail. The classic circular design has endless possibilities, making it a perfect project for beginners and experienced quilters.
Working with Dresden shapes offers a playful approach to quilting. The symmetry of the circle, combined with the soft curve of each petal, creates a visually captivating effect that draws attention instantly. Whether you prefer traditional floral color palettes or vibrant modern tones, this pattern adapts beautifully to every style. The Dresden Circles – TUTORIAL also encourages mindful crafting, allowing you to enjoy each step—from cutting the pieces to arranging the circle and adding decorative stitching.
As you explore this guide, you’ll learn practical techniques that help you create neat edges, perfect points, and smooth circular shapes. The instructions will teach you how to prepare your petals, assemble the circle, finish the center, and attach the block to your final project. With the Dresden Circles – TUTORIAL, your creativity will flourish as you bring a timeless quilt block to life.
1. Understanding the Dresden Circle Pattern
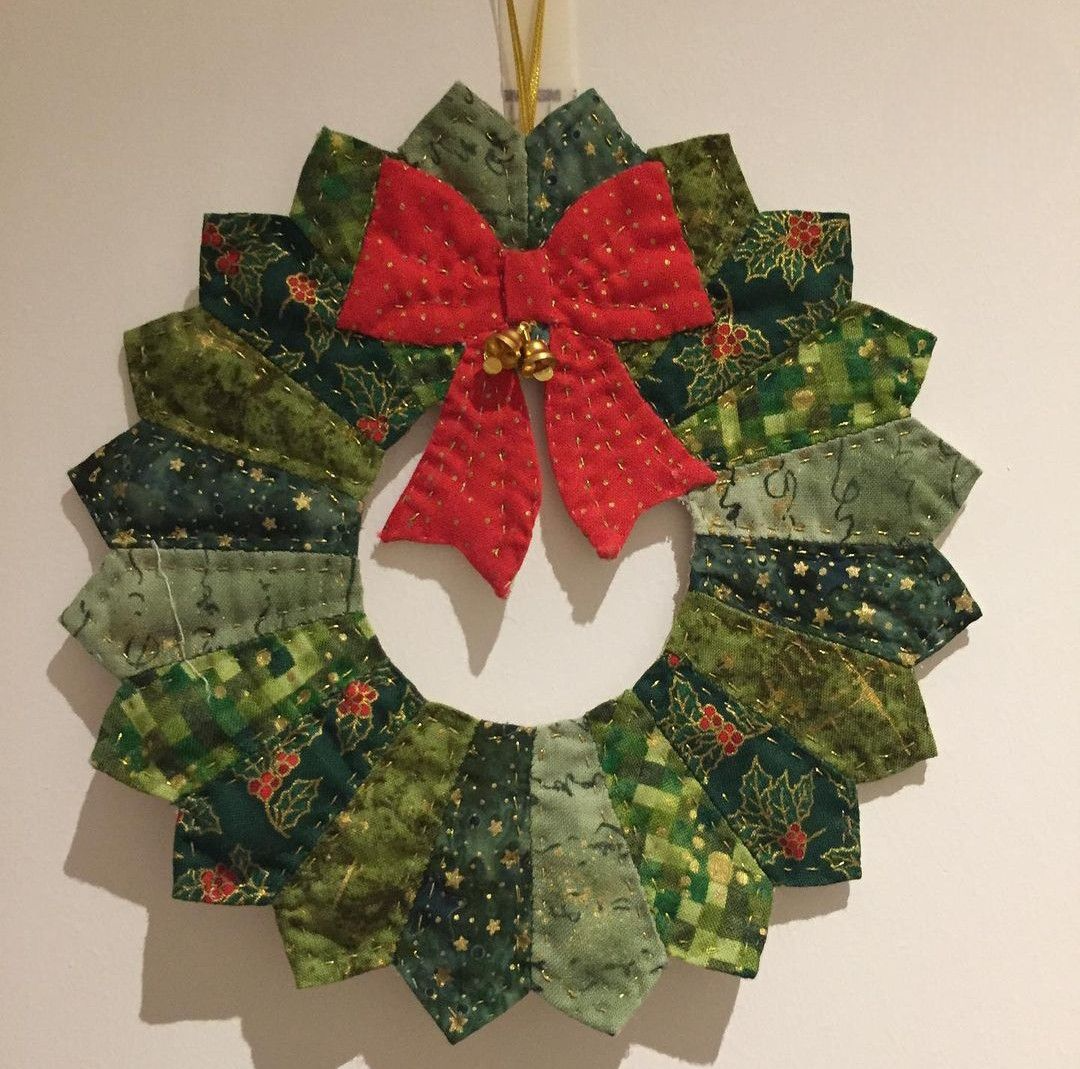
The Dresden design was first introduced many decades ago, and its popularity has only grown. This traditional block features repeating wedge-shaped petals that form a perfect circle once assembled. Because of its structure, the Dresden Circles – TUTORIAL gives quilters freedom to play with fabric scraps or coordinated bundles. The versatility of the pattern is one of the reasons it remains a favorite in the quilting world.
SEE OTHER FACE PATTERNS HERE!
One unique feature of the Dresden circle is how easily it adapts to different quilting projects. You can create large circles for focal points or small ones to use as embellishments. The petals themselves can be rounded, pointed, or scalloped depending on your creative preference. Each version adds a distinct personality to your quilt.
Choosing fabrics is one of the most enjoyable parts of this pattern. With so many petals, this block is perfect for showcasing a variety of prints and textures. The Dresden Circles – TUTORIAL encourages quilters to experiment with contrast and harmony, mixing bold patterns with subtle tones or using a single color gradient for a soft, elegant effect.
The construction of the petals is simple and beginner-friendly. Even if you are new to quilting, this block introduces easy sewing techniques that help you build confidence. The short seams are manageable, and the repetitive steps make the process relaxing and enjoyable.
The center circle provides a polished finish and allows for creativity as well. You can applique the center using hand stitching, machine stitching, or raw-edge techniques. Some quilters even add buttons or embroidery for an extra decorative touch. Regardless of the method, the Dresden Circles – TUTORIAL helps you achieve a clean and attractive final result.
Once complete, the finished block offers a beautiful balance between tradition and modern creativity. Whether used as a standalone centerpiece or part of a larger quilt, the Dresden circle adds charm and sophistication.
2. Materials and Preparation
Before beginning your project, it’s essential to gather all the necessary materials. The Dresden Circles – TUTORIAL requires standard quilting tools such as a rotary cutter, ruler, cutting mat, sewing machine, and iron. You will also need a Dresden wedge ruler, which helps you cut the petal shapes accurately.
Fabric selection plays a major role in the final outcome. Cotton fabrics are usually recommended for their stability and ease of stitching. You may choose a coordinated bundle, a color theme, or a collection of scrap fabrics to create a more eclectic style. The variety of petals allows you to use many colors in a single block without overwhelming the design.
The number of petals in your circle depends on the ruler you use, but the most common version includes 20 wedges. Cutting each wedge with precision ensures that your circle will close neatly without gaps or overlaps. Taking time during this step will improve the final appearance of your Dresden Circles – TUTORIAL project.
Pressing your pieces before sewing is equally important. A well-pressed fabric helps keep seams flat and minimizes distortion. Pressing after each sewing step also contributes to a clean, professional finish. Good pressing habits make the assembly process smoother and more enjoyable.
Once your petals are cut, you can prepare the top edges. For pointed petals, fold the top edge right sides together and sew a small seam before turning it inside out. For rounded petals, you can use a template or simply applique them after assembly. Both techniques are easy to learn and add delightful detail.
Organization is key during preparation. Keep your petals arranged in the order you want them to appear in the final circle. This helps maintain a balanced color flow and prevents surprises when you begin sewing. Careful planning ensures that your Dresden Circles – TUTORIAL results in a harmonious and eye-catching design.
3. Assembling the Dresden Circle
Once your petals are ready, it’s time to assemble the circle. Begin by sewing the wedges together using a quarter-inch seam allowance. Pair two petals at a time, always pressing the seam to one side to keep the block flat and organized. As the circle grows, you will start seeing the classic Dresden shape form beautifully.
It’s important to maintain consistent seam allowances throughout the process. Even a small variation can affect the final diameter of the circle. The Dresden Circles – TUTORIAL relies heavily on symmetry, so accuracy makes a noticeable difference. To check your progress, lay the circle flat after every few seams.
If your circle doesn’t close perfectly on the first try, don’t worry. Minor adjustments can be made by resewing a seam or pressing more carefully. Quilting is a forgiving craft, and even experienced quilters occasionally tweak their blocks during assembly. The goal is to keep the circle smooth and even.
Attaching the circle to a background fabric helps stabilize the pattern. Choose a solid or subtle print to allow the Dresden design to stand out. The circle can be appliquéd using your preferred method. Machine applique is faster, while hand stitching can provide a delicate, vintage appearance.
The center circle is the finishing touch. Cut a fabric circle slightly larger than your template, gather the edges with a running stitch, and press it flat with a perfect rounded shape. Place it in the center of your Dresden block and applique it securely. This step completes the look and hides the raw edges of the petals.
Once your circle is fully assembled, you can embellish it if desired. Some quilters add embroidery, decorative stitches, or even beads for a unique touch. The Dresden Circles – TUTORIAL invites endless creativity, making each finished block truly one of a kind.
4. Finishing Your Quilt Project
With your Dresden block complete, you can now incorporate it into a larger project. One of the easiest applications is a quilt block for a wall hanging or pillow. The circular design draws attention and makes an excellent focal point. A single Dresden circle can transform a simple project into a stunning piece of decor.
To turn your block into a quilt, continue adding sashing, borders, or additional blocks. The versatility of the Dresden pattern allows it to pair beautifully with both simple and complex quilt layouts. Whether used alone or repeated across the quilt, the design maintains a timeless appeal.
Quilting the block enhances its beauty even more. Simple straight-line quilting adds modern charm, while free-motion quilting brings softness and fluidity. Some quilters like to echo quilt around the petals to emphasize the circular structure. The Dresden Circles – TUTORIAL is compatible with many quilting styles.
Binding your project is the final step. Choose a coordinating fabric that complements the main colors. A bold stripe or a subtle solid works well depending on the desired effect. Proper binding gives your finished quilt a polished and complete appearance.
If you plan to give your project as a gift, adding a personalized label is a thoughtful touch. Write the date, your name, and a short message to commemorate your handmade creation. Dresden pieces make wonderful gifts because of their timeless look and heartfelt craftsmanship.
Once complete, you’ll enjoy a beautiful quilted item that reflects both tradition and creativity. The Dresden Circles – TUTORIAL will continue to inspire future projects, offering endless possibilities for fabric lovers and quilt makers.
FAQ – Dresden Circles
1. Is the Dresden pattern suitable for beginners?
Yes, this pattern is beginner-friendly. The repetitive petal construction makes it easy for new quilters to practice accuracy and sewing techniques.
2. How many petals do I need for a Dresden circle?
Most commonly, a Dresden circle uses 20 petals, but the number may vary depending on your wedge ruler.
3. Can I sew the petals by hand?
Absolutely. Hand stitching is a great option and adds a traditional charm to your project.
4. What type of fabric works best?
100% cotton quilting fabric is recommended because it presses well and maintains its shape.
5. How do I attach the Dresden circle to the background fabric?
You can use hand applique, machine applique, or even raw-edge techniques depending on the look you want.
6. Can I make different petal shapes?
Yes, petals can be pointed, rounded, or scalloped, giving you lots of creative flexibility.
Conclusion
The Dresden Circles – TUTORIAL is a beautiful introduction to traditional quilting, offering endless opportunities for creativity and expression. From choosing fabrics to assembling the petals and adding a center, each step invites joy and craftsmanship.
I hope this article has helped you understand the process clearly and inspired your next quilting project. If you enjoyed this guide, please leave a sincere opinion and share any suggestions for future tutorials!

