The Pyramid Tent for Cats – TUTORIAL is the perfect project for quilters who love creating practical, adorable, and cozy items for pets. Right from the first stitch, this pattern combines creativity with functionality, offering a stylish way to treat your beloved feline to their own comfortable hideaway. The Pyramid Tent for Cats – TUTORIAL stands out because it is beginner-friendly, quick to complete, and highly customizable, making it ideal for anyone looking to sew something unique and heartwarming.
This pattern has gained popularity among crafters who enjoy sewing pet accessories that not only look beautiful but also serve a real purpose. A tent-style bed creates a safe, warm, and playful space for cats who enjoy privacy and soft textures under their paws. Using the Pyramid Tent for Cats – TUTORIAL, you can personalize fabrics, colors, and structure thickness to match your home decor or your cat’s personality.
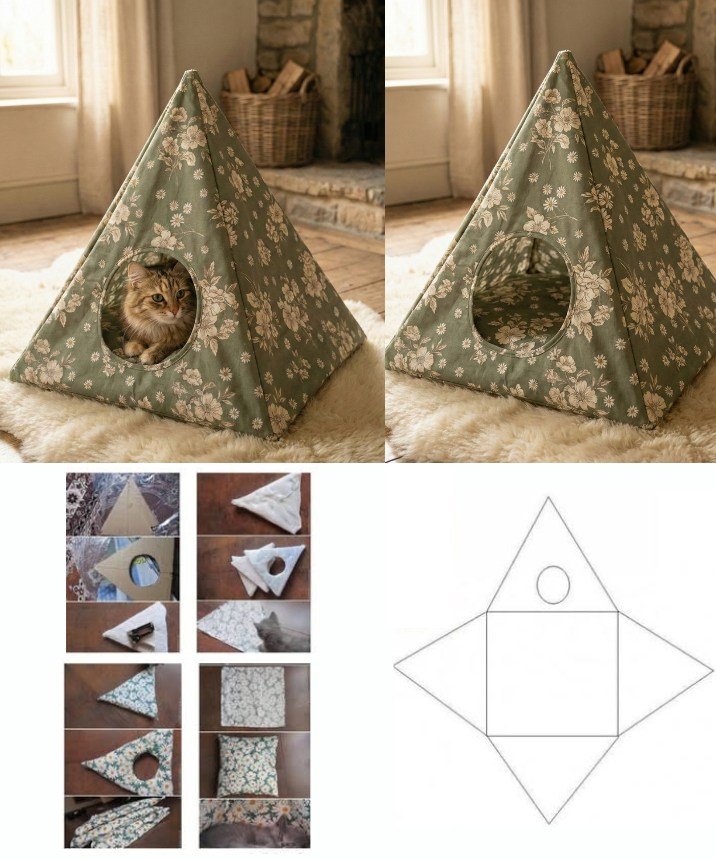
Before diving into the main steps, it is important to understand the basic structure of this project. The tent is formed using triangular quilted panels that join together to shape a firm yet comfortable pyramid. With simple sewing techniques and some quilt-friendly materials, you will be able to craft a pet tent that is durable, washable, and irresistibly cute. The Pyramid Tent for Cats – TUTORIAL will walk you through everything you need to know.
1. Understanding the Pyramid Tent Structure
The structure of the tent is based on three identical quilted panels that form the pyramid shape. Each panel must be sturdy enough to stand upright but still soft for comfort. This is why quilting techniques are ideal for this project. The Pyramid Tent for Cats – TUTORIAL emphasizes the importance of layering fabric, batting, and optional interfacing to achieve the right balance.
SEE OTHER FACE PATTERNS HERE!
Many makers appreciate that the pyramid shape naturally appeals to cats, providing both a hiding place and a warm bed. Since the panels are sewn together at the edges, the finished piece becomes strong and steady without needing complex internal supports. This simplicity is one reason why the Pyramid Tent for Cats – TUTORIAL is ideal for beginners.
You can choose cotton fabric, canvas, fleece, or even home-decor textiles depending on how soft or structured you want the tent. Cotton prints remain the most popular choice because they allow you to match themes, holidays, or your personal style. This flexibility makes the project enjoyable and customizable.
The tent requires precise cutting, but not advanced sewing experience. As long as the triangular pieces match in size and shape, the assembly process is smooth and straightforward. Quilters often enjoy experimenting with patchwork layouts or decorative stitching to make each tent unique. Even small changes in quilting lines can completely change the aesthetic.
Once your panels are quilted, the rest of the construction is quick. Sewing the sides together, adding a front opening, and attaching a soft cushioned mat inside creates a complete and cozy retreat for your cat. Following the Pyramid Tent for Cats – TUTORIAL ensures each step is approachable and well-organized.
2. Materials and Fabric Preparation
Choosing the right materials is essential for ensuring your tent turns out strong, washable, and comfortable. The Pyramid Tent for Cats – TUTORIAL begins by recommending cotton or home decor fabric for the exterior since these hold their shape well. For the inner lining, soft fabrics such as flannel or fleece can make the tent feel warm and comforting.
Batting adds thickness and stability to the walls of the tent. You may select medium- to high-loft batting or even foam stabilizer if you want the tent to stand more firmly. These layers will be quilted together to create the characteristic padded structure that cats love curling up in.
Cutting out the triangular panels is the first hands-on step. A simple isosceles triangle template keeps everything consistent. Accurate cutting ensures the panels fit perfectly together, so take your time measuring and marking. Precision is a key part of the Pyramid Tent for Cats – TUTORIAL.
If you are using directional prints, remember to align all pieces carefully so the design flows naturally across the tent. This adds polish and professionalism to the final product. Many makers enjoy choosing whimsical or themed prints to match their cat’s personality.
After cutting your fabric layers and batting, it is time to baste them together. You can use temporary adhesive spray, safety pins, or stitching depending on your preferred method. Proper basting prevents shifting while quilting and keeps the panels smooth.
Once your materials are prepared, you are ready to begin quilting. Straight-line, diagonal, or free-motion quilting can all be used. Each method contributes a unique look while reinforcing the structure. This part of the Pyramid Tent for Cats – TUTORIAL allows for creativity and personalization.
3. Assembling the Pyramid Tent
With quilted panels ready, the next phase is assembly. Lay the three triangular pieces next to each other, right sides together, and begin sewing along the edges. A quarter-inch seam allowance is standard, but depending on your preferred finish you may increase it slightly for added strength. The Pyramid Tent for Cats – TUTORIAL ensures these steps remain accessible even for beginners.
When two sides are joined, press the seams open or to one side depending on your fabric thickness. This helps reduce bulk and makes the final shape cleaner. Continue attaching the third panel until the pyramid walls begin to form naturally. It’s rewarding to see the tent take shape so quickly.
Before sewing the final seam, remember to leave an opening for the tent entrance. Cats enjoy a generous doorway, but the shape is up to you. A rounded, triangular, or arched opening all work beautifully. Reinforcing the edges of the entrance keeps it sturdy and prevents fraying.
Once the main structure is assembled, turn the tent right side out. You will immediately see the quilted texture and sturdy form. Minor adjustments can be made by smoothing seams or adding decorative stitching along the entrance. Every detail helps enhance the personality of the tent.
Creating the base cushion is the final part of assembling the tent. A simple square or triangular quilted pillow fits neatly inside and provides comfort for your cat. Using matching or contrasting fabrics can give the tent a stylish finishing touch. The base also adds stability.
After placing the cushion inside, the tent is ready for your cat to explore. The Pyramid Tent for Cats – TUTORIAL ensures a functional and delightful result that can be enjoyed year-round. Whether placed in the living room or a quiet corner, it becomes a cozy retreat.
4. Personalizing Your Pyramid Tent
One of the best aspects of the Pyramid Tent for Cats – TUTORIAL is the freedom to personalize every detail. You can start by selecting prints that represent your cat’s personality. Some crafters choose playful patterns such as fish, yarn balls, or forest scenes, while others go for minimalist designs.
Adding decorative quilting stitches is another way to personalize the tent. Stars, waves, geometric lines, or leaf motifs all enhance the final appearance. Quilting not only decorates but also reinforces the tent panels for long-lasting durability.
You can also embellish the exterior with appliqués. Felt shapes, embroidered names, or small patchwork details give extra charm. These additions transform the tent into something truly unique and heartfelt.
Interior personalization is just as fun. Choose a soft lining fabric that feels cozy for your cat. Fleece, minky, or flannel create a warm environment, while cotton adds breathability. Select what best suits your climate and your cat’s comfort.
Some makers even add lightweight ties or loops at the top of the pyramid for easy carrying or storage. This small detail is especially helpful if you move the tent around the house or take it on trips. Practical improvements can make a big difference.
Finally, consider experimenting with tent size. Whether you sew for a kitten, a large breed, or even a small dog, adjusting the height and width of the panels ensures a perfect fit. The Pyramid Tent for Cats – TUTORIAL is versatile enough to accommodate nearly any customization.
FAQ – Pyramid Tent for Cats
1. Is the Pyramid Tent suitable for beginner quilters?
Yes. The structure is simple, based on three quilted panels. If you can cut triangles and sew straight seams, you can complete this project.
2. What fabrics work best for the tent?
Cotton or home decor fabrics work well for the exterior. Fleece or flannel are great for the lining, and medium- to high-loft batting helps the tent stand upright.
3. Can the tent be washed?
Yes, if you choose washable fabrics and batting. The cushion should be removable to simplify cleaning.
4. What size should I make the panels?
Panel size depends on your cat’s dimensions. Larger cats benefit from wider and taller triangles. The template can be easily scaled.
5. How do I make the entrance?
Cut a shape of your choice in one panel before assembly. Reinforce the edges with stitching or bias tape.
6. Can I quilt the panels by hand?
Absolutely. Hand quilting adds charm and uniqueness, though machine quilting is faster.
Conclusion
The Pyramid Tent for Cats – TUTORIAL offers a creative, practical, and heartwarming sewing experience. Through structured quilted panels, thoughtful material choices, and customizable details, you can craft a cozy and unique retreat your cat will adore.
This project blends functionality with artistic expression, making it perfect for quilters of all levels. If you enjoyed this guide, feel free to share your honest opinion and suggestions — your feedback helps inspire even more beautiful handmade creations.